Inkbird Tech. C.L
Shenzhen, GD, 518000, China
www.ink-bird.com
cs@ink-bird.com
4.9 Timer Mode
4.9.1 Count down
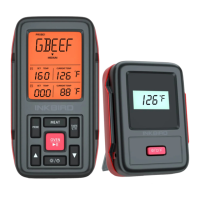
1. Press MODE/TIMER to select Probe 1 mode or Probe 2 mode. In the
NON-OVEN and Probe 1 mode, press and hold MODE/TIMER for 2 seconds
to display the corresponding timing symbol Timer and time 0:00. Then press
and hold MODE/TIMER for 2 seconds again to close the timing function of
probe 1. In the Probe 2 mode, press and hold MODE/TIMER for 2 seconds
to display the corresponding timing symbol Timer and time 0:00. Then press
again MODE/TIMER for 2 seconds to close the timing function of probe 2.
2. Press and hold SET/ST/SP for 2 seconds to enter the time setting page,
then you can press once ▲ or ▼ to set time, press and hold ▲ or ▼to set
time rapidly, and press SET/ST/SP to confirm setting time. The maximum
countdown timer setting is 9 hours and 59 minutes.
3. In the pause mode, press and hold MEAT/CLEAR to clear the setting back
to 00:00.
4. After setting, press SET/ST/SP to start the timer. TIMER ▼ will blink
indicating the countdown timer is running.
5. Press SET/ST/SP to pause the timer, TIMER ▼ will keep lighting. In the
pause mode, press and hold MEAT/CLEAR to clear the setting back to 00:00.
6. When countdown timer reaches 0:00, alarm will sound (beep 3 times in
0.5 second, stop in 0.5 second) and backlight will be on for one minute.
5. Help Hints
1. If the receiver and/or the transmitter display LLL or HHH instead of the
probe temperature, wait for probe to reach room temperature. If LLL or HHH
is still displayed or you get a false temperature, squeeze the probe jacks
harder into the transmitter and twist them back and forth so they make good
contact. If the problem is still persists, it is likely the internal probe wire has
been damaged by the moisture or heat temperature.
2. The probe and cable cannot be touched by the flame.
3. If the temperature displayed seems to read too high or the temperature
seems to increase too quickly, check to make sure the probe tip is not poking
through the food. Reposition the probe tip in the center of the thickest part of
food. Avoid touching bone or heavy fat areas.
4. Always wear the heart resistant gloves when you clearing and using the
probes. And do not to touch the probe or cable immediately just after cooking
to prevent burns or puncture.
5. Keep away probes from children.
6. The probes should be cleared well and dry out after used.
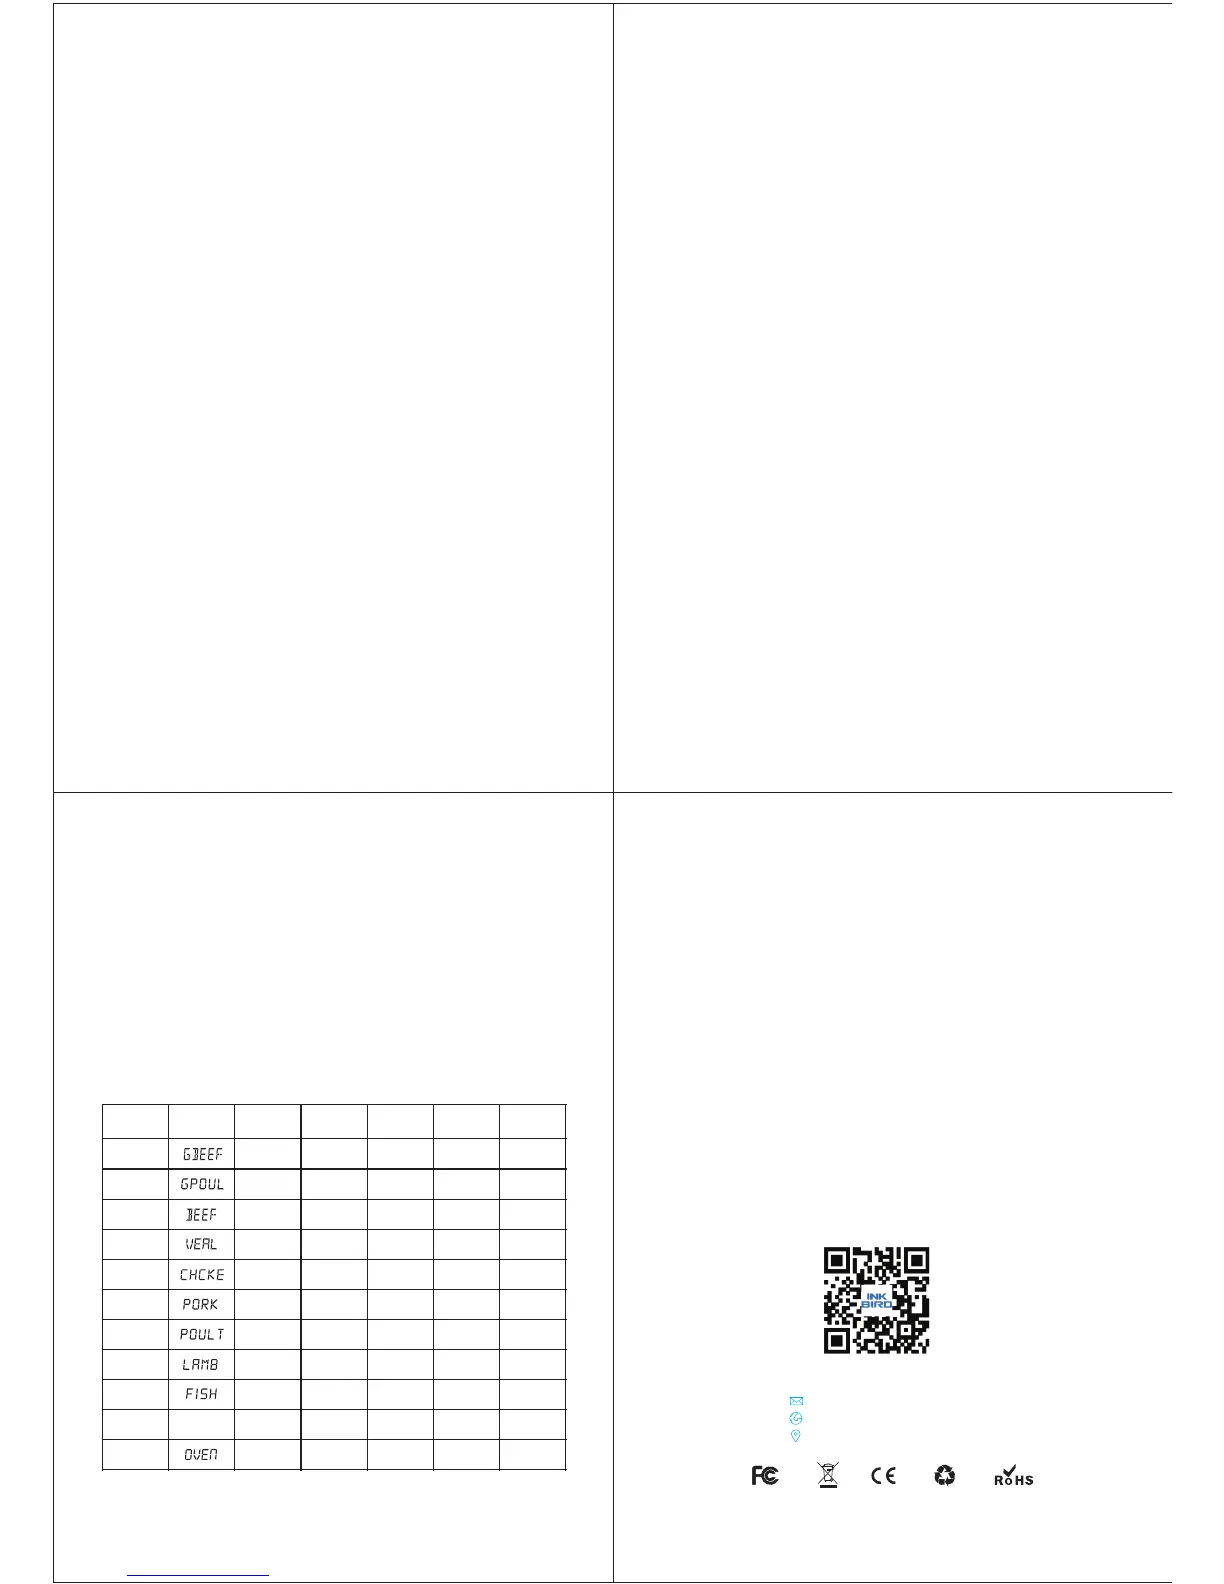
The Diagram of meat Type and Doneness Level
MEAT
LCD
DISPLAY
Rare
Med Rare
Medium
Well
Done
Ground
Beef
160
/71°C
°F
Ground
Poultry
165
/74°C
°F
Beef
125
/52°C
°F
140
/60°C
°F
150
/66°C
°F
160
/71°C
°F
165
/74°C
°F
Veal
125
/52°C
°F
140
/60°C
°F
150
/66°C
°F
160
/71°C
°F
165
/74°C
°F
Chicken
165
/74°C
°F
Pork
160
/71°C
°F
Lamb
140
/60°C
°F
145
/63°C
°F
160
/71°C
°F
165
/74°C
°F
170
/77°C
°F
165
/74°C
°F
170
/77°C
°F
Poultry
165
/74°C
°F
Fish
145
/63°C
°F
Program
145
/63°C
°F
OVEN
HI-176
/80°C
°F
LO-50
/10°C
°F
5. Press again SET/ST/SP to confirm LO temperature and stop flash, then
exit HI/LO temperature setting page.
6. Once the temperature (probe 1 or probe 2) reaches HI setting
temperature, the HI temperature icon will flash and the buzzer will alarm.
When the current temperature lower than LO temperature setting, the LO
temperature icon will flash and the buzzer will alarm (When the probe 1
reaches the preset temperature, the buzzer will beep twice in 0.5 second
and turn off in 0.5 second for lasting one minute. When the probe 2 reaches
the preset temperature, the buzzer will beep for 0.5 second and turn off in
0.5 second for lasting one minute. The sound of probe 2 is preferred.), and
the LCD backlight will be turned on. Press any button to stop the beep and
turn off the backlight.
Note: The LO setting temperature must lower than HI setting temperature.
Note: When the countdown reaches 0:00 the timer starts counting up and it
will beep (beep 3 times in 0.5 second, stop in 0.5 seconds) for one minute.
Press any button to stop timer and back to the countdown setting time. (For
example, counting down from 2:20 to 0:00 and counting up. It will display
2:20 if you press any button.) The timing of Probe 1 mode and the timing of
Probe 2 mode do not affect each other.
4.9.2 Count up
1. In the probe 1 mode, Press and hold MODE/TIMER for 2 seconds to
display the corresponding timing symbol Timer and time 0:00. In the Probe 2
mode, press and hold MODE/TIMER for 2 seconds to display the
corresponding timing symbol Timer and time 0:00. Then press again
MODE/TIMER to close the timing function of probe 2.
2. Press SET/ST/SP to start count up, The TIMER ▲ will blink.
3. Press SET/ST/SP to stop count up, The TIMER ▲ will keep lighting.
4. In pause mode, press MEAT/CLEAR to clear the setting back to 00:00.
7. The product is not waterproof and should not be used in rainy day.
8. Do not expose the plugs of the stainless steel probes or the plug in holes
of the transmitter to water or any liquid. This will result in bad connections
and faulty readings.
9. Do not expose the receiver or transmitter to direct heat.
10. Do not use stainless steel probes in a microwave oven.
11. Do not over the temperature of probes range (0-300°C/32-572°F), to
avoid damage the probes.
12. Children aged 12 or under should be guided by parents when children
use it.
6. Warranty and service
6.1 Technical Assistance
If you have any problems installing or using this thermostat, please
carefully and thoroughly review the instruction manual. If you require
assistance, please write us to cs@ink-bird.com. We will reply your emails
in 24 hours from Monday through Saturday.
You can also visit our web site www.ink-bird.com to find the answers of
the common technical questions.
6.2 Warranty
INKBIRD TECH. C.L. warrants this thermostat for one years from the date
of purchase when operated under normal condition by the original
purchaser (not transferable), against defects caused by INKBIRD's
workmanship or materials. This warranty is limited to the repair or
replacement, at INKBIRD's discretion, of all or part of the thermostat. The
original receipt is required for warranty purposes.
INKBIRD is not responsible for injury property damage or other
consequential damages or damages of third parties arising directly from
an actual or alleged in mater of workmanship of the product.
There are no representations, warranties, or conditions, express or implied,
statutory or otherwise, other than herein contained in the sale of goods act
or any other statue.
-7-
-8-
-9-
-10-
PROG
 Loading...