Do you have a question about the Innova 3568 and is the answer not in the manual?
Essential safety advice covering equipment, clothing, ventilation, battery, high voltage, and operational hazards.
Specifies that jacks are only for changing wheels and not for working under the vehicle.
Lists companies providing factory and non-factory service manuals with contact information.
Explains the importance of ignition timing for engine performance and fuel economy.
Describes the timing light's design, compatibility, and connection procedure for 6-volt systems.
Identifies and explains the functions of the timing light's controls and display.
Advises performing a thorough check of the vehicle for mechanical issues before testing.
Outlines essential preparation steps like locating timing marks and checking spark plugs.
Provides a step-by-step procedure for safely connecting the timing light to the vehicle.
Explains how to perform an initial check of the engine's base timing.
Directs users to the vehicle's service manual for timing adjustment procedures.
Introduces checks for mechanical and vacuum advance/retard timing controls.
Details how to check the engine's mechanical or centrifugal timing advance.
Explains how to check the vacuum timing advance feature using a vacuum pump.
States procedures for retard/advance vary, requiring vehicle service manual consultation.
Lists checks for common timing light problems like connection, pickup, or spark plug issues.
Describes how to clean the inductive pickup clip for optimal performance.
Explains how to obtain replacement leads if the timing light's detachable leads are damaged.
Outlines the terms and conditions of the one-year limited warranty provided with the unit.
Provides contact information for customer support, service centers, and warranty inquiries.
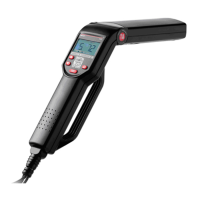
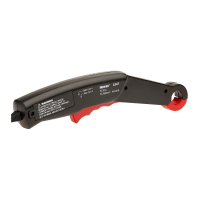
The Innova 3568 Digital Timing Light is a specialized tool designed for automotive enthusiasts and professionals to accurately check and adjust engine ignition timing. Proper ignition timing is crucial for optimal engine performance and fuel economy, and this device provides a simple and efficient means to perform these checks. It is compatible with all 12-volt negative ground vehicles equipped with conventional breaker point and electronic ignition systems, though it is not compatible with DIS (Distributorless Ignition System) systems. For vehicles with 6-volt electrical systems, the timing light can still be used with the aid of a separate 12-volt automotive battery and a specific connection procedure involving a jumper wire to ground the 12-volt battery to the vehicle under test.
The timing light's primary function is to illuminate the engine's timing marks, allowing users to observe the relationship between the crankshaft position and the ignition spark. This is achieved through a bright Xenon bulb housed within a swiveling head, which can rotate approximately 70 degrees. This rotational capability is a key usage feature, enabling easy illumination of timing marks even in hard-to-reach locations within the engine bay.
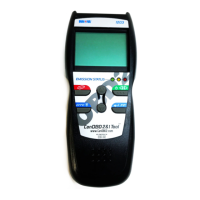
A central component of the timing light is its control panel, which houses all the necessary buttons and an LCD display. The LCD display is a significant usage feature, providing digital readouts of important engine operating parameters. These include the engine speed in revolutions-per-minute (RPM) and the ignition timing advance in degrees. When the strobe light is active, a flash symbol blinks on the display, confirming its operation.
The control panel includes several intuitive buttons for precise timing adjustments and readings. The "Advance Increment Switch" and "Advance Decrement Switch" allow users to increase or decrease the displayed degrees of advance, respectively. This is particularly useful when checking mechanical, vacuum, or electronic advance timing controls. A "Zeroing Switch" is also present, which returns the LCD advance display to 0 (zero) degrees, ensuring a baseline for measurements. The "Flash Switch" controls the strobe light, allowing users to turn it on or off as needed.
Connecting the timing light to the vehicle involves a detachable inductive pickup lead assembly. This assembly includes a red battery clip for the positive (+) battery terminal, a black battery clip for the negative (-) battery terminal or bare metal chassis ground, and an inductive pickup clip. The inductive pickup clip clamps around the No. 1 spark plug cable, sensing the ignition pulse to trigger the timing light's strobe. This inductive pickup design ensures non-invasive testing, as it does not require direct electrical connection to the high-voltage ignition system.
Before using the timing light, it is essential to perform a thorough pre-check of the vehicle, including fluid levels, spark plugs, wires, air cleaner, vacuum hoses, belts, and electrical connections. Engine preparation is also critical, which involves locating and cleaning the timing marks and reference pointer, ensuring spark plugs are in good condition, and running the engine to normal operating temperature. The timing light should always be connected with the ignition off to ensure safety and prevent damage.
For initial (base) timing checks, the timing light is connected, and the engine is started and idled at manufacturer specifications. The "Advance Display" is set to 0 degrees using the "Zeroing Switch." The user then aims the timing light at the timing marks and observes their position relative to the reference pointer. By comparing this observation with the manufacturer's specifications, the ignition timing can be verified. If adjustments are needed, the timing light assists in setting the timing to the correct specifications.
Beyond base timing, the Innova 3568 timing light is also capable of checking advance timing controls, which include mechanical, vacuum, and electronic advance/retard mechanisms. These controls ensure that ignition occurs at the proper time during the compression stroke, adapting to different engine speeds and loads. For checking mechanical/centrifugal advance, the engine speed is slowly increased while observing the timing mark movement. The "Advance Increment" and "Advance Decrement" switches are then used to realign the timing mark, and the displayed degrees of advance are noted and compared to manufacturer specifications. If the timing mark movement is rough or erratic, it may indicate a defective mechanical advance system.
Checking vacuum timing advance typically requires a vacuum pump equipped with a vacuum gauge. The vacuum hose from the distributor's vacuum advance port is disconnected and plugged, and the vacuum pump is connected to the port. After establishing the initial (base) timing, the specified amount of vacuum is applied, and the timing light is used to measure the resulting advance. The difference between the initial timing and the advanced timing indicates the vehicle's vacuum advance, which is then compared to manufacturer specifications. Similar procedures, though varying by vehicle, are used for checking vacuum/electronic retard and electronic advance.
Maintenance features for the timing light are straightforward. The inductive pickup clip, being a critical component for accurate readings, requires periodic cleaning. Dirt or grease on its inside surfaces can lead to erratic flashing or poor operation. Users are advised to clean the contact surfaces inside the inductive pickup clip by wiping them with a soft cloth. Another practical maintenance feature is the detachable inductive pickup leads. These leads can be disconnected from the timing light for easy storage after use. If the test leads or clips become damaged, a replacement set can be obtained from the dealer or service center, extending the lifespan of the timing light.
Troubleshooting guidance is also provided for situations where the timing light fails to operate or operates erratically. This includes checking battery clip connections and polarity, ensuring the inductive pickup clip's ferrite cores are clean, and verifying that the inductive pickup clip is properly connected to the No. 1 spark plug cable. If issues persist, checking the No. 1 spark plug's functionality by testing the inductive pickup on another spark plug cable is recommended. The manual also notes that low spark plug voltage or faulty spark plug wires can cause erratic operation and suggests trying different locations on the plug wire for the inductive pickup. It also cautions about certain ignition systems and specialty spark plug wires that may radiate high levels of Electro-Magnetic Interference (EMI) or Radio Frequency Interference (RFI), which can affect test equipment operation. In such cases, contacting the manufacturers of those parts for specific instructions on using inductive pickups is advised.
In summary, the Innova 3568 Digital Timing Light is a comprehensive and user-friendly tool for diagnosing and adjusting engine timing. Its digital display, swiveling head, and precise control buttons enhance its usability, while its inductive pickup design ensures safe and non-invasive operation. Simple maintenance procedures, such as cleaning the inductive pickup and replacing detachable leads, contribute to its longevity and reliability.
| Internet Updateable | Yes |
|---|---|
| ABS | Yes |
| SRS | Yes |
| Oil Reset | Yes |
| OBD2 Code Definitions | Yes |
| Freeze Frame Data | Yes |
| Live Data | Yes |
| Read and Erase Codes | Yes |
| Data Logging | Yes |
| Language Support | English, Spanish, French |
| Connectivity | USB |
| Compatibility | OBD2 |
| Supported Protocols | CAN |
| Functions | Live Data, Freeze Frame, Code Definitions |
| Display | 2.8-inch color LCD |