they're different from what they are currently. This should allow you to sync the
remote to the bed.***
D) Hard Reset Instructions:
1) If syncing your remote does not resolve the problem, unplug the bed from
power for 30 minutes and plug it back in.
2) After the hard reset, try the sync instructions again.
IF THE REMOTE LIGHTS UP AND ONLY THE MASSAGE WORKS ON THE BED:
E) Testing the Massage:
1) Press the (+) sign button for the HEAD or the FOOT to see if there is sound
or if you can feel the vibration on your base.
2) If you can hear or feel something when you turn the massage on, go to the
Child Lock instructions (F). If you do not, go up to the Sync Instructions (C).
F) Child Lock Instructions:
1) Press and hold the FOOT UP (upper right) and FOOT MASSAGE (-)
(lower right corner) buttons simultaneously until the remote blinks. This
will keep the remote unlocked for 5-10 minutes. (See Figure 4).
2) Then, press and hold the FOOT UP (upper right) and HEAD MASSAGE (-)
(lower left corner) buttons simultaneously until the remote blinks. This will
deactivate the child lock on your remote until you change the batteries. (See
Figure 4).
3) Test that the movement of your base now works by adjusting the head and
the foot of the base up and down.
***YOU MUST DO BOTH STEPS TO COMPLETELY SHUT OFF THE CHILD
LOCKS. If you only do the first step, the child lock will turn on every ten minutes.***
G) Information for Customers with King Bases:
If you have a king-sized bed, your base may be composed of two separate Twin XL
bed bases. Make sure that the DIP switches on each of your remotes are different
from one another. These switches are located on the back of the remote within the
battery compartment above the batteries (see Figure 3). Each remote must be
synced to a different base. If you would like one remote to control both sides of the
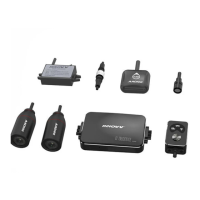
bed simultaneously, you will need to purchase a sync cord (see Figure 5).
1) To use the same remote to control both bases:
a) Connect both control boxes with the sync cable (see Figure 5) by
plugging in one side of the cable into the “SYNCHRO CNTL” on the side
of the control box and plugging the other side into the “SYNCHRO
CNTL” on the side of the other control box, then you can connect two
control boxes (see Figure 6).
b) *Do not pair both control boxes with the same remote control.*
Each remote must have a different DIP-switch setting and be paired
 Loading...