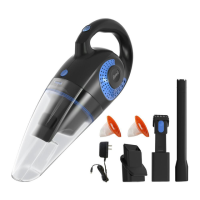
The INSE H5 is a cordless handheld vacuum cleaner designed for both wet and dry spills, intended for normal domestic, non-commercial, and indoor use in various settings like cars, apartments, houses, hotels, schools, factories, shops, and offices.
Function Description:
The vacuum cleaner is designed to vacuum and extract non-hazardous materials. It operates cordlessly, providing flexibility and ease of use without being tethered to a power outlet. It can handle both dry debris and liquid spills, making it a versatile cleaning tool for everyday messes.
Important Technical Specifications:
- Model No.: H5
- Operating Power: 90W
- Operating Voltage: 14.8V
- Input Voltage: 18V
- Input Current: 400mA
- Weight: 1.5Kg
- Package Size: 390140180mm
- Use Type: Dry & Wet
Components:
The device includes the following components:
- On/off switch
- 14.8V rechargeable battery unit
- Dust container release button
- Washable filter
- Waterproof cover
- Dust container
- Air inlet
- Charging port
- Squeegee nozzle
- 2-in-1 Dust brush
- Adaptor
- Crevice tool
Usage Features:
Charging:
Before first use, the vacuum cleaner must be charged for approximately 5.5 hours. Subsequent charging times vary depending on use, with a full recharge taking up to 5.5 hours if the battery is completely drained.
- Charging Process: Place the vacuum cleaner on a stable surface. Plug the mains power adapter into a mains power supply and switch it on. The indicator light will flash blue to confirm correct connection and charging. Once fully charged, the indicator light will stop flashing and remain solid blue.
- Important Notes: Always turn off the vacuum cleaner before charging. The appliance may warm up during charging. Unplug from the mains power supply once charging is complete. Never recharge with liquid in the dust container; always empty and dry it after vacuuming liquid spills.
Operating the Vacuum Cleaner:
- Preparation: Disconnect the vacuum cleaner from the adapter before use.
- Attachments: Fit the desired attachment (crevice tool for awkward corners and recesses, or squeegee nozzle for wet spillages) by firmly inserting it into the air inlet.
- Power On/Off: Slide the 'On/Off' switch forward to the 'On' position to start the vacuum cleaner.
- Wet and Dry Functions: The vacuum cleaner can handle both wet and dry spills, but these functions should not be mixed to preserve the appliance's life and maintain optimum performance. Empty the dust container of any debris before vacuuming liquid. After picking up liquid, empty the liquid as soon as possible and ensure the vacuum cleaner is thoroughly dry before using it for dry vacuuming. Never tilt the vacuum cleaner backward when vacuuming liquids, as this can allow liquid to enter the waterproof cover.
Maintenance Features:
Emptying the Dust Container:
To maintain optimum performance, the dust container should be emptied thoroughly, especially if there is a reduction in suction power.
- Process: Hold the vacuum cleaner with the dust container facing downwards. Press the dust container release button and carefully remove the dust container. Then, remove the washable filter.
- Cleaning: Empty the dust container slowly and carefully outdoors to minimize dust release. Clean individual parts with a soft, damp cloth and dry thoroughly if necessary.
- Refitting: Refit the washable filter and dust container after emptying.
Cleaning the Washable Filter:
The washable filter is accessible only after the dust container is removed.
- Process: Hold the washable filter over a waste bin, preferably outdoors, and gently shake off dust and debris. Rinse any remaining residue under cold water and allow it to dry thoroughly.
- Frequency: The washable filter and dust container should be thoroughly cleaned at least once every three weeks.
- Important Notes: Do not clean the washable filter with detergent or use external heat sources (like a radiator) to dry it. Do not reassemble or use the vacuum cleaner until the washable filter is fully dried, as this could cause damage.
General Care and Maintenance:
- Safety First: Always unplug the vacuum cleaner from the mains power supply before any cleaning or maintenance.
- External Cleaning: Wipe the external surface with a soft, damp cloth and allow it to dry thoroughly.
- Avoid Harsh Cleaners: Do not use detergents or harsh cleaning agents on any part of the vacuum cleaner.
- No Immersion: Do not immerse the vacuum cleaner in water or any other liquid.
- Filter Cleanliness: Keep the washable filter clean after every removal of the dust container.
Dos and Don'ts:
- Do:
- Check that the washable filter is clear of obstruction.
- Clean the dust container and washable filter regularly to preserve suction and prolong life.
- Empty any liquid immediately after picking up spills.
- Clean the dust container and washable filter at least once every three weeks.
- Don't:
- Use the vacuum cleaner without the washable filter or dust container in position.
- Use the vacuum cleaner to pick up flammable liquids, matches, cigarette ends, hot ashes, or any hot, burning, or smoking objects.
- Empty the dust container indoors.
Troubleshooting:
- Vacuum cleaner will not charge:
- Possible Cause: Mains power adapter not securely connected; vacuum cleaner not turned off.
- Solution: Check charger and charging base connection; ensure vacuum cleaner is turned off before charging. Contact seller if no light appears during charging.
- Vacuum cleaner suction is reduced:
- Possible Cause: Air inlet or attachment blocked; dust container almost full; washable filter blocked; battery running out of charge.
- Solution: Disconnect attachment and clear blockage; empty dust container; clean washable filter; recharge vacuum cleaner.
- Vacuum cleaner has stopped working:
- Possible Cause: Battery has run out of charge.
- Solution: Recharge the vacuum cleaner.
Warranty and Customer Service:
The INSE H5 comes with a 1-Year Limited Warranty covering defects in quality and materials under normal, non-commercial use, starting from the original retail purchase date. The warranty covers labor and parts for repairs or replacements if the appliance is found defective. It does not cover accidental damage, faults from negligent use, misuse, unauthorized repairs, use of non-INSE parts, commercial use, or reduction in battery discharge time due to age/use. For queries or support, customers can contact INSE customer service via email at support@inselife.com, providing model name/number, purchase date, order number, machine problem, and requirements.