RF IN RF OUT VIDEO OUT HDMI OUT
- R
AUDIO
OUT
L -
DC IN
RF IN
AV INPUT
VIDEO IN
IN
L - AUDIO - R
ANTENNA IN HDMI
HDMI OUT
RF IN
AV INPUT
VIDEO IN
AUDIO
IN
AUDIO
IN
ANTENNA IN
- R
L -
HDMI
HDMI
HDMI IN
Antenna
AC adapter
Coaxial cable
(included)
TV
CONNECTING YOUR CONVERTER BOX
You can connect your converter box with HDMI (not included), AV (not
included), or coaxial (included) cables. You must connect an antenna to
your converter box.
Connecting with an HDMI cable (BEST)
An HDMI connection provides the best video and audio quality.
1 Connect your existing antenna cable to the RF IN jack on the converter
box. You may need to use the antenna cable from your TV.
2 Connect an HDMI cable (not included) from the converter box’s HDMI
OUT port to your TV’s HDMI IN port.
3 Connect the AC adapter from the DC IN jack to a power outlet.
Connecting with an AV cable (BETTER)
You can use this option if your TV has Video (yellow) and Audio Left/Right
(white/red) AV ports.
1 Connect your existing antenna cable to the RF IN jack on the converter
box. You may need to use the antenna cable from your TV.
2 Connect a yellow video cable (not included) from the converter box’s
VIDEO OUT jack to your TV’s VIDEO IN jack.
3 Connect a red and white audio cable (not included) from the converter
box’s AUDIO OUT L/R jacks to your TV’s AUDIO IN L/R jacks.
Note: The red connector connects to the R (right/red) audio jack. The white
connector connects to the L (left/white) audio jack.
4 Connect the AC adapter from the DC IN jack to a power outlet.
V1 ENGLISH 16-1006
Before using your new product, please read these instructions to prevent any damage.
Connecting with an RF (COAXIAL) cable (GOOD)
The resolution of the video signal output is 480i for both RF and AV
connections, but AV gives better sound and signal quality. You will need an
additional coaxial cable if you use this setup option.
1 Connect your existing antenna cable to the RF IN jack on the converter
box. You may need to use the antenna cable from your TV.
2 Connect a coaxial cable (included) from the converter box’s RF OUT jack
to your TV’s ANTENNA IN jack. For best performance with this
connection, change the Audio Output option to Mono from Stereo (see
your TV’s user guide for more information).
3 Connect the AC adapter from the DC IN jack to a power outlet.
SETTING UP YOUR CONVERTER BOX
1 Turn on your converter box and TV.
2 Use your TV’s remote to select the correct source on your TV:
• If you connected the converter box with an HDMI cable, select HDMI.
• If you connected the converter box with an AV cable, select AV.
• If you connected the converter box with a coaxial cable, tune your TV
to channel 3.
Note: If channel 3 is used as a broadcast station in your area, you need to
switch the converter box’s RF Output to channel 4 after the Easy Install wizard is
nished. See CHANGING YOUR RF OUTPUT CHANNEL for instructions.
The Welcome screen opens.
3 Press or to select a language, then press OK or the green button on
your remote. The channel scan begins.
4 Press or to select your time zone, then press OK or the green
button on your remote.
Remote control
5 Press or to choose the type of connection you used to connect the
converter box to your TV, then press OK or the green button on your
remote.
6 If you selected “HDMI” in step 5, press or to select your video
resolution, then press OK or the green button on your remote.
7 Press or to enable Text-to-Speech, then press OK or the green
button on your remote.
8 When the channel scan is nished, setup is complete. See USING YOUR
CONVERTER BOX for more information.
Tips:
• The channel scan may not nd all available channels. See CHANGING
CHANNELS to learn how to navigate to channels that aren’t in the
memorized list.
• If a channel in range is not in the memorized list, you can run the
channel scan again. Press MENU > Settings > Channel Scan >
Start scan.
USING YOUR CONVERTER BOX
Turning your converter box on or o
• Press POWER to turn your converter box on or o. The power indicator
lights:
CHANGING YOUR RF OUTPUT CHANNEL
To change the RF output to a dierent channel:
1 Press MENU on the remote control.
2 Select the Settings menu, then select the System options.
3 Press or to select RF Output, then press or to select CH 3 or
CH 4.
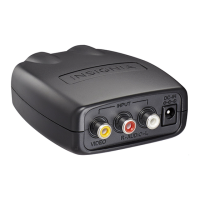
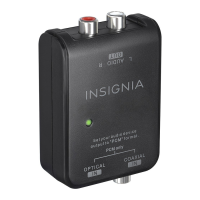
FEATURES
Front view
Back view
LEGAL NOTICES
FCC Statement
This device complies with Part 15 of the FCC Rules. Operation is
subject to the following two conditions: (1) this device may not cause
harmful interference, and (2) this device must accept any interference
received, including interference that may cause undesired operation.
This equipment has been tested and found to comply with the limits
for a Class B digital device, pursuant to Part 15 of the FCC Rules. These
limits are designed to provide reasonable protection against harmful
interference in a residential installation.
This equipment generates, uses and can radiate radio frequency
energy and, if not installed and used in accordance with the instruc-
tions, may cause harmful interference to radio communications.
However, there is no guarantee that interference will not occur in a
particular installation. If this equipment does cause harmful interfer-
ence to radio or television reception, which can be determined by
turning the equipment o and on, the user is encouraged to try to
correct the interference by one or more of the following measures:
• Reorient or relocate the receiving antenna.
• Increase the separation between the equipment and receiver.
• Connect the equipment into an outlet on a circuit dierent from
that to which the receiver is connected.
• Consult the dealer or an experienced radio/TV technician for help.
FCC warning: Changes or modications not expressly approved by
the party responsible for compliance could void the user’s authority
to operate the equipment.
ONEYEAR LIMITED WARRANTY
Visit www.insigniaproducts.com for details.
CONTACT INSIGNIA:
For customer support, call 1-877-467-4289 (U.S. and Canada) or
01-800-926-3000 (Mexico)
www.insigniaproducts.com
INSIGNIA is a trademark of Best Buy and its aliated companies.
Distributed by Best Buy Purchasing, LLC
7601 Penn Ave South, Richeld, MN 55423 U.S.A.
©2016 Best Buy. All rights reserved.
Made in Taiwan
Changing channels
You must use the buttons on the converter box, the included remote, or
program a universal remote to work with your converter box.
• Press CH+ or CH– to select a channel in the memorized list.
OR
• Press the number buttons for the channel you want. To enter a digital
sub-channel (for example 2.1), press the main channel numbers,
press , then press the numbers for the sub-channel.
Opening the guide
• Press GUIDE on your remote control.
TROUBLESHOOTING
INSTALLING THE REMOTE CONTROL
BATTERIES
1 Press the tab on the battery cover, then remove the cover.
2 Insert two AA alkaline batteries (included). Make sure that the
direction of the + and – symbols on the batteries match the +
and – symbols in the battery compartment.
3 Replace the cover.
RF IN RF OUT
VIDEO
OUT
AUDIO
OUT L/R
DC INHDMI OUT
QUICK SETUP GUIDE
Digital to Analog
Converter Box
NS-DXA3
Congratulations on your purchase of a high-quality Insignia
product. Your NS-DXA3 represents the state of the art in converter
box technology and is designed for reliable and trouble-free
performance.
PACKAGE CONTENTS
• Converter box
• Remote control and batteries (2)
• Coaxial cable
• AC adapter
• Quick Setup Guide
FIND YOUR USER GUIDE ONLINE!
Go to www.insigniaproducts.com, enter your model
in the search box, then press ENTER. Next to Features,
click Support & Downloads, then next to User Guide,
click the language you want.
LED:
Red
Green
DESCRIPTION:
Standby mode
On
Power LED Power buttonChannel - / +
IR Remote Sensor
NOTE: Do not block
the window.
IR Remote Sensor
# BUTTON
1 SIGNAL
2 (power)
3 SAP
4 AUDIO
5 MENU
6 OK
7
8 Green button
9 Red button
10 FAV
11 VOL +/-
12 (mute)
13 Numbers
14 (sub-channel)
15 ASPECT
16 PASS-THRU
17 FONT
18 CC
19 GUIDE
20
21 INFO
22 Yellow button
23 Blue button
24 CHANNEL
25 LAST
DESCRIPTION
Display your antenna signal strength for the
current channel.
Turn the converter box on or o.
Turn on second audio program and listen to
English-language programming in other
languages.
Open text-to-speech settings.
Open the on-screen menu.
Select a highlighted menu item.
Go back one level in the on-screen menu.
Switch to the System options in the
on-screen menu.
Switch to RRT (Rating Region Table).
Switch to a favorite channel through the
Program Guide in the on-screen menu.
Increase or decrease the volume.
Turn o the sound. Press again to restore the
sound.
Enter a channel number or parental control
password.
Enter a sub-channel number. For example, to
enter sub-channel 2.1, press 2, press this
button, then press 1.
Adjust the aspect ratio of the video output.
By-pass the converter box so that your TV will
function as it did without the converter box
(receiving analog channels only).
Access the CC FONT (closed captioning font)
menu.
Turn on closed captioning.
Open the Program Guide.
Navigate through the on-screen menus.
Display information about the current
program.
Switch to the User options in the on-screen
menu.
Change the PIN in the Lock settings of the
on-screen menu.
Change channels.
Return to the last channel.
PROBLEM:
Converter box
won’t turn on.
Poor picture
quality.
No audio.
No video.
Some channels are
not available after
running an Auto
Scan.
No closed caption
displayed.
Cannot use the
converter box with
my cable box.
SOLUTION:
• Make sure that the AC adapter is correctly
inserted into a working power outlet.
• Press the (power) button on the front
panel to see if the green light (power
indicator) is on.
• Make sure that the antenna is pointing in the
correct direction. Scan for available channels
after moving the antenna. Press MENU >
Settings > Channel Scan > Start scan.
• If you use a UHF/VHF amplier to boost the
signal level, make sure that it is operating
correctly.
• Make sure that your TV’s volume is turned up
and not muted.
• Make sure that the audio cables are
connected correctly.
• Check with local TV stations to see if they are
testing new services.
• If your TV is connected to the converter box
with a coaxial cable, make sure that the TV is
set to channel 3 (or channel 4 if you changed
your converter box’s RF output setting).
• If your TV is connected to the converter box
with an HDMI cable, make sure that the TV’s
input (source) is set to HDMI.
• If your TV is connected to the converter box
with an AV cable, make sure that the TV’s
input (source) is set to the correct video input
(for example, AV or Video 1).
• Make sure that the video cable between the
TV and the converter box is connected
correctly.
• Scan for available channels. Press MENU >
Settings > Channel Scan > Start scan.
• Adjust your antenna and scan for available
channels. Press MENU > Settings > Channel
Scan > Start scan.
• To determine which antenna you need for
your area, visit www.antennaweb.org. Type in
your address and zip code to nd an antenna
that will continue giving you free local
broadcast programming.
• Make sure that the channel you are watching
carries closed caption information.
• Press the CC button on the remote control to
check for closed caption data output.
• The converter box works only with
over-the-air broadcast television signals, not
cable or satellite service.
RF IN
RF OUT
VIDEO OUT HDMI OUT
- R
AUDIO
OUT
L -
DC IN
RF IN
AV INPUT
VIDEO IN
IN
L - AUDIO - R
ANTENNA IN HDMI
HDMI OUT
RF IN
AV INPUT
VIDEO IN
AUDIO
IN
AUDIO
IN
ANTENNA IN
- R
L -
HDMI
HDMI
HDMI IN
Antenna
AC adapter
HDMI OUT
(not included)
TV
Coaxial cable
RF IN RF OUT VIDEO OUT HDMI OUT
- R
AUDIO
OUT
L -
DC IN
RF IN
AV INPUT
VIDEO IN
IN
L - AUDIO - R
ANTENNA IN HDMI
HDMI OUT
RF IN
AV INPUT
VIDEO IN
AUDIO
IN
AUDIO
IN
ANTENNA IN
- R
L -
HDMI
HDMI
HDMI IN
Antenna
AC adapter
Audio cable
(not included)
Video cable
(not included)
TV
Coaxial cable