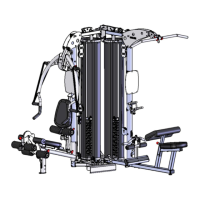
STEP 14 Shroud Mount Brackets
A) Attach a Front Upper Shroud Mount Bracket (59) (with the horizontal rib facing
towards outside of the machine) to the top back of the Right and Left Front
Upright (4R & 4L) using 2- M6x12 Button Head bolts (95) and 2- M6 washers (101)
on each as shown. Tighten these bolts now.
B) Attach the Left and Right Upper Shroud Mount Brackets (60 & 61) to the Left and
Right Top Beams (16 & 15) using 2-M8x16 Button Head Bolts (84) and 2-M8 washers
(100) on each as shown. Leave loose. These will be tightened in Step 15.
C) Attach an Accessory Hanger Bracket (49) to the bottom/back of both the Left and
Right Top Beams (16 & 15) using 2- M6x12 Button Head bolts (95) and 2- M6
washers (101) on each as shown. Tighten these bolts now.
PAGE 20
2 – M6*12 Button Head Bolts (95)
2 – M6 Flat Washers (101)
2 – M8*16 Button Head Bolts (84)
2 – M8 Flat Washers (100)
2 – M6*12 Button Head Bolts (95)
2 – M6 Flat Washers (101)
Bracket
Bracket
Front Upper Shroud Mount Bracket (59
Make sure the horizontal rib is
facing to the outside of the machine.