3.2.1
[
Beginner
]
Shooting mode screen and settings
1.
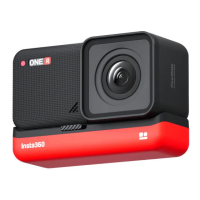
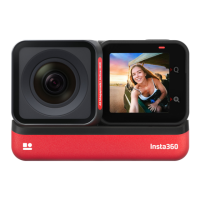
Camera Standalone Use
(
1
)
Video mode screen
(
2
)
Operation Instructions
①
Select the video mode from the camera menu
,
press
"
POWER
"
key to confirm entering such mode
.
A
er the camera
completes the preparation
,
the video recording READY state will be displayed
.
②
When the video recording mode is in video recording READY state
,
press UP and DOWN keys to switch over the size
levels for recording
.
③
When the video recording mode is in video recording READY state
,
press POWER key and you can start the recording as
per the current size
.
(
Note
:
If the storage device is used for the first time
,
the speed testing is required
.
The video
recording proceed smoothly only a
er the speed is ensured to meet the standard
.
)
Note
:
9
SD cards must be inserted to use Insta
360
Titan to shoot
,
so the speed test is required to be proceeded among
9
cards in same time
.
SD card
(
0
)
is used to store photos in jpg format and low
-
resolution proxy videos
.
SD cards
(
1
-
8
)
are used to store Raw photos in dng format and original high
-
resolution videos shot on
8
lenses
.
If your SD card
(
0
)
write speed does not meet the recording requirement but the other
8
cards do
,
video recording can
still proceed but the low
-
resolution proxy video stored on the SD card
(
0
)
may skip frames
,
which may a
ff
ect the
proxy video preview through Premiere plugin
.
Therefore
,
it
’
s recommended to use SD card which meets recording
requirement
.
If the write speed of your SD cards
(
1
-
8
)
don
'
t meet the recording requirement
,
video recording cannot proceed
.
Please use the camera
’
s formatting function to format the storage card which fails to pass the speed test
.
Camera
formatting can clear data fragments on storage card to ensure its write speed is fast enough
.
Formatting will erase all
data on the card
,
so please make sure to back up your files before formatting
.
Please refer to
1.1.3
for recommendations of SD cards for Titan
.
④
To stop recording video
,
please press POWER key again
.
If the real
-
time stitching level is needed a
er the video is
shot
,
the camera will enter the processing state
.
A
er processing is done
,
the storage will be carried out
,
and then
,
the
camera will be switched to video recording READY state
.
The work indicating lamp will be flashing until video shooting is
done
.
If the flashing lamp a
ff
ects the shooting
,
it can be turned o
ff
in the camera settings
.
Once the video is shot and
saved
,
a sound will be made for indication
(
3
)
Recording specifications and levels
 Loading...