USE
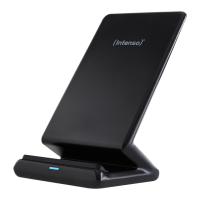
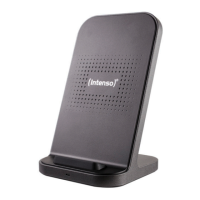
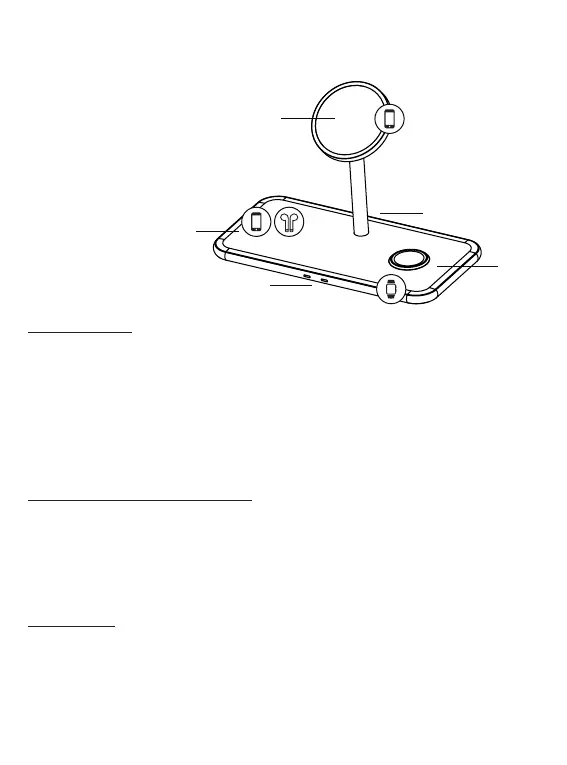
Device overview
1 - Magnetic charging area (smartphone)
2 - Charging area (TWS or smartphone)
3 - Status LEDs
4 - Charging area (Apple Watch)
5 - USB-C IN
Operaon
LED status display
When you connect the device to the mains, the LEDs ash green once and blue once to conrm and then
remain o. If you use the le charging area or charge an Apple Watch on the right side of the Wireless
Charger, the charging process is indicated by the respecve LED on the front. During the charging process,
the corresponding LED lights up blue connuously. When the mobile device is fully charged, the respecve
LED usually changes from blue to green (depending on the device being charged). If a LED ashes blue
quickly, there is an error; for example, the device is not posioned correctly, it has become too hot, there
is a foreign object between the devices or an incompable power supply unit is being used. If you use the
magnec stand of the wireless charger, no LED lights up; the charging process is shown on the display of
the smartphone.
Start-up / charging compable devices
Step 1: Preparaon
Connect one end of the supplied USB-C to USB-C cable to the USB-C port (USB-C IN) of the inducve char-
ging staon and connect the other end of the USB cable to the supplied power supply unit (HP8). Next,
connect the power supply unit to a power socket (follow the safety instrucons).
Step 2: Start charging
You can charge three dierent devices (simultaneously) with this wireless charger.
a) Magnec stand
You can dock your MagSafe-supporng iPhone onto the magnec stand in the middle. The magnets on both
sides ensure ideal alignment and the charging process starts automacally and is displayed on the screen of
your smartphone. Please note that the use of a case can reduce the magnec force.
EN - Page 4 of 6
1
2
3
4
5
 Loading...