Installation Instructions - Single Switch or 3-way - to replace an existing
switch:
1. TURN OFF POWER by REMOVING FUSE or turning
the CIRCUIT BREAKER OFF.
2. Remove the existing wall switch.
Prepare the ends of the building wiring as shown.
7/16”
Trim building wires bare to 7/16”.
BLACK WIRE
BLUE WIRE
RED WIRE
(Capped, Not Connected)
WIRE FROM
“COMMON” OF
OLD SWITCH
BLACK WIRE
RED WIRE
BLUE WIRE
REMOTE
3-WAY
SWITCH
MOVE
JUMPER WIRE
TO OTHER
TERMINAL
IF THIS
SWITCH
DOES NOT
TURN LIGHT
ON
COMMON
Single switch:
3. Connect one of the building wires to the black wire
from the timer, using the wire nuts provided.
Connect the other building wire to the blue wire from
the timer.
THE RED TIMER WIRE IS NOT USED FOR SIN-
GLE SWITCH INSTALLATIONS. Cap the red wire
with a wire nut.
BE SURE THAT ALL THE WIRE NUTS ARE SECURE.
3-way switch: (See “Other Installations” to use a dimmer or if switching from 3 or more
locations)
3a. A three way switch has three wires connected to it. One of the wires is “common” (the terminal
has a different colored screw or there are markings on the old switch). Connect the Black wire from
the timer to the common wire. Connect the other two wires to the Blue and Red wires from the timer (it
doesn’t matter which goes to which.)
3b. Identify the “common” terminal at the other (remote 3-way) switch. Connect the supplied jumper
wire from the common terminal to one of the other two terminals of the switch.
(If the light does not turn on when you get to step 6, turn power off at the fuse or circuit breaker and
switch the jumper wire to the other terminal.)
4. Tuck the wires into the wall box leaving room for the timer.
5. Using the screws provided, mount the timer to the wall box then install the wall plate.
6. Return the power to the circuit at the service panel. Install battery if not already installed. Press reset
button.
After display starts flashing "12:00 AM", press the "NEXT/ON/OFF" button. The display should switch
between ON and OFF. Your timer is now ready to set.
Battery Replacement
The 1.5 VOLT alkaline battery should operate your timer for 3 years or more under typical conditions.
High or low temperature or frequent use of the manual pushbutton or the 3-way switch will reduce the
battery life. Replace the battery when the digital display is dim, the message ‘lobAt’ (Meaning LOW
BATTERY) is displayed, or if the timer fails to operate. Press any button to clear the ‘lobAt’ message.
The timer has built-in memory protection providing at least 15 seconds to change a weak battery with-
out losing your time-of-day setting. You do not need to turn off the load or the power in order to replace
the battery, however, do not attempt to switch the timer on or off while the battery is out or your time
setting will be lost and the timer will need to be reset.
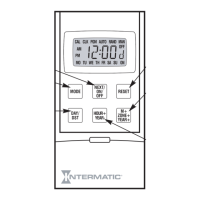
Controls and Displays
Cover/Switch
The clear cover/switch is the manual ON/OFF control.
1. Pull at notch at top edge to remove cover so you
can use the programming buttons.
To replace cover/switch:
2. Set bottom in first.
3. Click in the top.
To remove battery:
4. Release battery holder with flat
screwdriver at notch (4a) and
pull straight out.
To re-install battery:
5. Place AA Alkaline battery in
holder with “+” end towards
front of timer. Insert battery
and holder into timer. Push at
(5) so it clicks into place.
Battery Holder
2
3
4a
5
1
Introduction
The timer can replace your regular or 3-way light switch (where two switches control the
same light) to control lights for security, or can control an outlet to switch most 120VAC
loads up to the maximum rating on the timer label. The timer can control incandescent
lights, fluorescent lights, flood lights (PAR lamps), stereos, or appliances such as an air
conditioner. The timer can also control many loads 12 to 277 VAC and 12 to 28 Volts DC.
Timer may not be used with lighted 3-way switches. You will need to use a Decorator style
wall plate with this timer (not supplied).
The installation instructions on this page are for replacing a light switch (or 3-way light
switch) with the timer. See “Other Installations” on the next page for wiring diagrams for new
construction, switching from 3 or more locations, or using the timer with a dimmer.
MODEL SS8 SERIES
INSTALLATION AND OPERATING
INSTRUCTIONS
Features
• Automatic or manual operation. Push the clear cover/switch to switch On or Off at any time.
• Program up to 7 On/Off setting pairs (14 automatic switch settings).
• Astronomic Feature automatically adjusts for changing seasons.
• Automatic Daylight Savings Time adjustment.
• Each setting time can be once a week, every day, every weekday, or only on weekends.
• LCD digital clock and readout.
• Random feature automatically varies switching times for a “lived-in” look.
• One AA alkaline battery keeps time and operates timer for up to 3 years, even without utility power.
• Built in memory holds settings indefinitely without battery.
• Can be used for flood (PAR) and compact fluorescent lamps and dimmers.
• Unique “hard contact” output switch allows timer to control most 120 VAC loads.
Also controls many loads 12 to 277 VAC and 12 to 28 Volts DC.
Refer to product label for maximum ratings for various voltages and load types.
next selection.
programming.
calendar mode.
clock and program modes.
calendar mode.
calendar mode.
clock and program modes.
OFF times.
daylight savings time.