EasyManua.ls Logo

IrrigationCaddy IC-W1 User Manual

IrrigationCaddy IC-W1
12 pages
To Next Page IconTo Next Page
Page #1 background imageLoading...
Page #1 background image
1
Quick Start Guide
IrrigationCaddy IC-W1 Installation Steps
NOTE: The IC is an indoor device. Make sure the device is
placed indoors in a dry protected area. Exposure to rain and
extreme weather conditions will damage the device.
Steps:
1. Find an appropriate location for the IC, and hold the enclosure in place.
2. Using a pen make marks through the screw mounting holes (A) on the
plastic ears protruding from the enclosure.
3. NOTE: If installing on Drywall make sure you use screw anchors
4. Put the device aside, and drill a hole on each one of the marks you made.
5. Put the IC back in place and insert the screws through the mounting holes.
Mounting on the Wall
Figure 1 Caddy Parts
WARNING
info
Question and Answer IconNeed help?

Do you have a question about the IrrigationCaddy IC-W1 and is the answer not in the manual?

IrrigationCaddy IC-W1 Specifications

General IconGeneral
BrandIrrigationCaddy
ModelIC-W1
CategoryIrrigation System
LanguageEnglish

Summary

IrrigationCaddy IC-W1 Installation

Mounting the Irrigation Caddy IC-W1

Instructions for securely mounting the Irrigation Caddy IC-W1 unit.

Wiring and Connections

Connecting Valve Wires

Step-by-step guide for connecting water valve wires to the IC-W1 unit.

Network Setup and Configuration

Initial AdHoc Network Connection

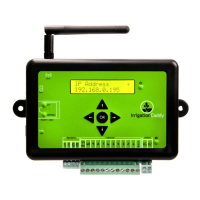
Connect your computer to the unit's temporary 'IrrigationCaddyAP' WiFi network.

Connecting to Home WiFi Network

Configure the IC-W1 to connect to your primary WiFi network for internet access.

Expansion Modules

IC-W1 Zone Expansion Capacity

Information on expanding zone capacity up to 43 zones using EXP-800 modules.

Maintenance and Reset

Performing a Factory Reset

Steps to reset the unit to its original factory default settings.