I I I I I I I I I I I I I I I I I I I I I I I I I I I I I I I I I I I II II I I I I I II II II II II I I I I I I I I
5-16 ENGINE ASSEMBLY 111
Mar
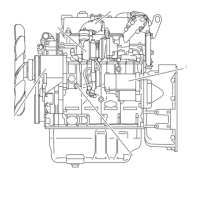
Apply sealant to the cylinder
body side only.
I
J
.
Front
c=1
0
CI
El
lell
2. Install the air compressor
3. Tighten the air compressor mounting bolts.
After installing the air compressor, ,perform Step 3 of
“Injection Pump and Injection Pump Gear Assembly” (on
the following page).
Refer to injection timing in section MAINTENANCE to
check the injection timing for correctness.
7. Crankshaft Pulley Nut
1) Apply MoS2 to the crankshaft pulley nut threads
and fitting face.
2) Use the appropriate wrench to tighten the crank-
shaft pulley nut to the specified torque.
Crankshaft Pulley 4B
Nut Torque
6B
kg-m (I b.ft)
39-49 (282-354)
55-65 (378-470).
9. Tappet Chamber Cover
1) Apply liquid gasket to the tappet chamber cover
gasket.
2) Install the tappet chamber cover and tighten the
bolts to the specified torque.
t
.
I
kgom (Ib.ft)
1
I
Tappet Chamber Cover
Bolt Torque
I
2.1 - 3.1 (15.2 - 22.4)
I
10. Water Pump
Apply sealant (Belco Bond No. 4) to the water pump
gasket before installing the water pump.
11. Cylinder Head Gasket
12. Cylinder Head
13. Cylinder Head Bolt
1)
Carefully place the cylinder head gasket on the
(?J
cylinder body upper surface.
The gasket “TOP” mark must be facing up.
2) Align the cylinder body dowels and the cylinder
head dowel holes.
 Loading...