This document serves as the installation, operation, and maintenance manual for Italinox Pass Through Hood Dishwashers, specifically models DMH005 and DMH006, which use a 500 x 500 mm basket. The appliance is designed for commercial kitchen use, emphasizing durability and efficiency even during peak business hours. Italinox products are manufactured in environmentally friendly facilities.
Function Description
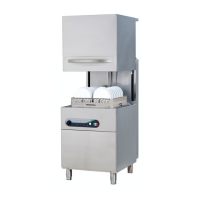
The Italinox Pass Through Hood Dishwasher is designed for washing dishes, plates, forks, and spoons in commercial settings. It features an automatic cleaning system that activates when the door is closed. The washing arms are active both at the top and bottom of the cabin, ensuring thorough cleaning. The machine also includes optional automatic rinse aid and detergent dosing pumps for optimal washing results. It is designed for energy-efficient operation, even with intensive use.
Important Technical Specifications
The manual provides a "Technical Data" table (Table 1) with key specifications:
- Basket Size: 500 x 500 x 100 mm
- Model: DMH005/DMH006
- Input Voltage: 220 V or 380 V (refer to the technical data plate on your dishwasher)
- Frequency: 50 Hz
- Electricity Consumption: 9.75 kW
- Power Supply Cable Section: 5 x 2.5 mm
- Washing Motor Power: 0.60 kW
- Total Heating Power: 9 kW
- Net Weight: 95 kg
Connection Identifications:
- P: Power Input
- W: Water Input
The device is equipped with a resistance temperature safety thermostat (manual reset type) to cut off power if necessary, which can only be reset by qualified technicians. It also has thermal protection for the washing motor to prevent damage from overheating.
Usage Features
Control Panel (Figure IV):
The control panel includes the following elements:
- A: On-Off and Program Switch
- B: Power Lamp
- C: Heat Lamp
- D: Washing Lamp
- E: Rinsing Lamp
- F: Drain Button
Turning On the Appliance (2.1):
- Ensure the device is connected to the ground line and power source, and the water valve is open.
- Turn the "A" On-Off switch to the right. The "B" power light will illuminate.
- Ensure the machine's hood is closed. The machine will begin filling with water.
- Once water filling is complete, the heating process starts. The "C" heat lamp will illuminate when the desired temperature is reached, indicating the dishwasher is ready.
- Load the basket with soiled dishes, close the hood, and turn switch "A" to select a washing program (1st, 2nd, 3rd, or 4th program, corresponding to 1, 2, 3, or 4 minutes washing).
- The "D" indicator light will illuminate during the washing process.
- After washing, the "D" light turns off. After a 5-second delay, the rinsing process begins (15-20 seconds), and the "E" lamp illuminates.
- Once the "E" light turns off, the cycle is complete. Open the hood and remove clean dishes.
Important Usage Notes:
- Always remove rough waste from dishes before loading to ensure optimal washing performance.
- Avoid starting a wash cycle before the water reaches the correct temperature (i.e., before the "C" heat lamp illuminates) to prevent foamy water from cleaning chemicals.
- The built-in automatic rinse aid and detergent dosing pumps (if optional) operate automatically. Ensure the pump buttons are switched on and hoses are correctly placed in the liquid boxes. Use high-quality detergents and rinse aids.
- Never open the hood while the machine is washing.
- Do not cover the top of the appliance during use.
Turning Off the Appliance at the End of the Day (2.1):
- Turn off the device using button "A". The "B" power light will turn off.
- Empty the water from the device by pulling out the waste plug (Figure B). On models with a drain pump, push button "F".
- Ensure all water is drained before replacing the waste plug.
- If the appliance will not be used for a long time, cut off its electricity supply.
- Check and clean the suction filter daily by turning it clockwise, cleaning it under water, and replacing it securely.
Maintenance Features
Routine Maintenance (5.1):
- Daily: General cleaning of the machine and surrounding area.
- Monthly: Check mechanical protection devices for deformation, loosening, or removed parts. Perform general cleaning of washing arms (Figure B).
- Yearly: Check control and machine structure for breakage, deformation, or loose screws. Ensure readability of labels and symbols. Check and replace electrical connection cable and plug if necessary.
Wash Arms General Cleaning (5.1):
- The upper and lower washing arms should be cleaned periodically (at the end of each month).
- Remove the washing arms from their bolts.
- Clean the jet nuts by removing them from the washing arms.
- Disassemble the washing and rinsing arms and clean their insides with water.
- Use a suitable fine-edged object to clean any dirt accumulation in the jet mouths.
- Regularly check and clean rinse arms, as hard water can cause clogging, directly impacting washing performance.
Servicing (7):
- Components requiring routine maintenance can be accessed by opening the front lower trunk lid and the top cover. This should only be done by qualified service personnel.
Troubleshooting (8):
The manual lists common faults and their potential reasons:
- Machine has less heated or not heated washing water: Failure of resistance, resistance contactor, thermostat, or switch.
- Machine receives continuous water: Pressure switch metering issue or failure.
- Dirty dishes after washing: Low network pressure (below 2 bar), rinse arms obstruction (clean arms and address scale problems), inappropriate chemical product, or low water temperature.
- Machine is doing foam: Boiler water temperature not reaching desired level before washing, or wrong type of detergent used.
- Machine shuts down: Overheating of engine breakdowns, or main control circuit board taking insurance.
Safety Precautions (3):
- ATTENTION! HEALTH AND SAFETY HAZARD TO THE OPERATOR: Indicates risks to personnel.
- ATTENTION! ELECTRICAL HAZARD CONTAINS DANGEROUS VOLTAGE: Warns of electrical shock risk.
- ATTENTION! ELEMENT OF THE MACHINE IS AVAILABLE DAMAGING: Highlights parts that can cause damage.
- Repairs must only be carried out by authorized service centers using original spare parts.
- Do not wash the appliance with jets of water.
- Do not use chlorine-containing products (bleach, hydrochloric acid, etc.) or corrosive substances (muriatic acid) to clean steel surfaces or the floor underneath the appliance.
- The appliance must only be used by trained staff.
- It is not intended for use by people (including children) with limited physical, sensory, or mental abilities without supervision or instruction.
- Switch off the appliance if it breaks down or malfunctions.
Personal Protection Equipment (3.1):
A table outlines necessary PPE for various stages:
- Transport/Carrying/Unpacking/Assembly/Maintenance/Disassembly: Safety Clothing, Shoe.
- Daily Use: Safety Clothing, Shoe, Glove (heat-proof for removing hot pans), Glasses.
- Placement/Routine Cleaning/Special Cleaning: Safety Clothing, Shoe, Glove.
Installation Instructions (II):
- The appliance must be installed in adequately ventilated premises, ideally with a hood and exhaust fans.
- Position the device on a flat surface and adjust height if necessary.
- Ensure proper electrical connection according to regulations, matching voltage and frequency on the rating plate. The appliance requires a permanent connection with an H05 RN-F type cable and must be earthed.
- Water inlet must be connected to a drinking water supply with 4 bar pressure. Install a mechanical filter and shut-off cock.
- Ensure the waste water evacuation system is working actively and the drain hose has a proper slope (at least 5°) to prevent water accumulation.
Safeguarding the Environment (4):
- All packaging materials are environmentally friendly and recyclable (Polyethtlene, Polypropylene, Expanded polystyrene).
- The appliance is designed for high performance and efficiency, but avoid no-load operation or conditions that impair performance (e.g., open door) to minimize energy consumption.
- Clean the appliance with at least 90% biodegradable products.
- Dispose of the appliance properly at the end of its service life, as it is made from 90% recyclable materials (stainless steel, iron, aluminum, galvanized steel, etc.). Cut off the power cable and remove any closure devices to prevent children from becoming trapped inside.