v.081118
9
ENGLISH
MAINTENANCE
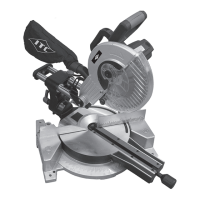
MOUNTING AND REMOVING THE BLADE
WARNING: Before replacing the saw blade always unplug the tool. Make sure
that the spindle speed diameter and saw blade bore match.
Only use sharp and undamaged saw blades. Cracked or bent saw blades must
be replaced immediately.
1. Lock the slide mechanism.
2. Lock the head of the machine in its highest position.
3. With the head of the machine in the upright position, rotate the lower saw blade
guard upward until exposing the xing screw. Place the supplied wrench onto
the xing screw.
4. Engage the blade lock button located on the rear of the motor, and keep it
depressed.
5. Loosen the xing screw and remove it.
6. Remove the outer ange, the old saw blade, the adapter and the inner ange.
7. Clean the anges and the adapter.
8. Place the inner ange and adapter, followed by a new saw blade with the teeth
pointing in the direction of rotation onto the saw blade shaft. (See the arrow on
the housing).
9. Place the outer ange on the saw blade shaft.
10. Engage the lock knob, mount the xing screw and tighten it.
11. Lower the saw blade guard.
REGULAR MAINTENANCE
WARNING: Prior to inspection or saw maintenance, turn off power switch and
disconnect plug from power source.
Inspect the cord regularly and have it replaced by an authorized repair facility if it
is damaged
The plastic table kerf plate insert should be replaced if damaged to reduce the
risk of chips lodging in the slot and catching in the blade.
Keep the vents clear of dust and debris. This will help prevent possible electrical
shorts and ensure proper cooling.
Keep the tool housing and handle clean and free of oil and grease using mild
soap and a damp (not wet) cloth.
Lubrication is done at the factory and with the exception of the slide bearings,
should not be necessary again under normal use.
An authorized repair center should do any repairs, modication, or maintenance
that involve disassembling the saw.
Any damage to the tool should be corrected at an authorized repair center.
ADJUSTING CUTTING CAPACITY
WARNING: Before any adjustments, disconnect the machine from the power
source.
This machine has been set by the manufacturer at the maximum cutting capacity
for a 10" saw blade. When the diameter of the blade diminishes because of
sharpening, adjust the machine per the following instructions:
1. Push the carriage to the back, in the direction of the fence, as far as it will go.
2. Push the handle down completely, to its lowest position.
3.
Turn the kerf depth adjustment screw with a hex wrench so that the saw blade
teeth are slightly below the table surface in line with the front surface of the fence.
4. Be sure the saw is disconnected from power. Turn the saw blade by hand,
and pressing the handle to its lowest position, check the saw blade does not
contact anything below the table. If necessary, you can adjust upward very
slightly.
5. Tighten the hex locking nut on the shank of the kerf depth adjustment screw to
lock its setting.