PELIGRO
PELIGRO
DANGER
DANGER
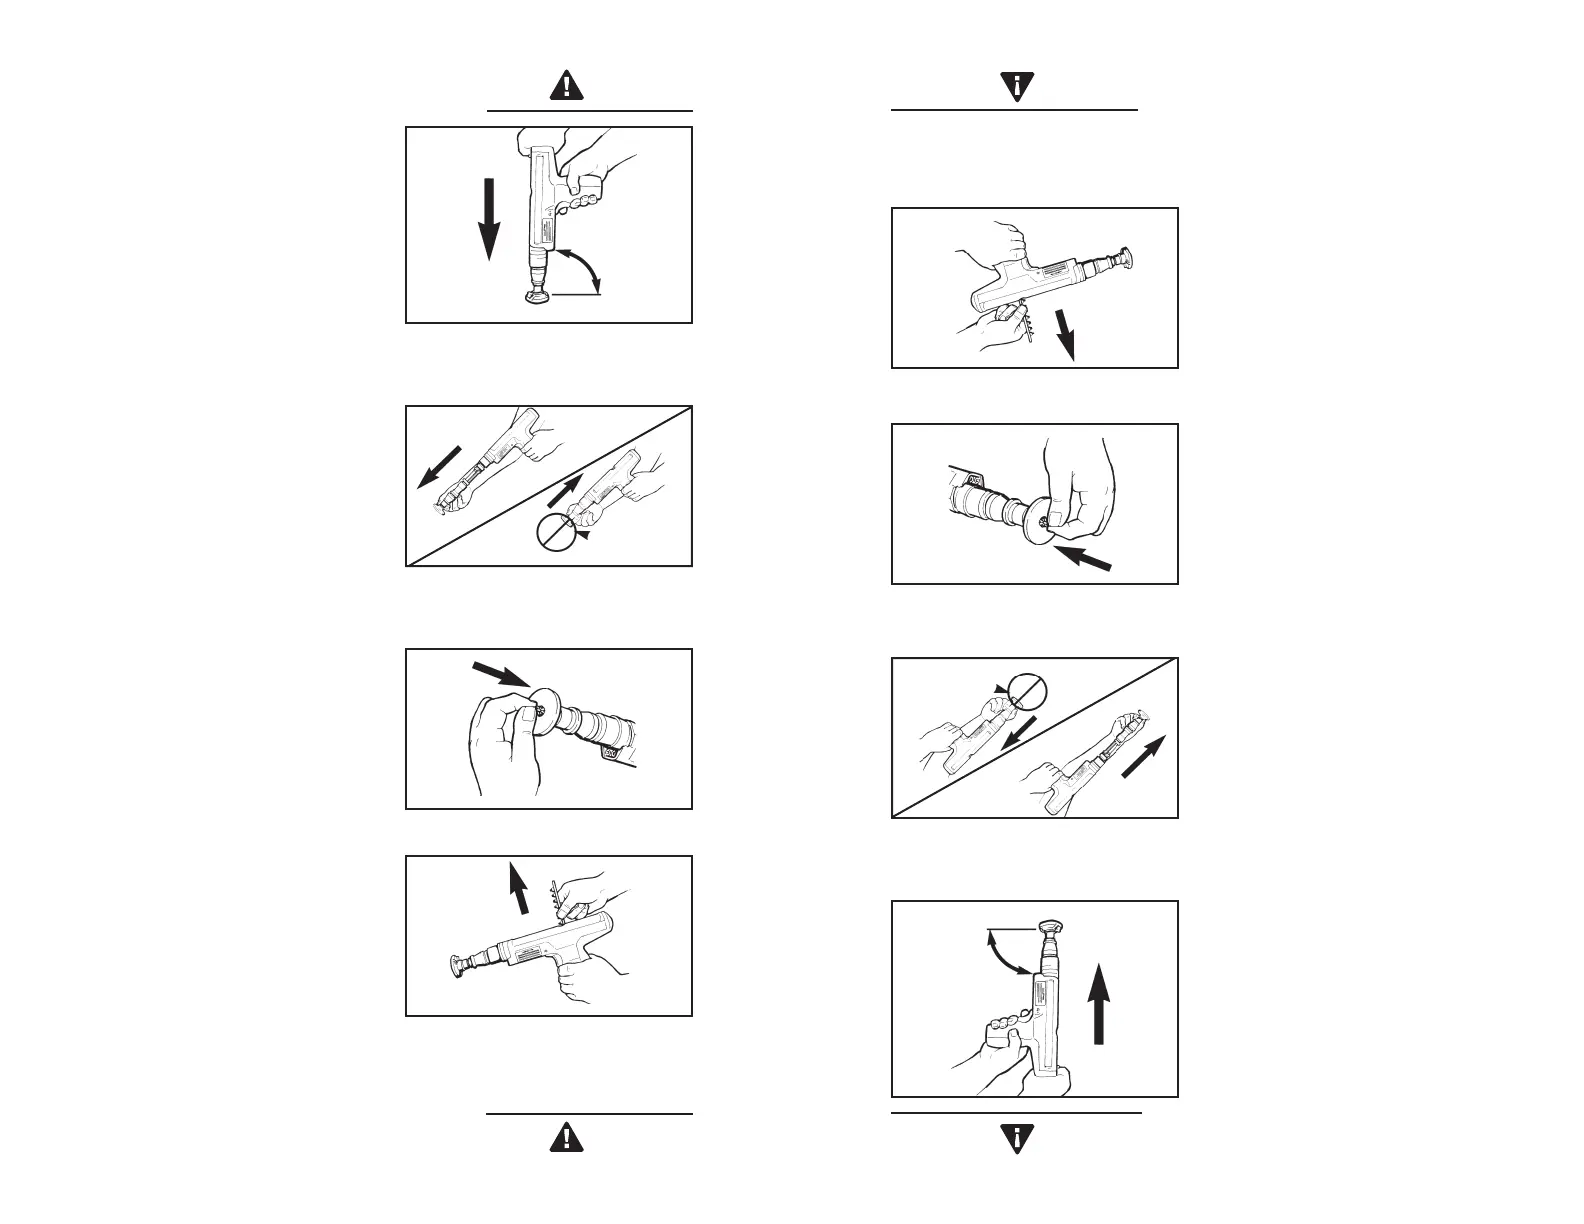
4. Hold the tool perpendicular (90˚) to the work
surface with both hands, and press down
firmly to fully depress the tool. Maintain firm
downward pressure on the tool with both hands
and pull the trigger to drive the fastener. DO
NOT DEPRESS THE TOOL AGAINST ANYTHING
OTHER THAN THE INTENDED WORK SURFACE.
Holding the tool firmly in place while fastening
will produce more consistent fastening quality,
and minimize tool wear or damage.
5. After making the fastening, fully open and
then close the tool. This resets the piston and
indexes a new load into place for the next
fastening.
6. Insert another fastener in the muzzle end of the
tool as before and the tool is ready for the next
fastening. Keep your finger off of the trigger
until the tool is in position to drive the fastener.
7. To remove a used or partially used load strip
from the tool, pull the strip out from the top
of the tool. Do not try to remove the strip by
pulling it out from the bottom of the handle.
NEVER try to remove a jammed or stuck load
strip. Should a “jammed” load strip occur, call
1-877-489-2726 for technical assistance.
TOOL OPERATING INSTRUCTIONS
TOOL OPERATING INSTRUCTIONS
10
FULLY OPEN AND CLOSE TOOL
TO THE CLOSED POSITION
HOLD THE TOOL FIRMLY
AND PERPENDICULAR TO
THE WORK SURFACE
KEEP HANDS
AWAY FROM
MUZZLE
INSERT THE NEXT FASTENER
REMOVE THE LOAD STRIP ONLY
FROM THE TOP OF THE TOOL
90
O
10
4. Sostenga la herramienta con ambas manos
en forma perpendicular (90°) a la superficie
de trabajo y presione firmemente para
contraerla totalmente. Mantenga una presión
firme hacia abajo sobre la herramienta con
ambas manos y jale del gatillo para clavar
el elemento de fijación. NO PRESIONE LA
HERRAMIENTA CONTRA NADA MÁS QUE
SOBRE LA SUPERFICIE DE TRABAJO
DESEADA. Al sostener la herramienta
firmemente en su lugar se producirá una
fijación de calidad más uniforme y se
reducirá al mínimo el desgaste o los daños a
la herramienta.
5. Después de fijar el sujetador, abra
completamente y luego cierre la herramienta.
Esto restablece el pistón y coloca una nueva
carga en su lugar para la siguiente operación
de fijación.
6. Inserte otro elemento de fijación en el
extremo de la boca de la herramienta como
lo hiciera anteriormente y la herramienta
quedará lista para la siguiente operación de
fijación. Mantenga su dedo retirado del gatillo
hasta que la herramienta esté en posición
para clavar el elemento de fijación.
7. Para sacar una tira de cargas usada o
parcialmente usada de la herramienta, saque
la tira de la parte superior de la herramienta.
No intente sacar la tira tirando hacia fuera de
la parte inferior de la empuñadura. NUNCA
trate de sacar una tira de cargas atascada
o trabada que contenga cargas sin disparar.
En caso de que se “atasque” una tira de
cargas, para recibir asistencia técnica, llame
al 1-877-489-2726.
INSTRUCCIONES DE FUNCIONAMIENTO
DE LA HERRAMIENTA
INSTRUCCIONES DE FUNCIONAMIENTO
DE LA HERRAMIENTA
ABRA COMPLETAMENTE Y CIERRE
LA HERRAMIENTA A LA POSICIÓN
ABIERTA
SOSTENGA LA HERRAMIENTA
FIRMEMENTE Y DE FORMA
PERPENDICULAR A LA SUPERFICIE DE
TRABAJO
INSERTE EL SIGUIENTE ELEMENTO
DE FIJACIÓN
RETIRE LA TIRA DE CARGAS SÓLO
DESDE LA PARTE SUPERIOR DE LA
HERRAMIENTA
90
O
MANTENGA
LAS MANOS
ALEJADAS
DE LA BOCA
 Loading...