EasyManua.ls Logo

Ivation IVAWLTHERM - User Manual

Ivation IVAWLTHERM
5 pages
Print Icon
To Next Page IconTo Next Page
Loading...
wireless barbecue
thermometer
manual
hello!
Welcome to the Ivation™ family. This manual offers you a
walkthrough of your new Wireless BBQ Thermometer. For
additional information and technical support, please contact
our helpful team at info@myivation.com.
receiver features
LCD – Displays all icons, temperature and time.
CLIP – Removable clip allowing you to have the
receiver hang.
BATTERY COMPARTMENT –
Holds 2 AAA batteries.
STAND (Removable Clip) – Swings out and
allow you to stand the receiver on tabletop.
Buttons
1 HI/HR – In THERMOMETER MODE, press
and hold until the digits flash; press to
increase the maximum BARBECUE
temperature. Press and hold for 2 seconds
to increase 10 degrees per second. In TIMER
MODE, when the TIMER is stopped, press to
set the hour. Press and hold for 2 seconds to
increase 10 hours per second.
2 LO/MIN – In THERMOMETER MODE, press and hold until the digits flash, press to increase the minimum BARBECUE temperature.
Press and hold for 2 seconds to increase 10 degrees per second. In TIMER MODE, when the TIMER is stopped, press to set the
minute. Press and hold for 2 seconds to increase 10 minutes per second.
3 LIGHT/MODE – Press to turn on the LCD back light for 5 seconds. Press and hold for 2 seconds to select THERMOMETER MODE or
TIMER MODE.
4 HI/CLEAR – In THERMOMETER MODE, press and hold until the digits flash, press to increase the maximum FOOD temperature.
Press and hold for 2 seconds to increase 10 degrees per second. In TIMER MODE, when the timer is stopped, press to clear the timer
setting back to 0:00.
5 ALERT, ˚C /˚F, START/STOP –Press and hold for 2 seconds to switch between ˚C and ˚F display. In THERMOMETER MODE, press to
turn ON/OFF the alarm. In TIMER MODE, press to start or stop the timer countdown or count up.
6 Power – Press to turn ON/OFF the receiver.
what’s in the box?
1x Receiver unit
1x Transmitter unit
1x Detachable stainless steel FOOD probe
1x Detachable stainless steel BARBECUE probe with clip
4x AAA batteries.
ITEM # IVAWLTHERM
Question and Answer IconNeed help?

Do you have a question about the Ivation IVAWLTHERM and is the answer not in the manual?

Summary

Receiver Features

LCD Display

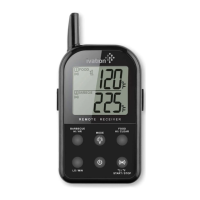
Displays all icons, temperature, and time.

Receiver Clip

Removable clip allowing you to hang the receiver.

Battery Compartment

Compartment that holds 2 AAA batteries.

Receiver Stand

Removable stand to place receiver on a tabletop.

Receiver Buttons

HI;HR Button

Sets maximum BARBECUE temperature or timer hour.

LO;MIN Button

Sets minimum BARBECUE temperature or timer minute.

LIGHT;MODE Button

Turns on LCD backlight or switches between modes.

HI;CLEAR Button

Sets maximum FOOD temperature or clears timer.

ALERT;°C;°F;START;STOP Button

Controls alarm, units, and timer start/stop.

Power Button

Turns the receiver ON/OFF.

Transmitter Features

Transmitter LCD

Displays temperature for both FOOD and BARBECUE.

Wire Stand

Allows transmitter to stand or hang.

Transmitter Battery Compartment

Compartment for 2 AAA batteries.

Food Probe Plug

Input for the stainless steel FOOD probe.

Barbecue Probe Plug

Input for the stainless steel BARBECUE probe.

Transmitter Buttons

RE-SYNC Button

Manually registers radio frequency with receiver.

Transmitter Power Button

Turns the transmitter ON/OFF.

Setup and Registration

Installing Batteries

Instructions for inserting batteries into receiver and transmitter.

Registering Receiver and Transmitter

Steps to register the transmitter's signal with the receiver.

Loss Link Alert

Notification when the receiver loses signal from the transmitter.

Thermometer Mode Operation

Setting Maximum Food Temperature

How to set the desired high temperature alert for food.

Setting Maximum Barbecue Temperature

How to set the desired high temperature alert for barbecue.

Setting Minimum Barbecue Temperature

How to set the desired low temperature alert for barbecue.

Activating Temperature Alarm

Enables alarms for exceeding or falling below set temperatures.

Timer Mode Operation

Count Down Timer

Setting and using the timer for countdown functionality.

Count Up Timer

Using the timer for count up functionality.

Temperature Display Formats

Switching between Celsius (°C) and Fahrenheit (°F).

Using Modes and Procedures

Simultaneous Mode Use

Using Timer and Thermometer modes concurrently.

Typical Barbecue Procedure

Step-by-step guide for setting up and using the thermometer for grilling.

Helpful Hints

Troubleshooting common issues like LLL/HHH display or false readings.

Important Information

Cautions

Safety warnings and precautions for using the thermometer.

Cleaning Instructions

How to properly clean the probes and the device.

User Information and Compliance

FCC compliance and warnings about modifications.

Limited One Year Warranty

Details on warranty coverage and claim procedures.

Overview

This document describes the Ivation wireless barbecue thermometer, a device designed to help users monitor food and barbecue temperatures remotely. It consists of a receiver unit and a transmitter unit, along with two detachable stainless steel probes (one for food and one for barbecue) and four AAA batteries.

Function Description

The Ivation wireless barbecue thermometer allows users to monitor both food and barbecue temperatures simultaneously. The transmitter unit, equipped with two probes, sends temperature data wirelessly to the receiver unit. The receiver displays these temperatures on an LCD screen and can be set to alarm when specific temperature thresholds are met for both food and barbecue. Additionally, the receiver unit includes a timer function, allowing users to track cooking duration. The device supports both countdown and count-up timer modes.

Usage Features

Receiver Unit:

  • LCD Display: Shows all icons, temperature readings (for both food and barbecue), and time. It automatically switches between food and barbecue displays.
  • Clip: A removable clip allows the receiver to be hung for convenience.
  • Battery Compartment: Holds two AAA batteries.
  • Stand: A swing-out stand (part of the removable clip) allows the receiver to be placed on a tabletop.
  • HI/HR Button: In thermometer mode, this button is used to increase the maximum barbecue temperature. Press and hold until digits flash, then press to adjust. Holding for two seconds increases the temperature by 10 degrees per second. In timer mode, when the timer is stopped, it sets the hour. Holding for two seconds increases the hour by 10 hours per second.
  • LO/MIN Button: In thermometer mode, this button is used to increase the minimum barbecue temperature. Press and hold until digits flash, then press to adjust. Holding for two seconds increases the temperature by 10 degrees per second. In timer mode, when the timer is stopped, it sets the minute. Holding for two seconds increases the minute by 10 minutes per second.
  • LIGHT/MODE Button: Press to turn on the LCD backlight for five seconds. Press and hold for two seconds to switch between thermometer mode and timer mode. This button also confirms temperature settings.
  • HI/CLEAR Button: In thermometer mode, this button displays the maximum food temperature. Press and hold until digits flash, then press to increase the maximum food temperature. Holding for two seconds increases the temperature by 10 degrees per second. In timer mode, when the timer is stopped, it clears the timer setting back to 0:00.
  • ALERT, °C/°F, START/STOP Button: Press and hold for two seconds to switch between °C and °F display. In thermometer mode, press to turn the alarm ON/OFF. In timer mode, press to start or stop the timer countdown or count up.
  • Power Button: Press to turn the receiver ON/OFF.
  • Temperature Alarm: The receiver beeps and flashes the alarm icon and probe temperature when the actual food temperature exceeds the set maximum, the actual barbecue temperature exceeds the set maximum, or the actual barbecue temperature falls below the set minimum. The minimum barbecue temperature alarm is only activated after the actual barbecue temperature has risen above the set minimum.
  • Loss Link Alert: If the receiver loses connection with the transmitter for over four minutes, it will beep every four seconds. This can be resolved by moving the receiver closer to the transmitter and re-syncing.
  • Simultaneous Mode Usage: Both timer mode and thermometer mode can be used simultaneously, allowing users to monitor temperatures while tracking cooking time.

Transmitter Unit:

  • LCD Display: Shows temperature of both food and barbecue, automatically switching between them.
  • Wire Stand: Allows the transmitter to stand on a tabletop or be used as a hanger.
  • Battery Compartment: Holds two AAA batteries.
  • FOOD Plug-in: For the stainless steel food probe.
  • BARBECUE Plug-in: For the stainless steel barbecue probe.
  • RE-SYNC Button: Transmits data manually and terminates the auto-registration process. Press and hold for two seconds to register the radio frequency with the receiver. Also used to select the temperature unit (°C or °F).
  • POWER Button: Press and hold for two seconds to turn the transmitter ON/OFF.

Installation and Registration:

  1. Insert two AAA batteries into the receiver unit, ensuring correct polarity.
  2. Remove two small screws to open the transmitter's battery compartment and insert two AAA batteries, ensuring correct polarity.
  3. Plug the stainless steel probe sensors into their corresponding jacks on the transmitter. The food probe is six inches long with a pointed end, while the barbecue probe is three inches long with a grill rack clip.
  4. Turn on the receiver by pressing its power button for two seconds.
  5. Turn on the transmitter by pressing its power button for two seconds (must be done within 120 seconds of turning on the receiver). If registration is successful, the unit will beep and probe temperatures will appear on the LCD. If not, re-sync the transmitter by pressing and holding the RESYNC button for two seconds or by turning the transmitter off and on again.

Setting Temperatures and Timer:

  • Maximum Food Temperature: Press HI/CLEAR to display, then press and hold until digits flash. Use HI/CLEAR to adjust. Confirm with LIGHT/MODE.
  • Maximum Barbecue Temperature: Press HI/HR to display, then press and hold until digits flash. Use HI/HR to adjust. Confirm with LIGHT/MODE.
  • Minimum Barbecue Temperature: Press LO/MIN to display, then press and hold until digits flash. Use LO/MIN to adjust. Confirm with LIGHT/MODE.
  • Activating Alarm: Press ALERT, °C/°F, START/STOP to activate the temperature alarm for both barbecue and food.
  • Countdown Timer: Press and hold LIGHT/MODE to switch to timer mode. Use HI/HR to set the hour and LO/MIN to set the minute. Press ALERT, °C/°F, START/STOP to start/stop the countdown. HI/CLEAR clears the setting.
  • Count-Up Timer: Press and hold LIGHT/MODE to switch to timer mode. Press ALERT, °C/°F, START/STOP to start/stop the count-up. HI/CLEAR clears the setting.

Typical Barbecue Use Example:

  1. Follow registration procedure.
  2. Place meat on the grill rack.
  3. Insert the food probe into the thickest part of the meat, avoiding bone or heavy fat.
  4. Clip the barbecue probe to the grill rack.
  5. Position probe wires to avoid flames and pinching by the cover.
  6. Stand/hang the transmitter away from heat sources.
  7. Set maximum food temperature (e.g., 160°F) using HI/CLEAR and LIGHT/MODE.
  8. Set maximum barbecue temperature (e.g., 250°F) using HI/HR and LIGHT/MODE.
  9. Set minimum barbecue temperature (e.g., 225°F) using LO/MIN and LIGHT/MODE.
  10. Activate temperature alarms using ALERT, °C/°F, START/STOP.
  11. Set a timer (e.g., 2 hours) using HI/HR and ALERT, °C/°F, START/STOP.
  12. Clip the receiver to your belt or pocket and move up to 300 ft away, or indoors. The receiver will beep and flash if temperatures exceed set limits.

Maintenance Features

Cautions:

  • Always wear heat-resistant gloves when touching probes or wires during/after cooking.
  • Keep probes and wires away from children.
  • Clean and thoroughly dry probes after each use.
  • The receiver is not rainproof; the transmitter is rainproof but not watertight. Do not immerse either unit in water.
  • Do not expose probe plugs or transmitter plug-in holes to water or liquid.
  • Do not expose the receiver or transmitter to direct heat or surfaces.
  • Do not use stainless steel probes in a microwave oven.
  • Do not use the stainless probe sensor above 572°F (300°C), as it will deteriorate the wire.
  • Not intended for use by persons under 12 years old.

Cleaning:

  • Always wear heat-resistant gloves when touching probes or wires during/after cooking.
  • Keep probes and wires away from children.
  • Wash metal probe tips with hot soapy water and dry thoroughly. Do not immerse the probe in water.
  • Wipe the transmitter and receiver with a damp cloth. Do not immerse either in water.

Troubleshooting Hints:

  • If the receiver/transmitter displays "LLL" or "HHH" instead of temperature, wait for the probe to reach room temperature. If the issue persists, firmly squeeze and twist the probe jacks into the transmitter. This may indicate a shorted internal probe wire due to moisture or heat damage.
  • Do not immerse the probe in water while cleaning.
  • Do not allow the probe or probe wire to come into contact with flames.
  • If the temperature reads too high or increases too quickly, ensure the probe tip is not poking through the food to the outside. Reposition the probe tip in the center of the thickest part of the food, avoiding bone or heavy fat areas.
  • Defective probes within the warranty period can be returned for a replacement.

Ivation IVAWLTHERM Specifications

General IconGeneral
Auto Power OffYes
WaterproofNo
Accuracy±1.8°F (±1°C)
DisplayLCD
Battery2 x AAA batteries
FeaturesAlarm, Timer
Wireless RangeUp to 300 feet
Resolution0.1°F/°C
Memory FunctionYes
TypeWireless Thermometer

Related product manuals