The Ivation Wireless BBQ Thermometer is a programmable radio frequency food thermometer designed to remotely monitor the temperature of grilling food and the internal temperature of a grill. It consists of a receiver unit, a transmitter unit, a detachable stainless steel FOOD probe, and a detachable stainless steel BARBECUE probe with a clip. Both the receiver and transmitter are powered by AAA batteries.
Receiver Features:
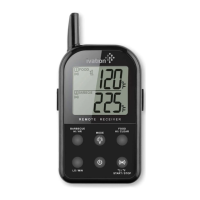
The receiver unit features an LCD (Liquid Crystal Display) that shows all icons, temperature, and time. It has a removable clip for hanging and a swing-out stand for tabletop use. The battery compartment holds two AAA batteries.
- HI/HR: In THERMOMETER MODE, press and hold to make digits flash, then press to increase the maximum BARBECUE temperature (10 degrees per second with a 2-second hold). In TIMER MODE, when the timer is stopped, press to set the hour (10 hours per second with a 2-second hold).
- LO/MIN: In THERMOMETER MODE, press and hold to make digits flash, then press to increase the minimum BARBECUE temperature (10 degrees per second with a 2-second hold). In TIMER MODE, when the timer is stopped, press to set the minute (10 minutes per second with a 2-second hold).
- LIGHT/MODE: Press to turn on the LCD backlight for 5 seconds. Press and hold for 2 seconds to switch between THERMOMETER MODE and TIMER MODE.
- HI/CLEAR: In THERMOMETER MODE, press and hold to make digits flash, then press to increase the maximum FOOD temperature (10 degrees per second with a 2-second hold). In TIMER MODE, when the timer is stopped, press to clear the timer setting to 0:00.
- ALERT, °C/°F, START/STOP: Press and hold for 2 seconds to switch between °C and °F display. In THERMOMETER MODE, press to turn the alarm ON/OFF. In TIMER MODE, press to start or stop the timer countdown or count up.
- Power: Press to turn the receiver ON/OFF.
Transmitter Features:
The transmitter unit also has an LCD that displays both FOOD and BARBECUE temperatures, automatically switching between them. It includes a wire stand for tabletop use or hanging, and its battery compartment holds two AAA batteries. It has two plug-ins: one for the stainless steel FOOD probe and one for the stainless steel BARBECUE probe.
- RE-SYNC: Transmits manually and terminates the auto-registration process. Press and hold for 2 seconds to register the radio frequency with the receiver. Press to select the temperature unit between °C and °F.
- POWER: Press and hold for 2 seconds to turn the transmitter ON/OFF.
Installation and Registration:
To install, open the battery compartments of both the receiver and transmitter and insert two AAA batteries into each, ensuring correct polarity.
For registration, plug the stainless steel probe sensors into their corresponding plugs on the transmitter. The FOOD probe is 6 inches long with a pointed end, while the BARBECUE probe is 3 inches long with a grill rack clip. Turn on the receiver by pressing its power button for 2 seconds, then turn on the transmitter by pressing its power button for 2 seconds. This must be done within 120 seconds of turning on the receiver. If the unit does not beep within 5-10 seconds and the "---" on the LCD is flashing or solid, turn the transmitter OFF and then ON again, or press and hold the RESYNC button for 2 seconds. Registration is complete when the unit beeps and probe temperatures appear on the LCD.
Loss Link Alert:
If the receiver goes out of range, experiences external interference, or the transmitter is shut off, it may lose transmission. After 4 minutes, the unit will beep every 4 seconds. Pressing any button on the receiver stops the beep. To regain the signal, move the receiver closer to the transmitter, turn the receiver OFF and then ON, and press and hold the transmitter's RESYNC button for 2 seconds within 120 seconds.
The RESYNC button can be activated manually once every 12 seconds. If re-synchronization fails the first time, wait 12 seconds before trying again, or turn the transmitter OFF and ON.
THERMOMETER MODE:
In this mode, the LCD shows a "1 FOOD" icon and a "2 BARBECUE" icon.
Setting HI (Maximum) FOOD Temperature:
- Press HI/CLEAR to display the maximum FOOD temperature (displayed for 5 seconds). The range is 32 °F - 572 °F, default 176 °F.
- Press and hold HI/CLEAR until digits flash.
- Press HI/CLEAR to set the desired temperature (increases one with each press, fast increase with hold).
- Press LIGHT/MODE to confirm.
USDA recommended minimum internal temperatures: Beef, Veal, Lamb Steaks & Roasts and Fish: 145 °F; Egg Dishes, Pork and Ground Beef Veal & Lamb: 160 °F; Turkey, Chicken & Duck Whole, Pieces & Ground: 165 °F.
Setting HI (Maximum) BARBECUE Temperature:
- Press HI/HR to display the maximum BARBECUE temperature (displayed for 5 seconds). The range is 140 °F - 572 °F, default 176 °F. Cannot be set below minimum BARBECUE temperature.
- Press and hold HI/HR until digits flash.
- Press HI/HR to set the desired temperature (increases one with each press, fast increase with hold).
- Press LIGHT/MODE to confirm.
Setting LO (Minimum) BARBECUE Temperature:
- Press LO/MIN to display the minimum BARBECUE temperature (displayed for 5 seconds). The range is 32 °F - 554 °F, default 50 °F. Cannot be set above maximum BARBECUE temperature.
- Press and hold LO/MIN until digits flash.
- Press LO/MIN to set the desired temperature (increases one with each press, fast increase with hold).
- Press LIGHT/MODE to confirm.
Activating the Temperature Alarm:
Press ALERT, °C/°F, START/STOP to activate the alarm for BARBECUE & FOOD. Alarm icons appear. The receiver beeps and probe temperature flashes if:
a) FOOD temperature exceeds set maximum (twice per second).
b) BARBECUE temperature exceeds set maximum (once per second).
c) BARBECUE temperature falls below set minimum (once per second).
Note: The minimum BARBECUE temperature alarm activates only after the actual BARBECUE temperature goes above the set minimum. The unit retains Barbecue & Food alert temperature settings even when turned off.
TIMER MODE:
Count Down:
- Press and hold LIGHT/MODE to switch to TIMER MODE. Timer 0:00 with a "TIMER" icon appears.
- Press HI/HR to set the hour and LO/MIN to set the minute.
- Press ALERT, °C/°F, START/STOP to start countdown. The icon will blink.
- Press ALERT, °C/°F, START/STOP to stop countdown. The icon will be solid.
- Press HI/CLEAR to clear the setting to 0:00.
Minimum setting is 1 minute, maximum is 24 hours. Displays hours & minutes for timers under 10 hours, only hours for timers over 10 hours. When countdown reaches "0:00", the timer counts up and beeps for 30 seconds. Press ALERT/°C/°F/START/STOP to stop the beep.
Count Up:
- Press and hold LIGHT/MODE to switch to TIMER MODE. Timer 0:00 with a "TIMER" icon appears.
- Press ALERT, °C/°F, START/STOP to start count up. The icon will blink.
- Press ALERT, °C/°F, START/STOP to stop count up. The icon will be solid.
- Press HI/CLEAR to clear the setting to 0:00.
When count up reaches 9:59, it continues displaying 9:59 and beeps with the icon blinking for 30 seconds.
Note: The unit retains timer settings even when turned off.
Press and hold ALERT, °C/°F, START/STOP for 2 seconds to switch between °C and °F.
Using TIMER MODE & TEMPERATURE MODE Simultaneously:
Both modes can be used concurrently. This allows monitoring FOOD and BARBECUE temperatures while tracking another cooking task with the timer.
- In THERMOMETER MODE, when temperature is reached, the receiver alarms (once per second for BARBECUE, twice per second for FOOD). Alarm icons and probe temperature blink.
- In TIMER MODE, when timer is reached, the receiver alarms (three times per second). Upward or downward arrow blinks.
Procedure for Typical Use in an Outdoor BARBECUE:
Example: Cooking a Boston Butt to 160 °F, with BARBECUE temperature alerts for below 225 °F or above 250 °F, and a 2-hour reminder to check the smoker.
- Set up BARBECUE: Follow registration. Place meat on the grill rack. Insert FOOD probe into the thickest part of the meat, avoiding bone/fat. Clip BARBECUE probe to the grill rack. Position probe wires away from flames and pinches. Stand/hang transmitter away from heat source (it is rain proof but not water tight).
- In THERMOMETER MODE:
- Set maximum FOOD temperature to 160 °F: Press HI/CLEAR, hold until flashes, repeatedly press to 160 °F, confirm with LIGHT/MODE.
- Set maximum BARBECUE temperature to 250 °F: Press HI/HR, hold until flashes, repeatedly press to 250 °F, confirm with LIGHT/MODE.
- Set minimum BARBECUE temperature to 225 °F: Press LO/MIN, hold until flashes, repeatedly press to 225 °F, confirm with LIGHT/MODE.
- Activate alarm: Press ALERT, °C/°F, START/STOP.
- In TIMER MODE:
- Set timer to 2 hours: Press HI/HR twice to display 2:00.
- Start countdown: Press ALARM/START/STOP.
- Return to THERMOMETER MODE: Press and hold LIGHT/MODE.
Clip receiver to belt/pocket, move up to 300 ft away, or go indoors. The receiver will beep and flash if meat temperature exceeds 160 °F, or BARBECUE temperature falls below 225 °F or exceeds 250 °F.
Helpful Hints:
If LLL or HHH is displayed, wait for the probe to reach room temperature. If it persists or shows false readings, squeeze probe jacks firmly into the transmitter and twist them. If the problem continues, the internal probe wire may be shorted. Do not immerse probes in water during cleaning. Keep probes and wires away from flames. If the displayed temperature is too high or increases too quickly, ensure the probe tip is not poking through the food to the outside; reposition it to the center of the thickest part.
Cautions:
- Always wear heat-resistant gloves when touching probe sensors or wires during or after cooking.
- Keep probe sensors and wires away from children.
- Clean and dry stainless steel probes thoroughly after each use.
- Do not use the receiver in rain (not rain proof). The transmitter is rain proof but not water tight; do not immerse it.
- Do not expose probe plugs or transmitter plug holes to water or liquid, as this causes faulty readings.
- Do not expose the receiver or transmitter to direct heat or surfaces.
- Do not use stainless steel probes in a microwave oven.
- Temperature range: 32 °F (0°C) to 572 °F (300 °C). LLL is displayed below 32 °F, HHH above 572 °F. Do not use probes above 572 °F as it will deteriorate the wire.
- Not intended for use by persons under 12 years old.
Cleaning:
- Wear heat-resistant gloves when touching probe sensors or wires during or after cooking.
- Keep probe sensors and wires away from children.
- Wash metal probe tips with hot soapy water and dry thoroughly. Do not immerse the probe in water.
- Wipe the transmitter and receiver with a damp cloth. Do not immerse either in water.
Changes or modifications not expressly approved by the party responsible for compliance could void the user's authority to operate the equipment. This device complies with Part 15 of FCC Rules, providing reasonable protection against harmful interference in a residential installation. If interference occurs, try reorienting the receiving antenna, increasing separation between equipment and receiver, connecting equipment to a different circuit, or consulting a dealer/experienced radio/TV technician.
This device complies with Part 15 of the FCC Rules. Operation is subject to two conditions: (1) this device may not cause harmful interference, and (2) this device must accept any interference received, including interference that may cause undesired operation.
LIMITED ONE YEAR WARRANTY:
C&A Marketing, Inc. warrants the Ivation Wireless BBQ Thermometer to be free of defects in parts, materials, and workmanship for one year from the date of purchase. For repairs or servicing, contact C&A Marketing Inc. and ship the unit to their service center.
C&A Marketing Returns Department
2 Bergen Turnpike.
Reidgfiled Park, NJ 07660
Tel: 201-881-1900
Email Info@myivation.com
www.myivation.com
Do not send parts or products without a Return Authorization Number. This warranty is VOID if instructions are not followed, for accidental damage, commercial use, damage incurred while in transit, or if the unit has been tampered with. This warranty provides specific legal rights, and you may also have other rights that vary by state.