4
WARNING
Flood hazard. If toilet is plumbed to an overboard
discharge, close the discharge seacock prior to
disassembling toilet. Failure to do so can result in
floodingwhichcancauselossofpropertyandlife.
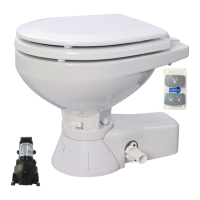
WiretheswitchpaneltothePAR-MAXrinsepumpand
toiletwastepumpasperthewiringdiagram.Thebrown
lead from the control panel connects with the waste
pump orange (positive) motor lead. The yellow lead
from the control panel connects with the PAR-MAX
rinsewaterpumporange(positive)motorlead.
Theblackmotorleadfromeachpumpmustbeconnectedto
batterynegative.Selectalocationfortheswitchpanelthatis
convenienttothetoiletuserandwillalsoallowaccesstorun
thewiresfromtheswitchpaneltoboththetoilet’swastepump
motorandthePAR-MAXpumpaswellasfromtheelectrical
powersourcetotheswitchpanel.Toinstalltheswitchpanel,
drilltwo1-3/4"(45mm)diameterholes(slightlyover-lapping)
throughtheselectedswitchmountingsurfacepertheattached
template.Ensurethetemplateisorientedcorrectlybecauseit
isnotsymmetrical.Also,drillfourappropriatesizedholesfor
the fasteners selected to secure the switch panel to its
mountingsurface.
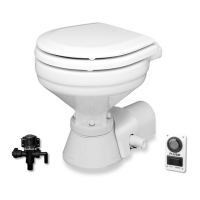
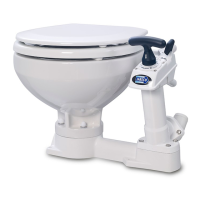
WASTE PUMP SERVICE
TheJabscoQuiet-FlushToiletdoesnotrequireroutine
maintenanceotherthanoccasionalcleaningtomaintain
ahygienicsanitarycondition.Cleantoiletwithmildnon-
abrasive cleaners without strong aromatics. Cleaners
havinghigh concentrations of aromatics such as pine
scented concentrated cleaners and strongly scented
degreaserconcentratescan cause the pump’s seal to
swellandmaycontributetoaprematuresealleak.The
toilet has no wearing parts that need periodic
replacement other than the shaft seal which, under
normal conditions, should provide several years of
service before needing replacement. The seal only
requires replacement if signs of leakage are noticed
aroundthebaseandrearofthetoiletchinabowl.
NOTICE: Before performing any service, turn off the
electricalpowertothetoiletandrinsewaterpump.Take
precautiontoensureitisnotturnedonuntiltheservice
is complete. Also, pump all water from the toilet bowl
andifconnectedtoanoverboarddischarge,closethe
dischargeseacock.
To replace the shaft seal, remove the two toilet hold-
down screw caps and remove the hold-down screw
nuts. Carefully lift the toilet up and away from the
bulkhead at it’s rear. Remove the pump assembly by
removingthefourscrewswithlockwashersthatsecure
it to the plastic toilet base. Carefully slide the pump
assemblyfromthebaseensuringthemaceratorhousing
alsoslidesoutofthebasewiththepump.The pump
chopperwillengagethemaceratorhousinganditmay
be necessary to gently tap the chopper against the
maceratorhousingtofreeitfromthebase.
Prevent the motor shaft from turning by inserting a
screwdriverintheshaftslotattherearofthemotorand
removethe self lockingnut.Removethe chopperand
macerator housing from the motor shaft. Remove the
O-ringfromtheO-ringgroovearoundtheouterdiameter
of the seal housing.With an allen wrench, loosen the
centrifugalimpellersetscrewandslidetheimpelleroff
theshaft.Removethetwoscrewsthatsecuretheseal
housingtothemotorandslidethehousingoffthemotor
shaft. Remove the two seal washers from under the
headof eachofthetwosealhousingretainerscrews.
Withapairofneedlenosepliers,grasptheshaftseal
and pull it from the seal housing. Clean all parts and
inspectfordamage.
LubricatetheODofthenewsealwithasmallamount
ofwaterandpressitintothesealborewiththeseal’slip
facingthethreadedendoftheshaft.
Do not use the stain less steel star retaining washer
supplied with the seal.
LubricatetheIDofthesealandthemotorshaftwitha
small amount of water resistant grease. Ensure the
slingerisproperlypositionedonthemotorshaftnextto
the motor and slide the seal housing onto the motor
shaftuntilitisagainstthemotorendbell.Positionanew
plasticseal washerundertheheadofeach of the flat
headsealhousingretainerscrewsandsecuretheseal
housingtothe motor.Slide thecentrifugal impelleron
themotorshaftpositioningitabout1/32"(1mm)from
thesealhousingandsecureittotheshaftwiththeset
screw.Rotatetheimpellertoensureitdoesnotrubon
thesealhousing.
Slidethemaceratorhousingoverthemotorshaft.Place
thechopperontheshaftwiththetabontheflatofthe
shaft.Installtheselflockingnutandtightenfirmlywhile
holdingthemotorshaftattherearofthemotor.Position
anewO-ringinthesealhousingO-ringgroove(itmay
be retained in the groove with a small amount of
grease).Slidethepumpassemblyintothetoiletbase
ensuringthemaceratorhousing is properlypositioned
withinthebase.
Thecut-outinthesideofthemaceratorhousingmust
alignwiththedischargeportinthebase(themacerator
housing is keyed so it will only go in when properly
positioned). Ensuring the O-ring is still properly
positioned in the O-ring groove in the seal housing,
placethepumpassemblyagainstthebaseandsecure
itinplacewiththefourscrewsandlockwashers.
Carefully lift the toilet and position over the two hold-
down screws using caution not to chip or break the
china. Securethe toilet down with the hold-downnuts
andwashersensuringtheplasticwasherisnexttothe
china.
Do not overtighten hold-down nuts.
 Loading...