EasyManua.ls Logo

Jack Richeson 880116 - User Manual

Jack Richeson 880116
2 pages
Print Icon
To Next Page IconTo Next Page
Loading...
Cabinet Components:
7 Parts: base (A), 2 frames (B), 2 sides (C&D), hardboard
backing (E), top (F)
Bag of Cabinet Hardware: 4 wood dowels, 8 plastic dowels,
3 - 1⅛" screws, 12 - 1½" screws, 16 - ⅝" screws (12 for #880116)
Bag of Bottom Hardware: 4 wood dowels, 3 - 1⅛" screws
1. Before beginning unit assembly, the flat file top needs to be pre-drilled. Flip top (F)
finished side down on floor and push four wood dowels into the holes. Make sure fin-
ished edge of one rectangular frame (B) and the finished side of top are on the same
side and push frame onto dowels. Use a rubber mallet to tap into place. Secure with
three 1⅛" screws. (It is critical to use the correct screw length to avoid causing damage to the flat file
top.) Set assembled top aside.
2. Put Base (A) on floor with finished side towards you and slats side up. Push four wood-
en dowels into holes in slats. Push remaining frame (B) (with finished side towards you) onto
dowels. Use a rubber mallet to tap into place. Secure with three 1⅛" screws.
3. Attach sides (C&D): Make sure the finished edge is facing you and the metal drawer
brackets are in a "7" position, not an "L" positions. Push four plastic dowels (using ridged
side of the dowel) into the cooresponding holes (C or D) and tap into place with a rubber
mallet. Hold one side (C or D) flush with the rectangular frame, push bottom dowels
into place and secure with three 1½" screws. Repeat with the other side.
4. Attach the assembled top (B&F) to the base. (Top will be quite heavy. Assistance recommended for
this step.): Make sure the finished side is facing you and gently maneuver the frame into
the slot between sides. (If it will not fit properly, slightly loosen screws on the bottom of one side to
give more space.) Once properly aligned, attach sides to top frame using six 1½" screws.
5. Gently tip unit on face (or leave as is, if desired). Place hardboard backing (E) (with reccessed
screw holes facing out) into the notched area on back and secure using sixteen " screws
(12 screws, if assembling 3 drawer unit). If the backing is hard to put in, slightly loosen screws
on top and bottom of one side and retighten after the backing is in place.
6. Carefully tip the unit back onto the base. Once drawers are put in, the unit will be quite
heavy. It is recommended to put the cabinet in the desired location before putting in
the drawers. Once drawers are added, the flat file is complete and ready to use.
Cabinet Assembly Instructions
HOW TO ASSEMBLE THE
Richeson Flat Files
#880116 - #880120
Imported Easels by Jack Richeson & Co., Inc. - Kimberly, WI - Phone: 1-800-233-2404 - www.richesonart.com 2/22
Separate components into a drawer group and a cabinet group and keep the corre-
sponding hardware with each.
For cabinet assembly, it is recommended to dry fit the base and top first. Then, for
best results and maximum stability, secure all wood dowels with wood glue.
Note: Please, open box, remove all pieces and check for damages before beginning assembly.
(Extra wood framing was used to protect flat file components and can be discarded.)
#880117 shown
A
B
CD
E
F
5
C/D
E
1
F
B
3
A
B
C
Please Note: Flat File parts are not labeled; letters below were
created for instructional purposes only.
Question and Answer IconNeed help?

Do you have a question about the Jack Richeson 880116 and is the answer not in the manual?

Summary

Richeson Flat Files Assembly Guide

Cabinet Assembly Instructions

Step-by-step guide for assembling the main cabinet structure.

Pre-drill Top and Attach Frame

Prepare the top piece by inserting dowels and securing it to a frame.

Attach Base Frame

Secure the base frame with dowels and screws to the prepared base.

Attach Cabinet Sides

Attach the side panels to the main frame using plastic dowels and screws.

Connect Top and Base Assemblies

Join the assembled top and base sections, securing them to the sides.

Install Hardboard Backing

Fit and secure the hardboard backing to the rear of the cabinet.

Final Cabinet Placement

Position the assembled cabinet before adding drawers.

Drawer Assembly Instructions

Step-by-step guide for constructing individual drawers.

Prepare Drawer Frame Components

Insert dowels into drawer sides/front and assemble frame with screws.

Install Drawer Bottom and Paper Catch

Slide and secure the hardboard bottom and attach the paper catch.

Assemble and Attach Drawer Face and Handles

Connect drawer face with dowels/screws and mount handles.

Repeat for Multiple Drawers

Repeat the drawer assembly process for all required drawers.

Multi-Drawer Unit Assembly

Specific guidance for assembling 8, 10, or 15 drawer configurations.

Overview

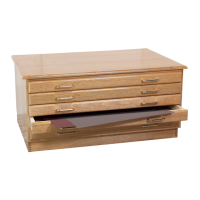
This document provides assembly instructions for the Richeson Flat Files, available in models #880116 and #880120. These are multi-drawer storage units designed for organizing and storing flat items, likely artwork, documents, or blueprints, given the "flat file" designation and the manufacturer's focus on art supplies. The units are imported by Jack Richeson & Co., Inc.

Function Description:

The Richeson Flat Files serve as a robust and organized storage solution for flat materials. The assembly process involves constructing a main cabinet frame and then assembling individual drawers, which are subsequently inserted into the cabinet. The design emphasizes stability and durability, utilizing wood dowels, screws, and hardboard components. The modular nature, especially for multi-unit configurations (8, 10, or 15 drawers), allows for stacking and secure attachment, providing a customizable storage system.

Important Technical Specifications (Derived from Hardware and Components):

Cabinet Components:

  • Parts:
    • Base (A): Forms the bottom foundation of the cabinet.
    • Frames (B): Two rectangular frames used for the top and bottom structure.
    • Sides (C & D): Two side panels that define the cabinet's height and house the drawer brackets.
    • Hardboard Backing (E): Provides structural rigidity and encloses the back of the cabinet.
    • Top (F): The finished top surface of the cabinet.
  • Hardware (Standard Unit):
    • Wood Dowels: 8 total (4 for top assembly, 4 for base assembly).
    • Plastic Dowels: 8 total (for attaching side panels).
    • Screws:
      • 3 - 1 1/8" screws (for securing the top frame).
      • 12 - 1 1/2" screws (for securing the base frame, attaching sides to base, and attaching sides to top frame).
      • 16 - 5/8" screws (for securing the hardboard backing; 12 for #880116 model).
  • Construction Materials: Primarily wood components (frames, sides, top, base) and hardboard for the backing.

Drawer Components (Per Drawer):

  • Parts:
    • Back Piece (A): Forms the rear of the drawer box.
    • Side Pieces (B & C): Two side panels of the drawer box.
    • Front Piece (D): Forms the front of the drawer box, where the drawer face attaches.
    • Hardboard Bottom (E): The base of the drawer.
    • Paper Catch (F): A component likely designed to prevent papers from sliding out or getting caught.
    • Finished Drawer Face (G): The visible front panel of the drawer, where the handle is attached.
  • Hardware (Per Drawer):
    • Plastic Dowels: 8 total (for connecting back and front pieces to side pieces).
    • Screws:
      • 4 - 1 1/2" screws (for securing the drawer box components).
      • 10 - 5/8" screws (for attaching the hardboard bottom and paper catch).
      • 1 - 1 1/8" screw (for securing the drawer face).
    • Wood Dowels: 2 total (for attaching the drawer face).
    • Bolts: 4 total (for attaching handles).
    • Handles: 2 total.
  • Construction Materials: Primarily wood components (drawer box, face) and hardboard for the bottom.

Usage Features:

  • Assembly Recommendations:
    • Pre-Assembly Check: Users are advised to open the box, remove all pieces, and check for damages before starting assembly. Extra wood framing used for protection can be discarded.
    • Component Separation: Separate components into "drawer group" and "cabinet group" with their corresponding hardware.
    • Dry Fit: For cabinet assembly, it is recommended to dry fit the base and top first.
    • Wood Glue: For best results and maximum stability, all wood dowels should be secured with wood glue.
    • Assistance for Heavy Parts: The assembled top (B&F) is quite heavy, and assistance is recommended for attaching it to the base. Similarly, stacking multiple units requires assistance.
    • Placement Before Drawers: Once drawers are put in, the unit becomes quite heavy. It is recommended to place the cabinet in its desired location before inserting the drawers.
  • Drawer Bracket Orientation: Critical instruction to ensure metal drawer brackets are in a "7" position, not an "L" position, during side panel attachment.
  • Screw Length Caution: Emphasizes using the correct screw length (3 - 1 1/8" screws for the top frame) to avoid damaging the flat file top.
  • Troubleshooting Tips:
    • If the assembled top doesn't fit properly into the side slots, slightly loosen screws on the bottom of one side to create more space, then retighten.
    • If the hardboard backing is difficult to insert, slightly loosen screws on the top and bottom of one side and retighten after the backing is in place.
    • If the hardboard drawer bottom doesn't slide in smoothly, slightly loosen one or two side screws to create more space.
  • Multi-Unit Assembly (8, 10, or 15 Drawer Units):
    • Bottom Unit: Assemble the cabinet for the bottom unit first, but use six 1 1/2" screws to attach the sides to the remaining frame in step four of the cabinet assembly.
    • Top Unit: Assemble the cabinet for the top unit by following step one of cabinet assembly, and in step two, secure the sides to the bottom frame using six 1 1/2" screws.
    • Middle Unit (15 Drawer Unit Only): Assemble the middle unit using 12 - 1 1/2" screws to connect sides to the frames. This unit will not have top or base pieces.
    • Stacking: Stack units on top of one another (assistance recommended).
    • Securing Stacked Units: Secure units together by screwing three 1 1/2" screws through the stacked frames (3 for 8 and 10 drawer units; 6 for 15 drawer units).

Maintenance Features:

  • The document does not explicitly detail maintenance features beyond the initial assembly and proper handling. However, the use of wood and hardboard suggests standard wood furniture care, such as dusting and avoiding excessive moisture. The robust construction with screws and dowels implies a durable product that, once assembled correctly, should require minimal ongoing maintenance other than keeping it clean. The ability to loosen and retighten screws for troubleshooting during assembly also hints at potential for minor adjustments if components shift over time.

In summary, the Richeson Flat Files are designed as a sturdy, multi-drawer storage system for flat items, with a clear emphasis on user-friendly assembly through detailed instructions and troubleshooting tips. The modular design allows for flexible configurations to meet varying storage needs.

Jack Richeson 880116 Specifications

General IconGeneral
BrandJack Richeson
Model880116
CategoryIndoor Furnishing
LanguageEnglish

Related product manuals