EasyManua.ls Logo

Jacuzzi 67662-X5104 User Manual

Jacuzzi 67662-X5104
4 pages
To Next Page IconTo Next Page
Page #1 background imageLoading...
Page #1 background image
TUB FILLER FAUCET
Jacuzzi Item # NW50826 / NW50827 / NW50817
MODEL # 67662-X5104 / 67662-X5101 / 6762-X517001
1
Questions, problems, missing parts? Before
returning to your retailer, call our customer service
department at 1-800-288-4002, 6 a.m. - 5 p.m.,PT
and 9 a.m. - 8 p.m.,ET, Monday - Friday
ATTACH YOUR RECEIPT HERE
Serial Number ___________________
Purchase Date ___________________
2018/07/20 V1
SAFETY INFORMATION
Please read and understand this entire manual before attempting to assemble, operate, or install the product.
WARNING:
Follow the installation instructions carefully. Proper installation is the installer’s responsibility.
Failure to follow correct installation procedures can result in the faucet being loose, which can result in serious injury.
Not suitable for installation in concrete floors.
CAUTION:
Check local building codes before beginning installation to ensure compliance.
PREPARATION
Before beginning the assembly of this product, make sure all parts are present. Compare parts with the package
contents and hardware contents list. If any part is missing or damaged, do not attempt to assemble the product.
Estimated Assembly Time: 90 minutes (including removal of old faucet)
Tools Required for Assembly (not included): Adjustable Wrench, Silicone Sealant, Phillips Screwdriver, Pencil, Electric Drill
Question and Answer IconNeed help?

Do you have a question about the Jacuzzi 67662-X5104 and is the answer not in the manual?

Jacuzzi 67662-X5104 Specifications

General IconGeneral
BrandJacuzzi
Model67662-X5104
CategoryPlumbing Product
LanguageEnglish

Summary

Safety Information

Warnings

Crucial installation warnings about procedures and suitability for floors.

Cautions

Important precautions regarding local building codes before installation.

Preparation

Assembly Overview

Information on checking parts, estimated assembly time, and required tools.

Assembly Instructions

Step 1: Floor Drilling

Instructions for drilling holes in the floor for installation.

Step 2: Spout Alignment

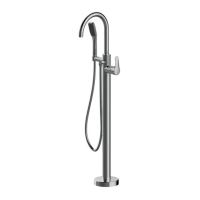
Procedure for aligning and tightening the spout and handle.

Step 3: Escutcheon Placement

Guide for placing the escutcheon onto the standpipe base.

Step 4: Standpipe Attachment

Instructions for screwing the standpipe onto the mixer and connecting supply lines.

Step 5: Assembly Securing

How to secure the standpipe and ensure correct anchors for floor types.

Step 6: Shower Hose Connection

Connecting the shower hose to the mixer and hand shower.

Assembly Instructions

Step 7: Supply Line Connection

Connecting flexible supply lines to water supplies.

Step 8: Flushing and Leak Check

Procedure for flushing debris and checking for water leaks after installation.

Diverter Usage Instructions

Guidance on using the diverter pin for spout-to-hand shower water transfer.

Care and Maintenance

Troubleshooting

Warranty

Replacement Parts List

Related product manuals