6
IT - Schermo principale
1. Programma Tipo AFHDS2A 1. Programm Typ AFHDS
2. Numero modello 2. Numero modello
3. Nome modello 3. Nome modello
4. Daten Information 4. Trimmare
5. Trimmare 5. Batteria / Pacco batteria
6. TX Batteria / Pacco batteria 6. Tipo di modello
7. RX Batteria / Pacco batteria 7. Trimmare
8. Tipo di modello
9. Trimmare
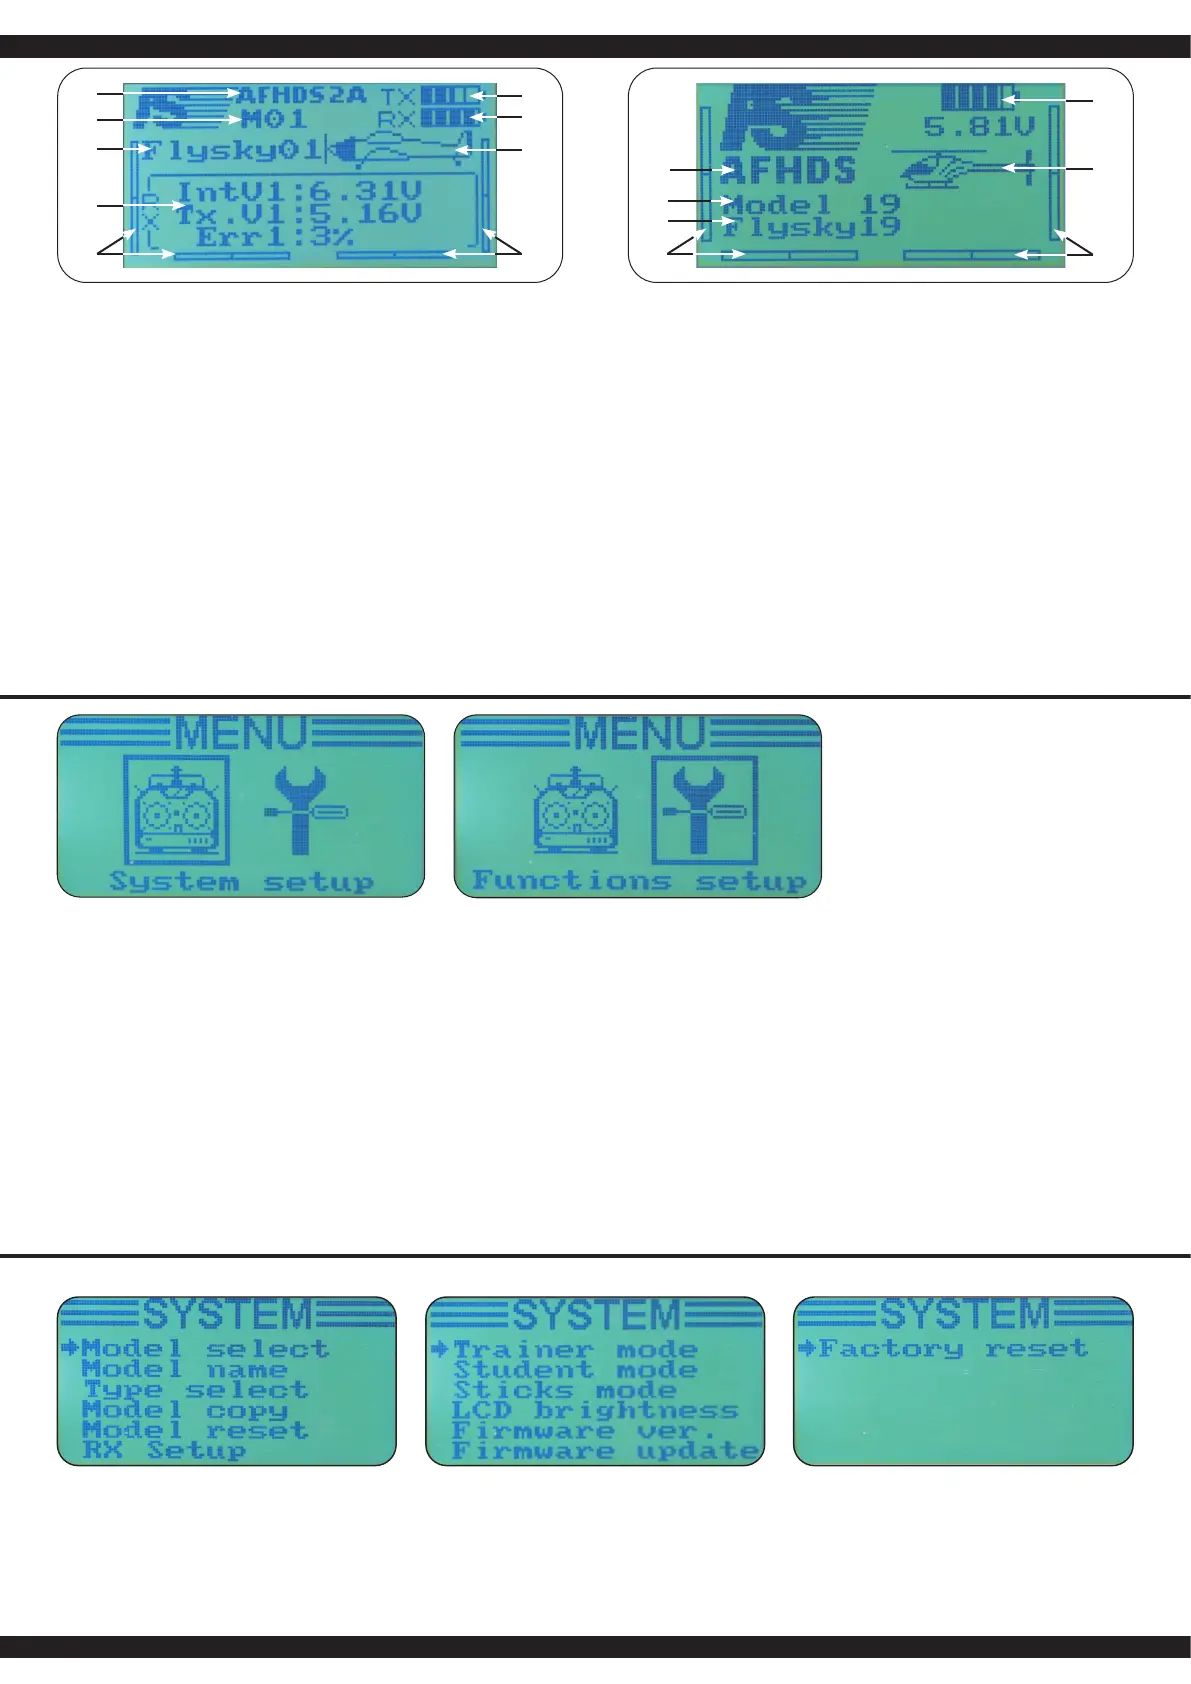
1. Nella nestra principale, si trovano Tipo di modulazione (ADFHDS2A e AFHDS) e le seguenti
informazioni:
2. Numero di modello selezionato (da 1 a 20): 20 modelli pos sono essere memorizzati nel
trasmittente, in modo da poter accedere o cambiare istantaneamente ai modelli desiderati.
3. Nome modello: è possibile dare ad ogni modello un nome (max. 8 caratteri) cosi i relativi modelli
sono più facilmente selezionabile.
4. AFHDS 2A: indica i dati della telemetria
AFHDS: le quattro barre di trimming indicano la posizione del trim
5. AFHDS 2A: le quattro barre di trimming indicano la posizione del trim
AFHDS: Capacità di visualizzazione Batteria/Pile trasmittente
6. AFHDS 2A: come 5 da AFHDS!
AFHDS: indica il tipo di modello scelto
7. AFHDS 2A: Capacità di visualizzazione Batteria/Pile trasmittente
AFHDS: quattro barre di trimming indicano la posizione del trim
8. AFHDS 2A: indica il tipo di modello scelto
GB - Main screen
1. Program type AFHDS2A 1. Program type AFHDS
2. Model number 2. Model number
3. Model name 3. Model name
4. Data feedback 4. Left trim
5. Left trim 5. Battery
6. TX Battery 6. Mode type
7. RX Battery 7. Right trim
8. Mode type
9. Right trim
1. Besides the modulations type (AFHDS2A or AFHDS), the main screen displays the following
information:
2. Selected model number (1 to 20): 20 dierent models can be saved in the transmitter allowing
you to instantly switch to 20 dierent models.
3. Model name: each model can be named with a 8 characters name that allow you to easily
recognize the associated models.
4. AFHDS 2A: Shows the data of telemetry
AFHDS: The four trimming bars show the position of the set value
5. AFHDS 2A: The four trimming bars show the position of the set value
AFHDS: Shows capacity of transmitter battery
6. AFHDS 2A: As in point 5 - AFHDS
AFHDS: Shows the chosen model type
7. AFHDS 2A: Shows capacity of receiver battery
AFHDS: The four trimming bars show the position of the set value
8. AFHDS 2A: Shows the chosen model type
1
3
4
5
6
7
2
3
4
5
6
7
8
9
1
2
Menu principale
Il menu principale è diviso in due parti, Sistema e Setup! Nel menu di sistema del trasmittente, è pos-
sibile impostare e salvare 20 modelli. Il menu delle funzioni è quindi utilizzato per impostare i singoli
modelli. Dalla schermata principale arrivate nel menu principale premendo il tasto „OK“ per un tem-
po prolungato. Per arrivare dal menu principale nelle impostazioni di sistema, premere e rilasciare
il tasto „OK“. Il punto desiderato del sistema di sotto-menu selezionate con il tasto „UP“ o „DOWN“
scorrere no al punto di programma appropriato e selezionarla premendo il tasto „OK“. Le rispettive
impostazioni vengono confermati e eettuati dal tasto „CANNEL“ . La maggior parte delle schermate
seguenti saranno trattati in base a questo schema. Ogni impostazione di memoria va confermato
con il tasto„OK“.
Per uscire dalla voce di menu corrente, premere il tasto „OK“.
1. Sceglere i parametri con il tasto „Enter“.
2. Utilizzare la manopola „UP“ e „Down“ per modi care il valore del parametro selezionato.
3. Premere il pulsante „OK“ per salvare le impostazioni e tornare al parametro precedente.
4. Premere il pulsante „Cancel“ per uscire senza salvare le nuove impostazioni e tornare al
parametro precedente.
Per tornare alla schermata precedente, premere il tasto „Cancel“. Premendo ripetutamente il tasto
è possibile scorrere indietro no alla schermata principale.
Main Menu
The main menu is seperated into two sections, system and functions setup. The system menu
allows you to set up the transmitter and manage the 20 models. The function menu is used to set up
each model seperately. To enter the main menu, long press the „OK„ . Then use the „Up“ and „Down“
Key to select the desired submenue and press again „OK“. Then, use the „Up“ and „Down“key to
select the desired submenu and press again „OK“.
Most of following screens work according to this simple scheme:
1. Use the „OK“ key to select the parameter to modify.
2. Use the „UP“ and „Down“ key to modify the value of the selected parameter.
3. Long Press the „Cancel“ key to exit and save the new parameters.
4. Short Press the „Cancel“ key to exit without saving the new parameters.
To return to the previous screen, press the „Cancel“ key. You can
repeat that operation until the main screen.
Impostazioni di sistema System settings

 Loading...