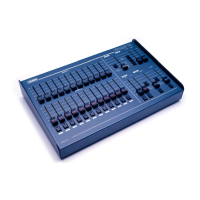
The Jands Stage 12/24 is a lighting control console designed for economical pricing, compact size, and expandability, offering features typically found in more elaborate consoles. It supports the USITT (1990) DMX-512 protocol, ensuring compatibility with leading lighting equipment manufacturers and allowing for system expansion without rendering existing infrastructure obsolete.
Function Description:
The console provides comprehensive control over lighting channels, presets, chases, and scenes. It features two banks of preset faders for setting individual channel levels, with master faders for each bank (P1 and P2) to scale their output. Flash buttons are available for momentary channel activation, and two independent Grab faders allow for storing and recalling scenes. A dedicated Chaser section enables dynamic lighting sequences with adjustable speed, direction, and level, and can be triggered by an audio signal. The console can operate in a "Wide Mode" to double the number of available control channels, effectively turning a Stage 12 into a single-preset 24-channel console (or a Stage 24 into a 48-channel console). It can also function as a slave console for Jands Event and ESP II consoles.
Important Technical Specifications:
- Power Input: 12 V DC via a supplied plug-pak (2.5mm co-axial connector).
- Power Consumption: 6 watts for Stage 12 (12 channels), 9 watts for Stage 24 (24 channels).
- DMX Output: USITT DMX-512 (1990) Protocol, Cannon 5 pin AXR connector.
- Pin 1: SHIELD
- Pin 2: SIGNAL -
- Pin 3: SIGNAL +
- Pin 4 & 5: NOT USED
- Audio Trigger Input: 6.5mm (1/4") jack, line level, 100 Hz trigger frequency. Supports stereo plug for balanced signals or mono plug for unbalanced signals.
- Faders: 60 mm presets.
- Plugpack Rating: Standard 12 volt DC, 0.5A for 12 channels, 0.75A for 24 channels. Plug tip positive.
Usage Features:
Presets:
- Channel Preset Faders: Two rows (Preset 1 and Preset 2) for setting individual channel levels. The output level is scaled by the corresponding P1 or P2 Master fader.
- P1 and P2 Master Faders: Scale the overall level of their respective preset banks. Crossfading between P1 and P2 allows for smooth transitions between two preset settings.
- Doubling Number of Channels (Wide Mode): The console can be configured (via DIP switch #4) to operate as a single preset console, effectively doubling the number of control channels (e.g., Stage 12 becomes a 24-channel console). In this mode, only the first 12 (or 24 for Stage 24) channels have flash buttons.
- Channel Flash Buttons: Momentarily flash a channel to the level set by the Add/Solo Master fader.
- Add/Solo Master Switch: Toggles the function of all flash buttons (channel, preset master, grab) between "Add" (LED OFF - flashes output to set level) and "Solo" (LED ON - flashes output to set level while turning off all other desk outputs).
- Add/Solo Fader: Scales the intensity of all flash buttons. Setting this fader to 0 in Solo mode and pressing any flash button achieves a dead blackout (DBO) effect.
Grabs (Scenes):
- Grab Faders 1 and 2: Control the output level (0-100%) of the stored Grab scenes.
- Grab Flash Buttons 1 and 2: Flash the Grab'd scene to the Add/Solo level, similar to preset flash buttons.
- Grabbing a Scene:
- Select a Grab fader. If its LED is on, press the button to clear it.
- Use Preset faders, Flash buttons, Chaser, and other Grab fader outputs to create the desired scene.
- Press the corresponding Grab button to store the current output. The LED in the Grab button will illuminate to indicate a scene is stored.
Chases:
- Chase Level Fader: Controls the overall output level of the chase.
- Rate Fader: Adjusts the chase speed from stop (zero) to 1000 beats per minute (full).
- Chase Direction Button: Toggles the chase direction between forward (ascending, LED off) and reverse (descending, LED on).
- Assign Button: Enters chase assign mode (LED on). In this mode, channel mimic LEDs show assigned channels, and pressing a channel flash button adds or removes that channel from the chaser. All channels are automatically assigned to the chaser on power-up.
- Go/Cue Button: Its operation depends on DIP switch #3.
- DIP switch #3 OFF: Alternately activates/deactivates the chase. LED flashes at step rate when inactive, solid when active. Resets chase to lowest/highest step when pressed.
- DIP switch #3 ON: Chase is always active at the chase level fader's setting. The Go/Cue button acts as a chase flash button, flashing the chase to the Add/Solo fader's level. In Solo mode, other outputs are removed. Resets chase to lowest/highest step when pressed.
- Audio Trigger: When a plug is inserted into the Audio Trigger input, the chase is automatically stepped by the audio signal, overriding the Rate fader.
Console Configuration (DIP Switches - accessible from rear panel):
- #1 (Slave Mode): Use the STAGE as a slave to an Event or ESP II master console. When #1 is ON, all other switches are ignored.
- #2 (P2 Master Reverse): Reverses the operation of the P2 master fader (full at 0 position) for single-action crossfades. Ignored if #4 is ON.
- #3 (Chase Operation): Changes the operation of the Go/Cue button (see "Go/Cue Button" above).
- #4 (Single Preset Wide Mode): Console operates as a single preset console, doubling channels (e.g., Stage 12 becomes 24 channels). Flash buttons are only on the first 12 (or 24 for Stage 24) channels. When #4 is ON, #2 is ignored.
- Changing Configuration: Remove console power, change DIP switch positions, then reapply power for changes to take effect.
Maintenance Features:
- The manual does not explicitly detail maintenance features beyond the configuration via DIP switches.
- It is important to note that all settings are lost when power is removed from the console.
- The console uses a standard 12V DC plug-pak; ensure the correct rating (0.5A for 12 channels, 0.75A for 24 channels) and plug tip positive. Do not use the plug-pak to power other equipment.