124610 Rev. B
5
ENGLISH
CLEANING AND MAINTENANCE
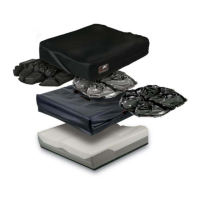
A. CLEANING AND DISINFECTING YOUR AIR INSERT
Cleaning and disinfecting are two separate processes. Cleaning
must precede disinfection.
CLEANING THE AIR INSERT
To clean the Air Insert, gently pull it out of the recess in the foam
base, taking care to gently pull the valve through the foam. Deflate
the cushion, close the valve(s) and place in a large sink. Gently
scrub the air cells and the spaces between them with a soft plastic
bristle brush, sponge or wash-cloth. Liquid dishwashing or laundry
detergent or other general-purpose cleaning product is suggested.
For institutional cleaning, a general housekeeping disinfectant
cleaner may be used.
DISINFECTING THE AIR INSERT
To disinfect the Air Insert, use a germi-cidal product that meets
infection control needs. A disinfectant with tuberculocidal
properties is recommended. Follow the manu-facturer’s dilution
directions. For home disinfection, use solutions of approximately
1/2 cup liquid household bleach per quart of water (125 ml bleach
to 1 liter of water). Keep the clean cushion wet with bleach
solution for 10 minutes. Rinse thoroughly and dry.
WARNING
Disinfectants are not effective on porous surfaces, such as
foam, if the cushion becomes soiled or contaminated. DO
NOT use with multiple users.
CAUTION– DO NOT USE OIL-BASED LOTIONS OR LANOLIN ON
YOUR CUSHION AS THEY MAY COMPROMISE THE
INTEGRITY OF THE NEOPRENE RUBBER.
B. REPAIRS
Each JAY Fusion Cushion with a Air Insert is shipped complete
with a repair kit and instructions for minor repairs. The
following information can be used if repair instructions have
been lost or misplaced.
IF A LEAK OCCURS:
1. Place your cushion cells down and over-inflate until all four
corners touch.
2. Immerse the over-inflated cushion in water to locate the
leak.
3. Once the leak has been located, mark the leak by inserting a
toothpick into the hole.
4. Allow the cushion to dry thoroughly.
5. Remove the toothpick, and clean the area around the hole
with the alcohol wipe provided. Let the surface dry.
6. Peel the backing from the patch provided, and centering the
patch, place it over the hole.
7. Press the patch down firmly until a good seal is achieved.
8. The cushion is now ready for use. Adjust the cushion for
proper inflation following the instructions in this manual.
Although patches do not change the performance of the cushion,
they should be monitored periodically to ensure effectiveness in
addressing the leak. If the patch is not successful in addressing the
problem, or if more extensive damage is present, please contact
your supplier immediately.
Replacing Valves
1. Firmly grip the rubber valve stem and remove the old infla-
tion valve by using pliers.
CAUTION– DO NOT REMOVE AN INFLATION VALVE BY HOLDING
THE CUSHION AND PULLING THE VALVE, DOING SO
MAY TEAR THE CUSHION.
2. Moisten the ribbed end of the replacement valve and insert it
into the valve stem until the rubber is snug to the body of
the valve.
 Loading...