ENGLISH OPERATION MANUAL
JB SYSTEMS® 7/55 DSP6
MENU ITEMS
• DMX FAIL:
The DSP6 works with analog 0/10V or digital DMX-512 input signals. DMX-signals
have priority to the analog inputs. This means that you can only use the analog
inputs when no DMX-signal is detected. When the DMX-signal is not present you
have 3 options:
• Hold:
In case of DMX-fail the DSP6 keeps the last scene on the outputs.
• Press “menu” and “up/down” until the display shows “Dmx fail”.
• Press “menu” again: the display shows one of the 3 options.
• Press “up/down” until the display shows “Hold”
• Press “esc” to store this option and leave the menu.
• Analog:
In case of DMX-fail the DSP6 goes in analog 0/10V mode.
• Press “menu” and “up/down” until the display shows “Dmx fail”.
• Press “menu” again: the display shows one of the 3 options.
• Press “up/down” until the display shows “Analog”
• Press “esc” to store this option and leave the menu.
• Prog 01 … Prog 12:
In case of DMX-fail the DSP6 shows one of the 12 built-in patterns.
• Press “menu” and “up/down” until the display shows “Dmx fail”.
• Press “menu” again: the display shows one of the 3 options.
• Press “up/down” until the display shows the desired program (Prog 01 … 12)
• Press “esc” and “up/down” buttons to select the proper speed.
• Press “esc” to store the selected speed and leave the menu.
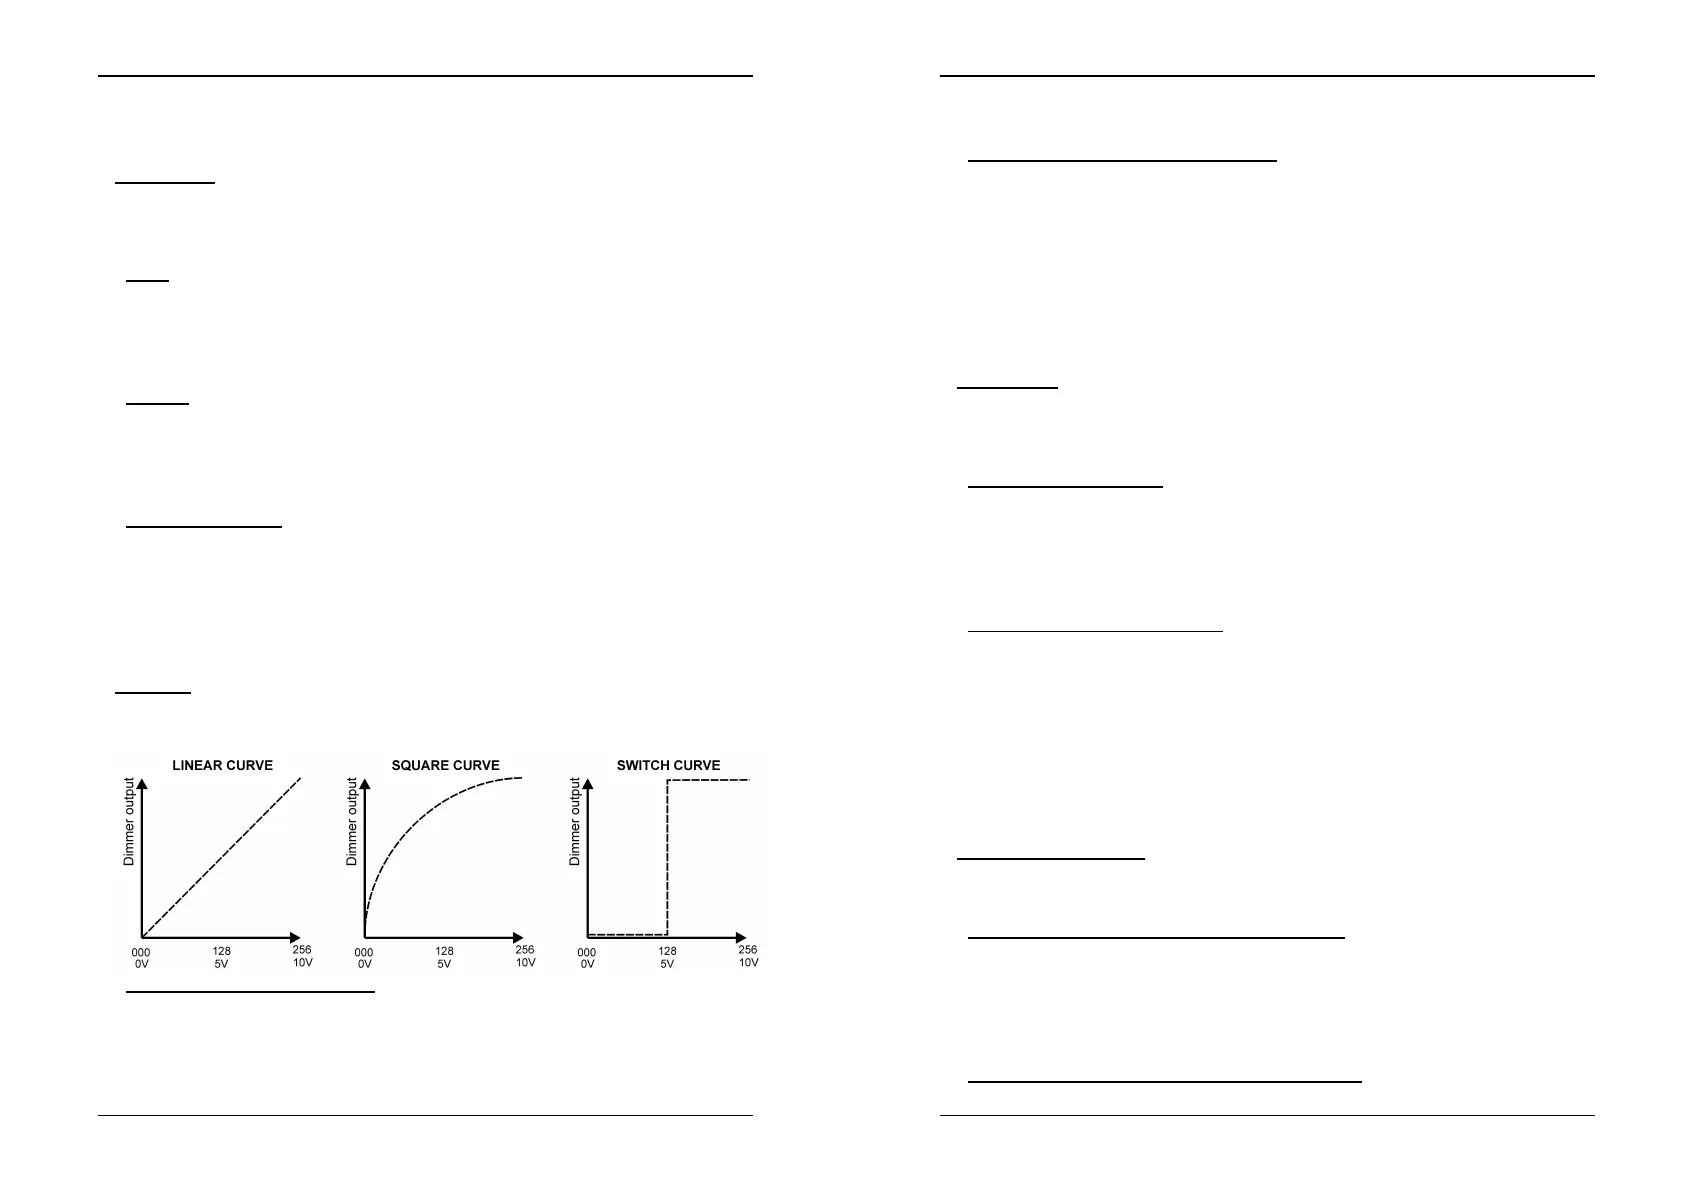
• CURVE:
With the DSP6 you can select a different working mode (curve) for each individual
channel. This is a nice feature if you need to switch light effects on/off while at the
same time you have to dim lamps. 3 Curves are available:
• Select a curve for all channels:
• Press “menu” and “up/down” until the display shows “Curve”.
• Press “menu” again: the display shows one of the 2 options.
• Press “up/down” until the display shows “All”
• Press “menu” to select this option.
ENGLISH OPERATION MANUAL
JB SYSTEMS® 8/55 DSP6
• Press “up/down” to select one the 3 curves
• Press “esc” to store the selected curve and leave the menu.
• Select a curve for individual channels:
• Press “menu” and “up/down” until the display shows “Curve”.
• Press “menu” again: the display shows one of the 2 options.
• Press “up/down” until the display shows “Single”
• Press “menu” to select this option: the display shows the channel number on
the first row and the curve on the second row.
• Press “menu” to toggle between both rows.
• Press “up/down” to set the desired curves and channel numbers until all
channels are set.
• Press “esc” to store the selected curves and leave the menu.
• PREHEAT:
On the DSP6 you can set a preheat level up to 50% for all channels in one time or
for each channel separately. While the preheat function keeps the lamp filament at a
certain temperature, the turn on current of the lamp is much lower. This extends the
lamp life considerably in many cases.
• Preheat on all channels:
• Press “menu” and “up/down” until the display shows “Preheat”.
• Press “menu” again: the display shows one of the 2 options.
• Press “up/down” until the display shows “All”
• Press “menu” to select this option.
• Press “up/down” to set the desired overall level.
• Press “esc” to store the selected level and leave the menu.
• Preheat on individual channels:
• Press “menu” and “up/down” until the display shows “Preheat”.
• Press “menu” again: the display shows one of the 2 options.
• Press “up/down” until the display shows “Single”
• Press “menu” to select this option: the display shows the channel number on
the first row and the preheat level on the second row.
• Press “menu” to toggle between both rows.
• Press “up/down” to set the desired preheat levels and channel numbers until all
channels are set.
• Press “esc” to store the selected preheat levels and leave the menu.
• DMX ADDRESSING:
On the DSP6 you can set the DMX start address for the complete unit or for each
channel separately. Due to this “soft patch” option DMX addressing becomes
extremely flexible.
• Setting the start address for the complete unit:
• Press “menu” and “up/down” until the display shows “Dmx addr”
• Press “menu” again: the display shows one of the 2 options.
• Press “up/down” until the display shows “Block”
• Press “menu” to select this option.
• Press “up/down” to set the desired start address for the DSP6.
• Press “esc” to store the selected level and leave the menu.
• Setting the start address for individual channels:
 Loading...