Die Set Installation and Bending Procedure
There are two types of forming dies provided for the Model 3 Bender. Those with drive holes and those without. The drive holes
aretheve1"holesdrilledinacircularpatternaroundtheformingdie'scenterhole.A7/8"diameterpininsertsthroughthedrive
links and through the forming die's drive holes when in operation. The drive holes are drilled 1/8" oversize to provide easier pin
installation.Toprepareforbending,followthestepsbelowdependingonthetypeofdieset.
WITH DRIVE HOLES:
Place the forming die into the bender using the 1"
framepin.Ifbendingsquaretubing,thoroughlylubricate
theformingdie'sgroove.However,ifbendingroundtubing
orpipe,NEVERlubricatetheformingdie'sgroove.Ifyou
do,thetubewilltendtoslipbackwardsinthediewhile
bending,whichinturncausesthetubingtokinkorwrinkle.
PlacethetubeintotheformingDie.InstalltheU-Strap
withtheshorter7/8"U-strappin.Ifnecessary,tightenthe
U-strapbolttopreventthetubefromslippingthroughthe
die will bending. It's a good idea to cut a slice out of a
bigger piece of tubing place it between the bolt and tubing
to prevent the bolt from dimpling the tubing. If bending
thinwalltubing(.065"orthinner)youmustalwaysuse
theU-strapbolt.
Next,usingthe7/8"FollowbarPin,placetheFollowbar
into the bender. See page 5 for the correct way to install
the Followbar. Lightly spray some lubricant on the outside
of the tubing so that the tubing will slide through the Followbar easily. Any spray lubricant works well. If you are bending tubing
withawallthicknessof.065"orthinneryoumaywanttoskipthelubeentirely.Thiswillhelpthefollowbarsticktothetubingduring
ratchet repositioning and generally helps prevent wrinkling. Make sure all pins are completely seated in their holes. Failure
to do this may cause damage to the bender links or worse yet the operator may slip and fall.
RotatetheRatchetLeverfullycounter-clockwise.EngagetheRatchetontotheouter3/4"drivelinkspacertube.Lightlypull
onthehandletopreloadthetubing.Donotpullhardenoughtoactuallybendthetubing.Usingafreehand,loosenthedegree
platenut.Rotatethedegreeplateuntilthedie'spointerisat0degreesandthenhandtightenthenuttosecureitintoposition.
Nowyou'rereadytobend.PullonthehandleinaclockwisedirectionuntiltheRatchetLevercannotrotateanyfurther.Returnthe
Ratchet Lever to the starting position. Initially release the Ratchet easily so as not to move the tubing and minimize spring back.
Reengagetheratchetandpullagain.WhenthelastRatchettoothisreached,returntheRatchetLevertoitsstartingposition.
Removethe7/8"DrivePinandrotatetheDriveLinkscounter-clockwiseuntiltheDrivePinmaybereinstalledthroughanother
holeintheBendingDie.Becarefulnottomovethetube.Nowrepeattheabovebendingsequenceuntilthedesireddegreeof
bendisobtained.Toreleasethetubingfromthebender,removethehandlefromtheRatchetLever.Insertitdiagonallythrough
the3/4"drivelinkspacertubesandpullcounter-clockwise.TheFollowbarwillreleaseitsgripandthetubingmayberemoved.
WITHOUT DRIVE HOLES:
These dies typically have a center line
radius of less than 3". Because the radius of
thedieissosmall,driveholescannotbedrilled
into the die. This does not present a problem
as the tube sizes for these dies is of relatively
small diameter and is easily bent. The ratchet
is not used.
Die installation procedure:
Swing the ratchet assembly out of the
way as shown below. Place the forming die
into the bender. Place the tubing to be bent
in the bender and using the 5 1/4" long drive
pin(nottheshorterU-Strappinthatisusually
used)installtheU-strap.Ifdesired,tightenthe
U-strapbolt tosecure thetubing tothe die.
This is not mandatory and may be omitted if
the tubing shows no signs of slipping through
thediewhilebending.Nowinstallthefollowbarbeingsuretheword'TOP'isfacingup.Rotatethedrivelinksuntiltheirfrontedge
pushesdirectlyontheU-strappinasshowningure6.Placethehandlediagonallythroughthedrivelinks'two3/4"spacertubes.
Lightlypullonthehandletopreloadthetubing.Donotpullhardenoughtoactuallybendthetubing.Usingafreehand,loosen
thedegreeplatenut.Rotatethedegreeplateuntilthedie'spointerisat0degreesandthenhandtightenthenuttosecureitinto
position.Now,simplypullthehandleandobservethepointeruntilthedesireddegreeisreached.
- 7 -
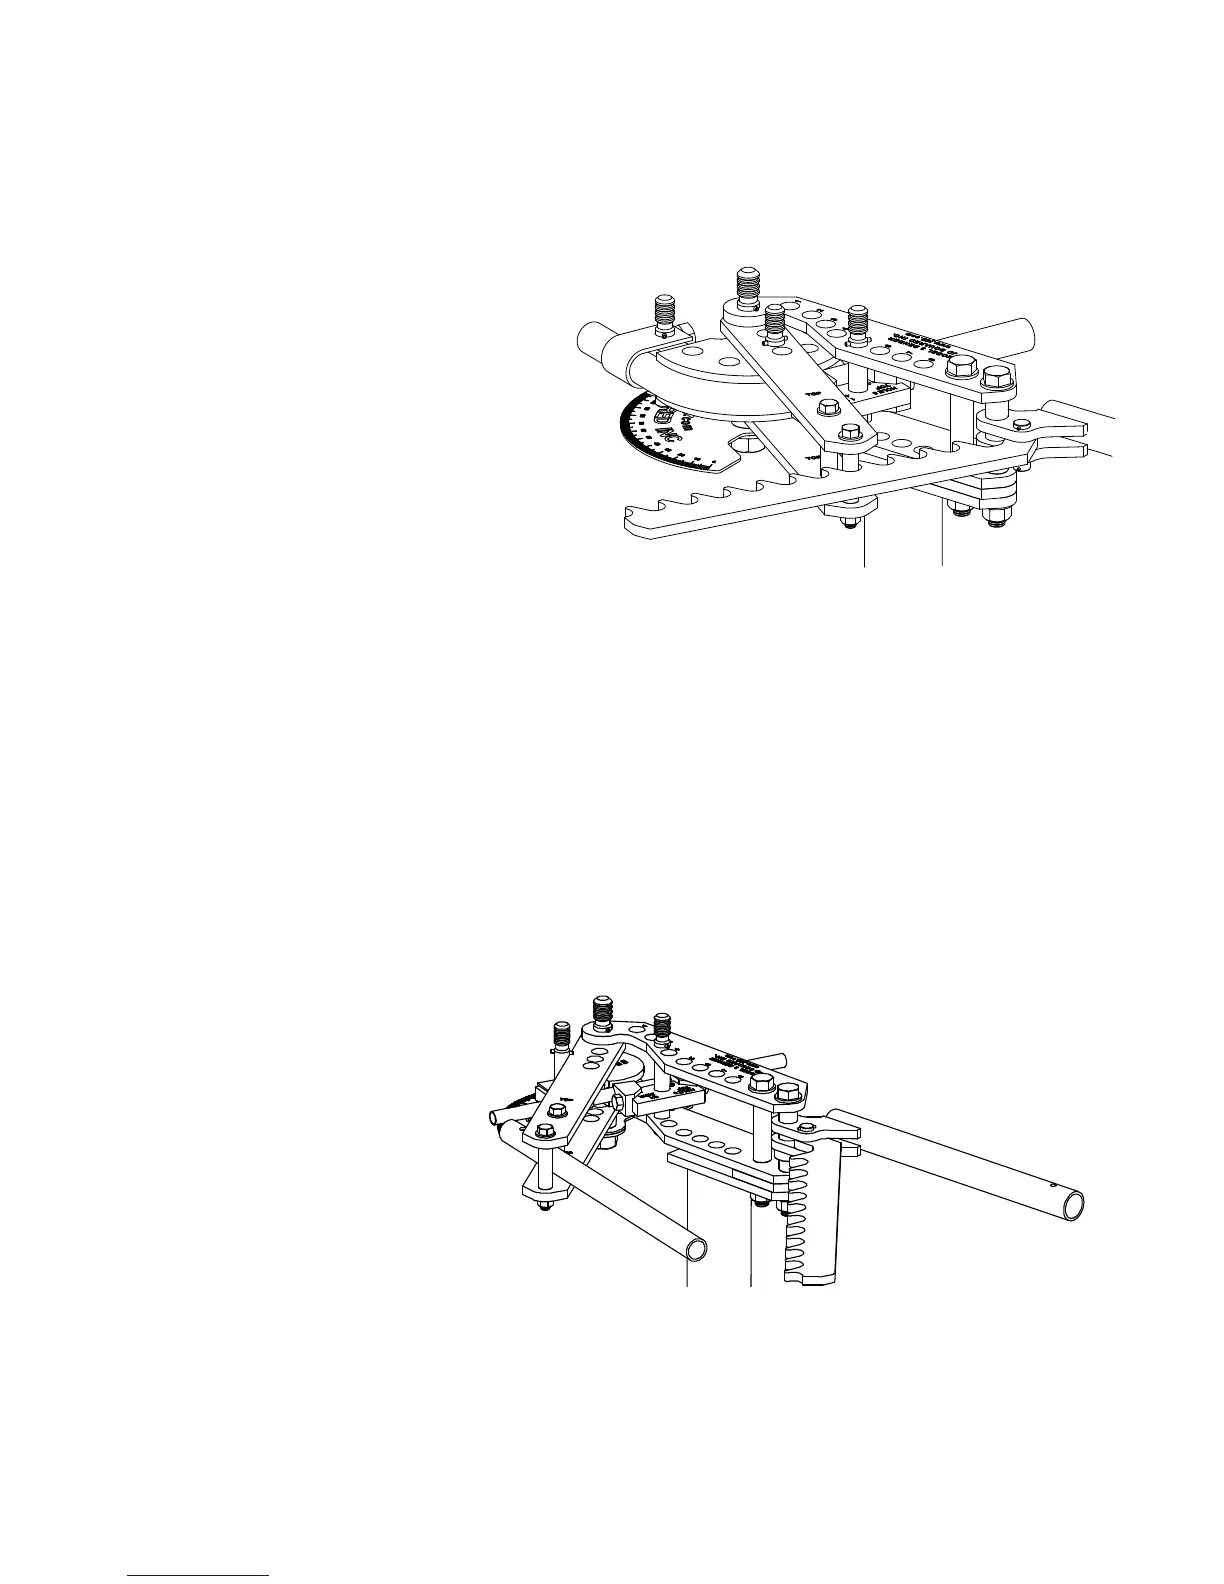
Figure 14 - Handle installed and ready to bend without drive holes
Figure 13 - Bending with drive holes and ratchet
 Loading...