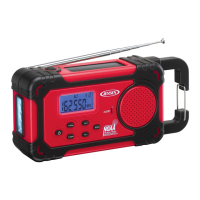
The JENSEN JEP-750 is a versatile AM/FM/NOAA Weather Band Radio designed for multi-source power operation and emergency preparedness. This robust unit combines a radio with a built-in LED flashlight and a USB charging port for portable devices, making it suitable for both everyday use and emergency situations.
Function Description:
The JEP-750 functions primarily as a radio, offering reception for AM, FM, and NOAA Weather Bands. It features a digital tuner with an LCD display for easy frequency selection and clock display. A key feature is its NOAA Weather Alert function, which allows the radio to automatically turn on and broadcast warnings during severe weather emergencies. The unit is equipped with multiple power sources, including a dynamo hand crank, solar panel, internal rechargeable lithium battery, and options for dry cell AAA batteries or USB power. Additionally, it includes a built-in LED flashlight with SOS flashing mode and a siren for emergencies, as well as a USB port for charging external portable devices like smartphones.
Important Technical Specifications:
- Power Requirement:
- 3 x AAA (UM-4) Batteries (not included)
- Built-in DC 3.7V, 800mAH Li-ion rechargeable battery
- USB Power DC 5V, 500mA (Max.)
- Frequency Range:
- FM: 87.5 - 108 MHz
- AM: 520 - 1710 KHz
- WX (Weather Band): CH1-7 (162.400 MHz to 162.550 MHz)
- Battery Type (Internal): 3.7V, 800mAH Li-ion rechargeable battery
- USB Output for Charging: 5V, 500mA (Max.)
- Display: LCD with backlight
- Alert Indicator: Front LED flashes during weather alerts.
- Charging Indicators (Back LED):
- USB Charging: Red (charging), Green (fully charged)
- Crank Charging: Red (charging)
- Solar Charging: Yellow (charging - requires strong/direct sunlight)
- Audio Output: Built-in speaker, Headphone Jack (3.5mm, earbuds not included)
- Antenna: Telescopic Antenna for FM/Weather Band, Internal Antenna for AM.
Usage Features:
- Multi-Power Operation: The JEP-750 can be powered by four distinct methods:
- Dynamo (Hand Crank): Lifting and rotating the crank handle generates electricity to charge the internal lithium battery. The CHARGING indicator lights up during cranking. It may require 5-6 minutes of cranking if the battery is completely drained.
- Solar Power: The unit features a solar panel on top. Placing the unit in direct sunlight charges the internal rechargeable battery, indicated by the solar charging indicator. This method is most effective outdoors under strong sunlight.
- USB Power: The unit can be charged via a mini USB DC input port using a 5V DC, 500mA output AC adaptor (not included) and a USB to mini USB cord (not included). The charging indicator will be red during charging and turn green when fully charged.
- Dry Cell Batteries: The unit can operate on 3 'AAA' (UM-4) alkaline batteries (not included), inserted into the battery compartment.
- Low Battery Indicator: An icon appears and flashes on the LCD display when the battery power is low, prompting the user to recharge or replace batteries.
- Radio Tuning:
- Manual Tuning: Tap the TUNE ▲/▼ buttons to manually adjust the frequency.
- Auto Scan Tuning: Press and hold the TUNE ▲/▼ buttons to automatically scan for strong signals.
- Band Selection: Tap the MODE button to cycle through AM, FM, and WB (Weather Band) modes.
- NOAA Weather Alert: In Weather Alert standby mode ("ALT" icon displayed), the radio automatically turns on when an alert is broadcast by the National Weather Service. It is recommended to use an AC adaptor for continuous power when in this mode to prevent battery drain.
- Clock Setting: In standby mode, press and hold the MODE button for 2 seconds to enter clock setting. Users can select 12-hour or 24-hour format and set the hour and minute using the TUNE ▲/▼ buttons.
- LED Flashlight: A built-in LED flashlight is located on the side of the unit. Press the Flashlight button once to turn it on/off. Quickly pressing it twice activates SOS flashing mode. Pressing and holding the Flashlight button activates a siren and flashing light for emergencies.
- USB Charging Port for Portable Devices: The unit includes a USB charging port (5V, 500mA max) to charge external devices. The internal rechargeable lithium battery must be fully charged for this function to work. Press and hold the power button for 2 seconds to activate "PHONE" charging mode. This feature does not work when operating on alkaline batteries.
- Headphone Jack: A 3.5mm headphone jack allows for private listening, automatically disconnecting the speaker when earbuds are plugged in.
Maintenance Features:
- Cleaning: Clean the unit with a damp (never wet) cloth. Avoid solvents or detergents.
- Battery Care:
- For the internal lithium battery, charge for 5-6 hours before first use. Avoid overcharging to prolong battery life.
- Do not burn, bury, puncture, crush, or disassemble lithium batteries. Recycle them properly.
- If using dry cell batteries, ensure correct polarity, do not mix old and new batteries, or different types (alkaline, carbon-zinc, rechargeable). Remove batteries if the unit will not be used for an extended period to prevent leakage.
- Reset Function: In case of a power surge or electric shock causing the unit to become unresponsive, a RESET button (located on the back under the rubber dust cover) can be pressed with a straightened paper clip or similar object. This clears system memory and erases previous settings.
- Environmental Responsibility: Jensen, through Spectra, promotes responsible recycling. Information on green initiatives and recycling sites can be found on their website.
- Placement: Avoid exposing the unit to excessive force, shock, dust, extreme temperatures, direct sunlight, hot/humid places, or sources of electrical noise.
- Warranty: A 90-day limited warranty covers defective materials or factory workmanship for units purchased and utilized within the U.S.A. The warranty requires proof of purchase and applies only if the product has not been subjected to misuse, abuse, or unauthorized modifications.