EasyManua.ls Logo

JL Audio SB-H-DELSOL/8W3v3 User Manual

JL Audio SB-H-DELSOL/8W3v3
3 pages
To Next Page IconTo Next Page
Page #1 background imageLoading...
Page #1 background image
Sheet SKU#011127 Revision 8/8/00
Installation Guide:
This Stealthbox™ is a product which requires professional installation skills and tools. Please read this
installation guide thoroughly before beginning the project. It will guide you step by step through the
installation. Some steps in this process may require two people to accomplish.
This enclosure is designed to mount behind the seats of the Honda Del Sol, replacing the factory-
installed storage compartments. It is absolutely vital that the enclosure be properly mounted to the
vehicle according to these instructions. Failure to mount the enclosure properly presents two prob-
lems: 1) the sub-bass performance will suffer due to the movement of the enclosure caused by the
force exerted by the woofers and 2) A loose enclosure could cause injury in the event of a collision or
sudden jolt.
STEP 1: Remove center console.
STEP 2: Remove rear storage compartments.
STEP 3: Remove back wall trim panel.
STEP 4: Remove rear side trim panels.
STEP 5: Unbolt and
remove seat belt
retractors from both
sides of the car (two
bolts per retractor).
SB-H-DELSOL/8W6 Stealthbox™
Fits Honda Del Sol
SB-H-DELSOL/8W6, JL AUDIO, Inc 1996 • Page 1
Question and Answer IconNeed help?

Do you have a question about the JL Audio SB-H-DELSOL/8W3v3 and is the answer not in the manual?

JL Audio SB-H-DELSOL/8W3v3 Specifications

General IconGeneral
BrandJL Audio
ModelSB-H-DELSOL/8W3v3
CategorySubwoofer
LanguageEnglish

Summary

Honda Del Sol Stealthbox Installation

Initial Component Removal

Remove center console, rear storage compartments, and trim panels.

Seat Belt Retractor Removal

Unbolt and remove seat belt retractors from both sides of the car.

Airflow Sealing with Foam

Stuff foam-rubber into body to seal airflow between trunk and interior.

Sheet Metal Hole Sealing

Seal small holes in bottom sheet metal using duct tape or silicone.

Reinstallation of Trim and Retractors

Reinstall seat belt retractors and rear side trim panels.

Stealthbox Positioning and Drilling

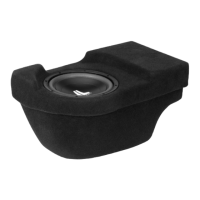
Place Stealthbox, drill pilot holes, then enlarge with a 1/2" bit.

U-Nut Installation

Insert supplied 'U-nuts' through factory holes over drilled holes.

Final Trim and Box Mounting

Reinstall rear center trim, align box, insert bolts, and tighten.

Wiring and Final Touches

Connect speaker wires, test for rattles, glue carpet, and reinstall console.

Related product manuals