Do you have a question about the JL Audio TR650-CSi and is the answer not in the manual?
Welcome message for choosing the JL Audio Evolution TR Component System, emphasizing professional installation for optimal performance and warranty.
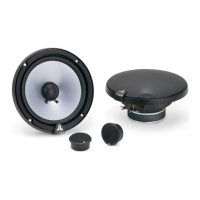
Details on woofer and tweeter construction, crossover design, power handling, frequency response, efficiency, and impedance.
Essential initial steps for installation, including turning off the audio system and preparing the mounting area safely.
Explanation of the advanced electronic circuit designed to prevent tweeter failure by monitoring and disconnecting from overload.
Guidance on optimal woofer and tweeter positioning for balanced tonal quality and coherent stereo imaging.
Instructions for adapting factory speaker locations, ensuring proper fit, sealing air leaks, and correct wiring polarity.
Steps for custom mounting, including wire routing, drilling, cutting, and ensuring a clean fit and sealed mounting.
Guidance on choosing between flush or surface mounting for tweeters, considering clearance and appearance.
Instructions for connecting the tweeter wiring harness, including the in-line filter and optional direct connection to the amplifier.
Detailed steps for mounting tweeters on a surface, including drilling, fixture attachment, and wire routing.
Comprehensive instructions for flush mounting tweeters, involving precise hole cutting and secure attachment.
Details the 90-day standard warranty, extended to one year with authorized installation, and exclusions.
Procedure for obtaining warranty service, including shipping instructions and required proof of purchase.
Provides customer service contact details for the USA and notes on international warranty coverage.
| Speaker Type | Component |
|---|---|
| Size | 6.5 inches |
| Power Handling (RMS) | 75 watts |
| Power Handling (Peak) | 225 watts |
| Impedance | 4 ohms |
| Tweeter Design | Silk Dome |
| Woofer Composition | Mineral-filled Polypropylene |
| Configuration | 2-way |
| Tweeter Size | 0.75 inch |