EasyManua.ls Logo

John Lewis Emily Storage Bed User Manual

John Lewis Emily Storage Bed
9 pages
To Next Page IconTo Next Page
Page #1 background imageLoading...
Page #1 background image
Double
For product support or spare parts please call
the John Lewis Helpline;
T: 01244 689949
E: mail@fwgroup-uk.com
Emily Storage Bed
PRE-ASSEMBLY PREPARATION
Please check the pack contents before attempting to assemble this product. A full checklist of components is
given in this leaflet. If any components are missing, please contact the John Lewis Helpline.
This product is HEAVY. It should be assembled as near as possible to the point of use. TAKE CARE WHEN
LIFTING to avoid personal injury and (or) damage to the product.
This product takes approximately 90 MINUTES to assemble with 2 PEOPLE.
The fittings pack contains SMALL ITEMS which should be KEPT AWAY FROM YOUNG CHILDREN.
Read this leaflet in full before commencing assembl
Do not use power tools to assemble.
y.
If you require any additional information or have any issues with this product please call the
John Lewis Helpline on 01244 689949 or email mail@fwgroup-uk.com
John Lewis
Please ensure instructions are read in full before attempting to assemble this product.
Necessary Tools
1/9
Thank you for purchasing this Emily storage bed. Please read the instructions carefully before use to
ensure safe and satisfactory operation of this product.
Question and Answer IconNeed help?

Do you have a question about the John Lewis Emily Storage Bed and is the answer not in the manual?
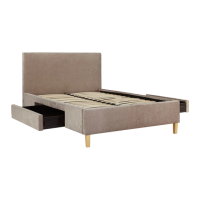
John Lewis Emily Storage Bed Specifications

General IconGeneral
TypeStorage Bed
Assembly RequiredYes
HeadboardYes
Mattress IncludedNo
Bed SizeDouble

Summary

PRE-ASSEMBLY PREPARATION

Necessary Tools

Lists the tools required for assembling the Emily storage bed.

Fittings and Parts Checklist

Fittings

Details all hardware components with quantities and identifiers for the bed assembly.

Parts

Step-by-Step Assembly Instructions

Step One: Attaching Legs

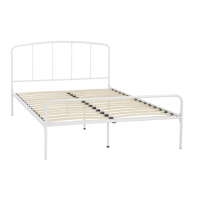
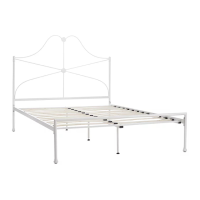
Attaching wooden legs to the headboard and footboard as the first assembly step.

Step Two: Connecting Side Rails

Loosely attaching the side rails to the headboard and footboard using pre-inserted bolts.

Step Three: Attaching Drawer Runner Base

Securing the drawer runner base components to the bed frame using provided fixings.

Step Four: Installing Drawer Centre Support

Attaching the drawer centre support to the drawer runner base for added stability.

Step Five: Installing Centre Rail

Inserting the centre rail and then fully tightening all frame bolts.

Step Six: Drawer Construction

Assembling the drawer components including front, sides, back, and bottom supports.

Step Seven: Attaching Upholstered Front Panel

Attaching the upholstered front panel to the assembled drawer.

Step Eight: Attaching Metal Stoppers

Attaching metal stoppers to the drawer runner bases for drawer retention.

Step Nine: Arranging Slats

Inserting all slats and caps into the bed frame for mattress support.

Step Ten: Final Check

Confirmation that the bed is now ready for use after assembly.

Care and Maintenance

Safety Instructions

Related product manuals