EasyManua.ls Logo

John Lewis Victoria User Manual

John Lewis Victoria
10 pages
To Next Page IconTo Next Page
Page #1 background imageLoading...
Page #1 background image
1/10
Please ensure instructions are read in full before attempting to assemble this product.
Please check the pack contents before attempting to assemble this product. A full checklist of components is
given in this leaflet. If any components are missing, please contact the John Lewis Helpline.
This product is HEAVY. It should be assembled as near as possible to the point of use. TAKE CARE
WHEN LIFTING to avoid personal injury and (or) damage to the product.
This product takes approximately 60 MINUTES to assemble with 2 PEOPLE.
The fittings pack contains SMALL ITEMS which should be KEPT AWAY FROM YOUNG CHILDREN.
Read this leaflet in full before commencing assembly.
If you require any additional information or have any issues with this product please call the
John Lewis Helpline on 01244 689949 or email mail@fwgroup-uk.com.
Stock code: 803/67010
Question and Answer IconNeed help?

Do you have a question about the John Lewis Victoria and is the answer not in the manual?

John Lewis Victoria Specifications

General IconGeneral
BrandJohn Lewis
ModelVictoria
CategoryIndoor Furnishing
LanguageEnglish

Summary

Product Overview and Preparation

Necessary Tools

Lists the tools required before assembly begins.

Heavy Product Warning

Warns that the product is heavy and requires care during lifting to avoid injury.

Assembly Time and People

States the estimated time and number of people needed for assembly.

Small Parts Safety

Alerts users to keep small items away from children to prevent choking hazards.

Fittings and Parts Checklist

Wall Fixing Note

Advises on the suitability of wall fixings for different wall materials.

Step-by-Step Assembly Instructions

Step One: Attaching Side Frames to Base

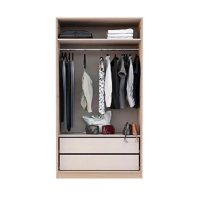
Connects side frames to the base using camfixes and minifixes.

Step Two: Attaching Back Panel Supports

Secures back panel supports to side frames using camfixes and minifixes.

Step Three: Placing Back Panels

Inserts back panels into rails at the back of the side frames.

Step Four: Attaching Top Frame

Secures the top frame to the side frames using camfixes.

Step Five: Securing Back Panels

Fastens back panels to the wardrobe using pan head screws.

Step Six: Attaching Ring Holders and Pipe

Fixes ring holders and chrome pipe to side frames using screws.

Step Seven: Attaching Door Panels

Mounts door panels to side frames using hinges and screws.

Step Eight: Attaching Safety Straps

Secures safety straps to the back of the wardrobe using washers and screws.

Care and Maintenance

Wood Furniture Care

Provides guidance on cleaning and maintaining wood furniture surfaces.

Environmental Considerations

Advises on avoiding heat sources to prevent warping.

Safety Instructions

General Safety Warnings

Outlines essential safety precautions for handling and assembly.

Product Suitability and Compliance

States age suitability and compliance with safety standards.

Related product manuals