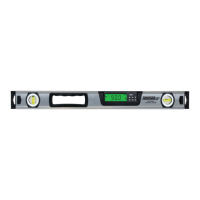
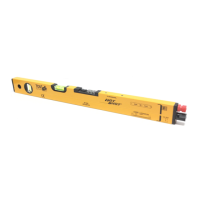
Thank you for purchasing this Johnson digital level! This level helps
you accurately determine plumb, level or any angle in between -
perfect for building ramps, setting drainage pitches and more!
This digital level features:
• Accuracy of 0.10° (at 0°/90°)
• Accuracy of 0.20° for all other angles
• Reads in units of in/ft, mm/m, degrees and percent
• Angled backlit display for easy reading
• IP54 dust and water resistance
• Hold and reference modes
1760 Series Digital Levels Quick Start Guide (1760-2400 • 1760-4800)
www.johnsonlevel.com/manuals
We want to get you up and running as quickly as possible - but this quick start guide is not a replacement for reading and understanding your
operator’s manual! For complete safety & operating instructions, refer to the operator’s manual included with your tool or scan the QR code.
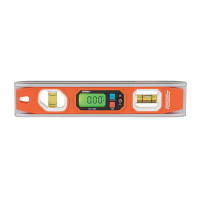
LCD SCREEN & BUTTON OVERVIEW
LEVEL INDICATORS (2)
SOUND INDICATOR
BATTERY INDICATOR
GETTING STARTED
1. Insert fresh batteries - see “INSTALLING THE BATTERIES”.
2. For best results, calibrate your level prior to each use. See
“CALIBRATION PROCEDURE” for details.
3. Power on the digital level by pressing .
4. Enable or disable sound by pressing
.
5. Set your operating units by pressing
.
6. Enable the backlight by pressing
. The backlight will
automatically turn o after 30 seconds of inactivity. Press any
button or move the level to re-enable the backlight.
7. Set the desired auto shuto timer by pressing and holding
.
The LCD will indicate “5” for 5 minutes or “2H” for 2 hours.
8. Set a temporary zero reference by pressing
. See “SETTING A
ZERO REFERENCE”. To exit reference mode, press
again.
9. To hold a measurement, press
. To return to normal operation,
press
again.
10. During operation, the level indicators will show which direction
the digital level must be tilted to achieve a reading of zero:
11. The audio alert will increase in speed as you approach closer to
zero, and turn into a solid tone when you have achieved zero.
12. To power o the level, press
.
INSTALLING THE BATTERIES
1. Always use fresh batteries (2xAAA).
2. Use a #1 Philips screwdriver to remove the battery cover.
3. Insert the battery according to the polarity indicated on the level
and in the diagram below.
4. Replace the cover - do not over-tighten the screw.
HOLD INDICATOR (2)
UNIT DISPLAY (2)
Powers on/o the level
Enables/disables sound
Sets the temporary zero reference
Changes the displayed unit or auto shuto timer
Enables/disables the backlight
Freezes the current screen reading
Initiates calibration mode
Move Left Side Up On Grade Move Right Side Up
REFERENCE
INDICATOR (2)
MAIN
DISPLAY