07
05. Close the inlet valve (a) and open the discharge
valve (b). The pump will switch on and run for 15
to 20 seconds. The pump should then stop
operating and the failure light on the flow
controller should be illuminated. This tests the
run dry operation.
06. Open the inlet valve (a) and press the reset button
on the flow controller. The pump will start running.
03. Open the discharge valve (b), the pump should
start automatically.
04. Close the discharge valve (b), the pump will switch
o within 15 to 20 seconds (this is a built-in
safety feature that protects the pump). This tests
the pressure controller operation.
AUTOMATIC PUMP CONTROL
TYPE: PS02.1
220 - 240 50 / 60 Hz
10Amax. 10BARMAX. IP 65
POWER
FAILURE
ON
RESET
AUTOMATIC PUMP CONTROL
TYPE: PS02.1
220 - 240 50 / 60 Hz
10Amax. 10BARMAX. IP 65
POWER
FAILURE
ON
RESET
Operating instructions (continued)
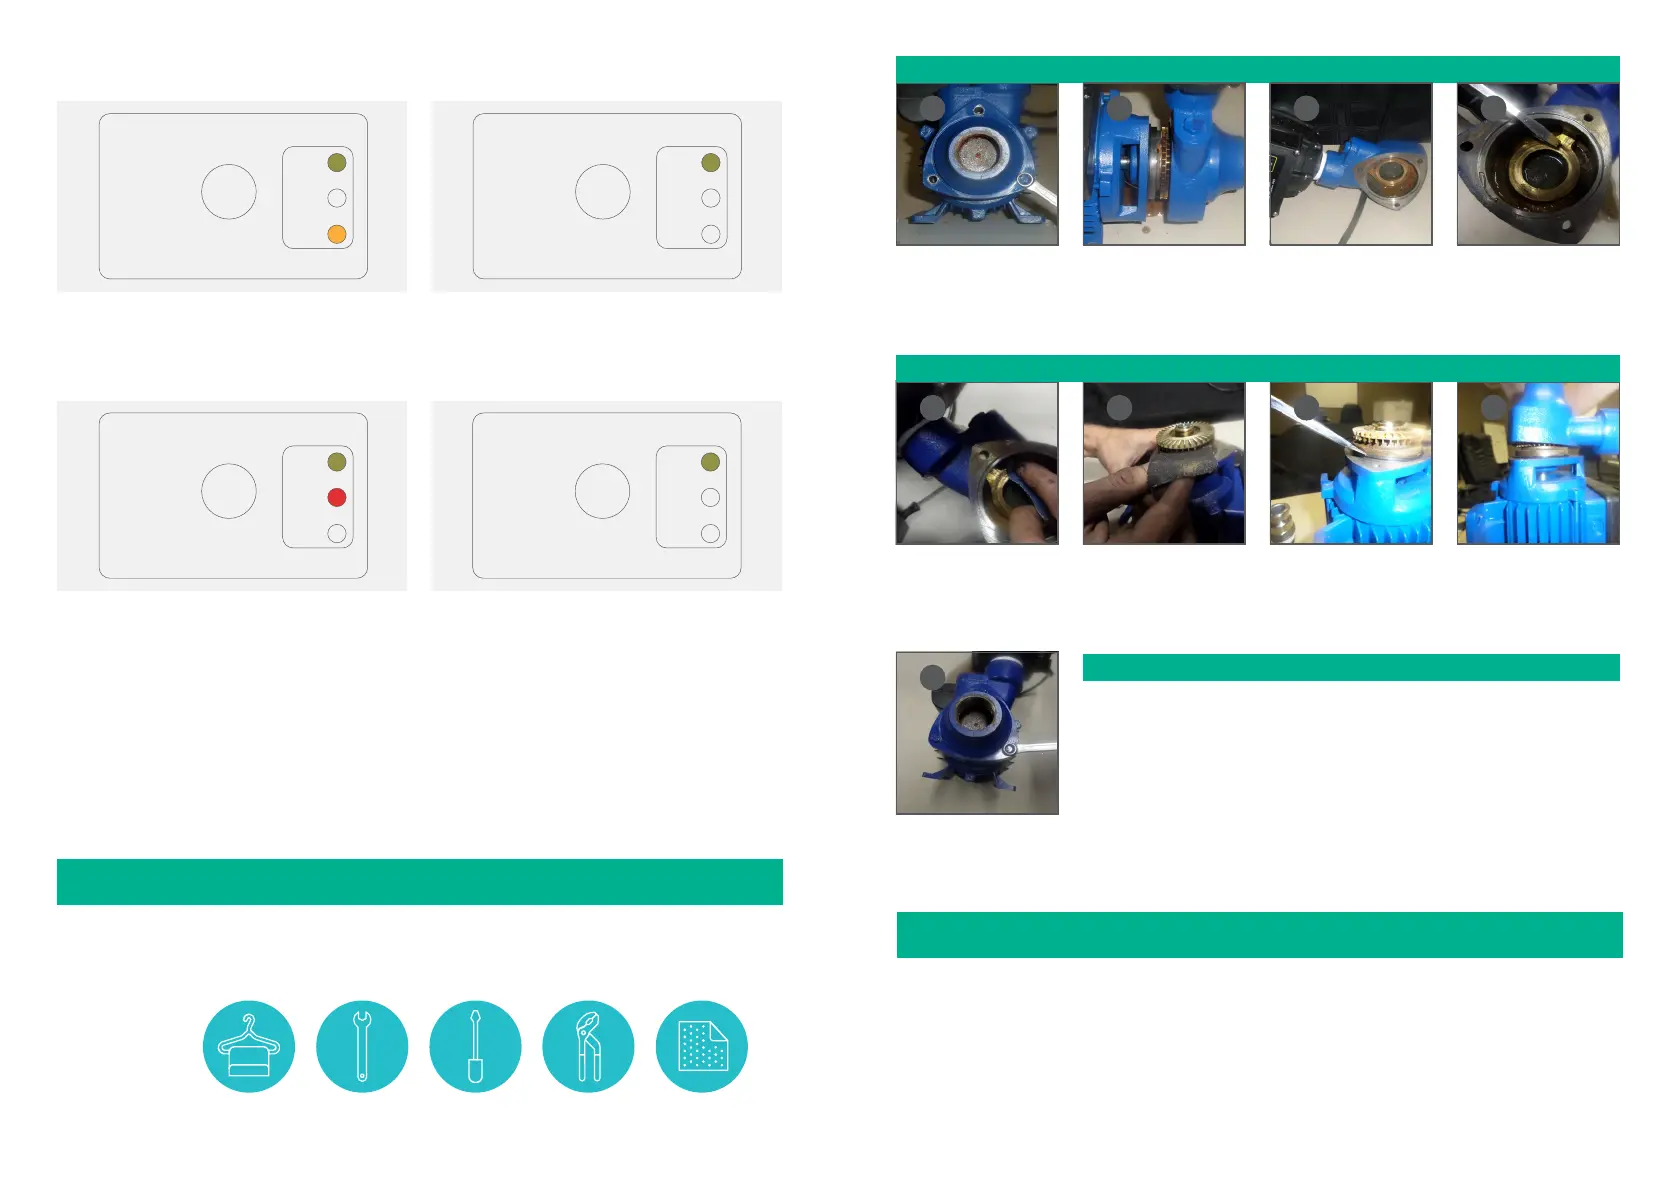
MAINTENANCE INSTRUCTIONS
IMPORTANT: it is advised to run the pump at least once a month to prevent the impeller from
getting stuck. Should the impeller get stuck (typically due to sediment in the water), you can
follow these guidelines to clean and test it.
With the pump inlet
facing you, remove the 3
x 6mm screws from the
front casing.
Split the front cover from
the pump.
If the wear-plate or
impeller is dirty, dirt will
be visible as indicated in
the image above.
Using a piece of sandpaper
gently clean the surface
where the impeller runs.
Next clean behind the
impeller and casing. Once
done, wipe both sides
with a cloth.
Make sure the O-Ring is
in place (as indicated in
the image above), before
re-fitting the front cover.
Replace the front cover
and refit the 3 x 6mm
screws to it.
Tighten the 3 screws
on the cover, making sure
not to over tighten them.
To clean the
pump, you will
require:
A CLEAN
CLOTH
SIZE 8
SPANNER
FLAT POINT
SCREW DRIVER
WATER PUMP
PLIERS
100/120 GRIT
SAND PAPER
Move the cover away from
the pump. Be careful not
to damage the electrical
cord.
Open the pump to confirm if the impeller needs cleaning.
If the impeller needs cleaning, simply do the following:
01
02 03 04
05 06
07
08
09
Test the pump to ensure it has been cleaned properly.
Note: we recommend testing the pump before connecting it to the water supply.
10. Insert the plug into the main power supply and switch it on. The pump should
start up immediately and run for 20 seconds, after which it will shut down (a
built in safety feature to prevent dry run).
11. Reconnect your pump to your water supply as per the operation instructions on
pages 5 and 6 in this manual.
12. Reset the pump by pressing the reset button on the flow controller.
JOJO PUMP WARRANTY
Please read this warranty in conjunction with the South African Consumer Protection Act 68 of 2008.
01. JoJo warrants its pumps to the original end user/purchaser to be free of defective materials and workmanship
under normal use for a period of 12-months from the date of purchase from authorised retailers and distributors.
To be eligible for warranty repair or replacement, the pump must be returned to the point of purchase during
and up to the expiry date of the warranty period. Proof of date of purchase is required.
02. Liability in terms of this warranty shall be limited to repair or replacement of the pump. Liability for all and any
other losses and/or subsequent damages suered are expressly excluded.
06
AUTOMATIC PUMP CONTROL
TYPE: PS02.1
220 - 240 50 / 60 Hz
10Amax. 10BARMAX. IP 65
POWER
FAILURE
ON
RESET
AUTOMATIC PUMP CONTROL
TYPE: PS02.1
220 - 240 50 / 60 Hz
10Amax. 10BARMAX. IP 65
POWER
FAILURE
ON
RESET
07. Close the discharge valve and wait for the pump to switch o. Open the discharge valve a little bit so that the
pressure on the pressure gauge decreases slowly. Observe at what pressure the pump switches on again. Adjust
the adjustment screw to increase/decrease the desired cut-in pressure (the pressure at which the pump switches
on). Note: the adjustment screw does not determine the pressure at which the pump switches o.
After completing steps one to six, the pump will be ready for use.
 Loading...