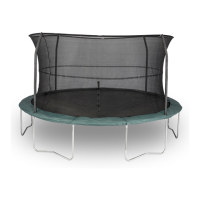
7
Join Part 4 and Part 5 together.
STEP 1 : ASSEMBLING THE FRAME
You will need the following parts to complete
section 1:
2 x Part 1 & 21: L tube with C D marking and
T-Connector + Welded Tube (2xD).
2 x Part 2 & 21: L tube with A B marking and
T-Connector + Welded Tube (2xA).
4 x Part 3 & 21: Top tube with B and C marking and
T-Connector + Welded Tube (2xB 2xC).
2 x Part 4: Straight tube with C marking with extension
(9 spring holes)
2 x Part 5: Straight tube with D marking(9 spring holes)
2 x Part 6: Straight tube D A marking(10 spring holes)
4 x Part 7: Centre Leg
8 x Part 8: L Leg
16 x Part 16: Self tapping screw + washers
21
16
1
2
L-Top tube
C D marking
L-Top tube
A B marking
Centre leg
L Leg
You will also need a cross-head screwdriver
(not
supplied)
.
Self tapping screw and washer
Cross-head screwdriver
4
5
Top tube C marking(9 spring holes)
Top tube D marking(9 spring holes)
8
With D marking
With C marking
Long - 9 spring holes
6
Top tube D A marking(10 spring holes)
7
Top tube C marking with extension (9 spring holes) Top tube D marking(9 spring holes)
With A marking
With B marking
Long - 9 spring holes
Please note: The Welded tube faces inwards on the frame
Top tube B marking and C marking(9 spring holes)
3
T-Connector + Welded tube
Place Part 1 - L Tube upside down and attach Part 21 - T-Connector + welded tube D marking to the long end,
join Part 3 - Top tube C marking (9 spring holes) to the short end and attach Part 21 - T-Connector + welded tube
C marking.
N.B: The welded tube is to be positioned on the inside of the frame and screw holes facing towards one another.
Place Part 2 - L Tube upside down and attach Part 21 - T-Connector + welded tube A markingto the long end,
join Part 3 - Top Tube B marking (9 spring holes) to the short end and attach Part 21 - T-Connector + welded tube
B marking.
Screw together Part 7 - Centre leg and Part 8 - L Leg to make your leg sections.
As shown in image above.