EasyManua.ls Logo

JumpTek 084-0207 - User Manual

JumpTek 084-0207
17 pages
Print Icon
To Next Page IconTo Next Page
Loading...
Version 4
Assembly, Installation and Use Manual
8’ (2.4 m) Trampoline and Enclosure Combo
084-0207
Stop
Please read and understand this manual before assembly.
Before beginning assembly of product, make sure all parts are present.
Compare parts with packaging contents list. If any part is missing, or if you
have any questions, contact the vendors customer service department at
1-866-567-4089.
084-0207-Cantire-8ft Trampoline Combo-GB-02.indd 1 11-11-9 ��4:10
Question and Answer IconNeed help?

Do you have a question about the JumpTek 084-0207 and is the answer not in the manual?

Summary

Safety Instructions

Safety Instructions for Trampoline

Key safety guidelines for safe trampoline use and supervision.

Safety Instructions for Enclosure Net

Safety guidelines specific to the trampoline enclosure net and its use.

Parts List

Diagram

Assembly

Step 1: Preparation

Prepare all parts and the assembly area before beginning the trampoline setup.

Step 2: Assembling the Vertical Leg Tubes

Connect vertical leg tubes to V-shaped tubes using specified fasteners.

Step 3: Assembling the Top Rail Frame

Assemble the top rail tubes and connect them to the T-shaped joints.

Step 4: Assembling the Leg Tubes to the Top Rail Tubes

Attach the assembled leg tubes to the top rail frame structure.

Step 5: Preparing the Trampoline Mat

Unfold the trampoline mat and get springs and the hook tool ready for attachment.

Step 6: Connecting the Trampoline Mat to the Top Rail Frame

Attach the trampoline mat to the frame using springs and the spring hook tool.

Step 7: Assembling the Supporting Poles

Connect upper and lower supporting poles, ensuring proper locking tab engagement.

Step 8: Attaching the Foam Sleeve

Slide the foam sleeves onto the assembled upper and lower supporting poles.

Step 9: Fixing the Ball Cap

Attach the ball caps to the top ends of the supporting poles using screws.

Step 10: Fixing the Supporting Poles to the Trampoline Legs

Secure supporting poles to trampoline legs using U-bolts, clamps, and nuts.

Step 11: Assembling the Enclosure Net

Hang the enclosure net onto the ball caps and secure it to the trampoline bed.

Step 12: Attaching the Frame Pad

Place frame pads on the trampoline and tie them securely using the sewn-in straps.

Information on Trampoline Use

Training with the Trampoline

Fundamental Trampoline Skills

Learn basic bouncing techniques like stop bouncing, arm action, and bounce variations.

Specific Training Techniques

Practice advanced skills including basic, knee, hands-and-knees, seat, front, 180°, and full twist bounces.

Cleaning and Care

Inspection

Check the trampoline and enclosure for wear and damage before each use.

Cleaning

Instructions for cleaning the frame pad and enclosure net with suitable cleaning agents.

Storing

Guidance on disassembling and storing the trampoline for extended periods of non-use.

Technical Data

Limited Warranty

Additional Limitations

Further restrictions and exclusions apply to the product warranty.

Notice to Consumer

Information regarding consumer rights and provincial/federal warranty laws.

Overview

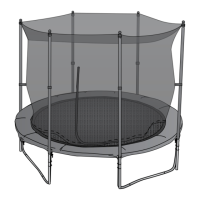
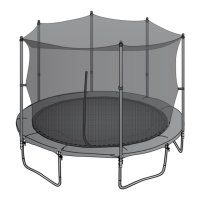
This document is an assembly, installation, and use manual for an 8' (2.4 m) JumpTek Trampoline and Enclosure Combo, model 084-0207.

Function Description:

The JumpTek trampoline is designed to provide a means for physical exercise and recreation. It is intended for home use only, offering a convenient way to engage in regular exercise that can improve physical and mental health. The trampoline propels the user to unaccustomed heights and into various body movements, with an enclosure net for added safety. The manual emphasizes that the trampoline should be used under the supervision of a mature, knowledgeable person and is not recommended for children under six years of age if over 20" (51 cm) tall. It is strictly for single-person use to prevent injuries from collisions or loss of control.

Important Technical Specifications:

  • Model: 084-0207
  • Size: 8' (2.4 m) diameter
  • Dimensions (assembled): 7 x 8' (221 x 244 cm)
  • Weight Limit: 113 kg (250 lb)
  • Overhead Clearance Recommended: Minimum 24' (8 m) from ground level.
  • Parts List Highlights:
    • Enclosure Net (x1)
    • Ball Caps (x6) and Screws (x6)
    • T-shaped Joints (x2)
    • Vertical Leg Tubes (right x3, left x3)
    • V-shaped Tubes (x3)
    • Long Nuts (x6), Washers (x6), Bolts (x6)
    • Top Rail Tubes (a x4, b x2, c x2)
    • Trampoline Mat (with sewn-in V-rings) (x1)
    • Springs (x48)
    • Frame Pad (x2)
    • Lower Supporting Poles (x6)
    • Upper Supporting Poles (pre-installed with foam) (x6)
    • Spacers (x24)
    • Bolt Clamps (x12)
    • Locking Nuts (x24)
    • U-shaped Bolts (x12)
    • Foam Sleeves (x6)
    • Allen Key (x2)
    • Spring Hook Tool (x1)

Usage Features:

  • Safety First: The manual provides extensive safety instructions, including warnings against somersaults, landing on the head or neck, and multiple users. It stresses the importance of adult supervision and maintaining a clear area around the trampoline.
  • Controlled Bouncing: Users are advised to focus on controlled, low bounces in the center of the mat. High, reckless bouncing is discouraged.
  • Stop Bounce Technique: This fundamental skill involves flexing knees as feet contact the mat to quickly stop bouncing and regain control.
  • Arm Action: Proper arm movement is crucial for control and lift, with arms moving up to shoulder height and width, then circling down behind the hips for rebound.
  • Bounce Variations: Basic variations like tuck, pike, and straddle pike are introduced, emphasizing perfect form, pointed toes, and straight fingers.
  • Training Exercises: The manual outlines a progression of skills:
    • Basic Jump: Standing straight, gathering momentum, holding feet together, pointing toes, and landing with feet shoulder-width apart.
    • Knee Bounce: Starting with a basic jump, landing on knees with a straight back, maintaining balance with arms, and using momentum to return to standing.
    • Hands and Knees Bounce: Starting with a basic jump, landing on hands and knees with even weight distribution, avoiding rocking, and pushing to rebound.
    • Seat Bounce: Starting with a basic jump, landing on the bottom with a straight back, hands beside hips, and pushing up to standing.
    • Front Bounce: Basic jump, pushing forward with feet, holding arms in front, landing with arms crossed beneath the head, and using momentum to return to standing.
    • 180° Bounce: A difficult skill requiring body control, starting with a front bounce, then using an arm/hand to initiate a 180° roll, keeping the back straight, and returning to standing.
    • Full Twist Bounce: Starting with a seat bounce, moving the shoulder in the direction of the twist, placing hands by sides, holding the body straight, and finishing in a seat drop.
  • Enclosure Net Use: The enclosure net is designed for the specific trampoline size and should not be bounced against. It is important to ensure no fire is lit nearby due to spark risk.
  • Wind Precautions: In strong winds, the enclosure net and trampoline should be disassembled to prevent personal injury or property damage.

Maintenance Features:

  • Pre-Use Inspection: Before each use, the trampoline and enclosure must be checked for wear and damage. Any worn, defective, or missing parts should be replaced immediately.
  • Hazard Identification: The manual lists conditions that pose potential hazards, including missing or improperly positioned frame padding, punctures or tears in the mat or frame pad, deterioration of stitching, ruptured springs, bent/broken frame, sagging mat, unstable supporting poles or vertical legs, unfixed enclosure net, sharp protrusions, and unstable parts/connections.
  • Cleaning:
    • Frame Pad: Clean with a soft cleanser suitable for padding to remove oil or dirt. Avoid aggressive or chemical cleansers.
    • Enclosure Net: Clean with a brush or a slightly damp cloth to remove dirt or dust.
    • Frame: Remove dirt and dust with a soft, slightly damp cloth. Rust spots should be removed with a wire brush or coarse sandpaper and treated with non-toxic paint.
  • Storage: For extended periods of disuse, the enclosure net and trampoline should be disassembled and stored in a clean, dry place.

JumpTek 084-0207 Specifications

General IconGeneral
BrandJumpTek
Model084-0207
CategorySports & Outdoors
LanguageEnglish

Related product manuals