EasyManua.ls Logo

JVC GR-AX220 User Manual

JVC GR-AX220
56 pages
To Next Page IconTo Next Page
Page #1 background imageLoading...
Page #1 background image
For Customer Use:
Enter below the Serial Nos. of the
GR-AX720U/GR-AX420U/GR-AX220U
camcorder and the AA-V11U AC Power
Adapter/Charger.
The serial numbers are located on the
bottom of the GR-AX720U/GR-AX420U/
GR-AX220U, and the AA-V11U.
Model No.
GR-AX720U/GR-AX420U/GR-AX220U
AA-V11U
Serial No.
(The camcorder illustrations appearing in
these instructions are of the GR-AX720.)
GR-AX720
GR-AX420
GR-AX220
COMPACT VHS CAMCORDER
INSTRUCTIONS
LYT0002-007A
Compact VHS
Question and Answer IconNeed help?

Do you have a question about the JVC GR-AX220 and is the answer not in the manual?

JVC GR-AX220 Specifications

General IconGeneral
Recording MediaVHS-C
LCD Screen Size2.5 inches
TypeCamcorder
Weight1.1 lbs
Battery LifeApprox. 90 minutes
ViewfinderColor
Power SupplyAC Adapter or Battery

Summary

SAFETY PRECAUTIONS

General Safety Warnings

Key warnings to prevent fire, shock hazards, and misuse of the camcorder.

IMPORTANT PRODUCT SAFETY INSTRUCTIONS

Installation and Antenna Safety

Guidelines for safe installation, ventilation, power sources, and antenna connections.

PRODUCT USE AND SERVICING

Usage Precautions and Maintenance

Safe practices for using the camcorder, cleaning, and general servicing guidelines.

QUICK OPERATION GUIDE

Basic Power and Operation Steps

Steps for powering the camcorder, inserting cassettes, and basic playback/shooting.

MAJOR FEATURES AND ACCESSORIES

Camcorder Features and Provided Items

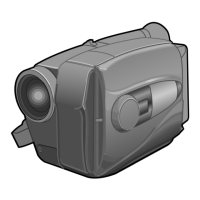
Overview of key camcorder features, special effects, and included accessories.

GETTING STARTED: POWER AND BATTERY MANAGEMENT

Power Sources and Battery Charging

Details on AC power usage, battery pack charging, and available power options.

GETTING STARTED: INITIAL SETUP PROCEDURES

Clock Battery and Viewfinder Adjustment

Procedures for installing the clock battery and adjusting the viewfinder for optimal viewing.

GETTING STARTED: DATE AND TIME SETTING

Setting Camcorder Date and Time

Step-by-step guide to setting the camcorder's internal date and time.

GETTING STARTED: TAPE AND CASSETTE MANAGEMENT

Tape Length, Mode Settings, and Cassette Handling

Instructions for setting tape length, recording modes, and managing cassettes.

GETTING STARTED: HANDLING AND MOUNTING

Grip, Strap, and Tripod Adjustments

Adjusting the camcorder grip, strap, and mounting it on a tripod.

RECORDING: BASIC OPERATION

Loading Cassette, Recording, and Stopping

Steps for loading a cassette, starting, and stopping the recording process.

RECORDING: BASIC FEATURES - ZOOM

Using the Power Zoom Control

Operating the power zoom switch to vary focal length and achieve zoom effects.

RECORDING: BASIC FEATURES - REVIEW AND RETAKE

Quick Review and Retake Functions

How to quickly review recorded segments and re-record specific parts.

RECORDING: VIDEO LIGHT (GR-AX720 Only)

Video Light Operation and Safety

How to operate the video light and important safety precautions.

RECORDING: ADVANCED FEATURES - PROGRAM AE

Program AE with Special Effects

Utilizing Program AE to apply various special effects like Sepia, Electronic Fog, and ND filter.

RECORDING: ADVANCED FEATURES - EFFECTS AND EXPOSURE

Creative Shooting Modes and Exposure Control

Using Sepia, Twilight, Sports modes, and adjusting exposure levels.

RECORDING: ADVANCED FEATURES - FOCUSING

Auto Focus and Focus Lock

How auto focus works and how to lock focus on a subject.

RECORDING: ADVANCED FEATURES - MANUAL FOCUS

Manual Focus Adjustment and Locking

Step-by-step guide to manually adjust and lock focus.

RECORDING: ADVANCED FEATURES - FADER AND WIDE

Fader and Wide-Screen Effects

Creating smooth fade effects and applying a wide-screen look.

RECORDING: ADVANCED FEATURES - TITLES AND CHARACTERS

Instant Titles and Character Generator

Superimposing preset titles and creating custom text titles.

RECORDING: ADVANCED FEATURES - DATE/TIME INSERT

Date/Time Display on Video

Options for displaying date, time, and custom characters on recorded video.

RECORDING: ADVANCED FEATURES - WHITE BALANCE

Manual White Balance Adjustment (M.W.B.)

Adjusting white balance for accurate color reproduction under various lighting.

RECORDING: ADVANCED FEATURES - MENU SYSTEM

Using the Menu for Detailed Adjustments

Navigating the on-screen menu for detailed camcorder settings.

RECORDING: ADVANCED FEATURES - SELF-TIMER

Setting the Self-Timer Delay

Configuring the delay time between pressing record and the actual start.

RECORDING: ADVANCED FEATURES - ANIMATION AND TIME-LAPSE

Animation and Time-Lapse Recording Setup

Creating animation effects and recording subtle changes over time.

PLAYBACK: USING THE CASSETTE ADAPTER

Playback with VHS-C Cassette Adapter

Instructions for using the cassette adapter to play VHS-C tapes on a standard VCR.

PLAYBACK: BASIC CONNECTIONS

Connecting Camcorder to VCR and TV

Various methods for connecting the camcorder to a VCR and TV for playback.

PLAYBACK: BASIC PLAYBACK OPERATIONS

Loading Cassette, Playback, and Tape Search

Steps for loading, playing back, and searching tapes.

PLAYBACK: ADVANCED FEATURES

Manual Tracking, Still Playback, and Shuttle Search

Adjusting tracking, pausing playback, and performing high-speed tape search.

EDITING: TAPE DUBBING

Connecting and Performing Tape Dubbing

Procedure for dubbing video from the camcorder to a VCR.

EDITING: RANDOM ASSEMBLE EDITING SETUP

Remote Control Setup and Connection

Configuring the remote and connecting the camcorder for R.A.Edit.

EDITING: RANDOM ASSEMBLE EDITING PROCEDURES

Selecting Scenes and Making Corrections

Steps to select scenes, register points, and make corrections for assembly editing.

USING THE REMOTE CONTROL UNIT

Remote Control Battery and Button Functions

Installing battery and overview of remote control buttons and their functions.

REMOTE CONTROL FUNCTIONS: TIMERS AND MODES

Remote Control for Timers and Indexes

Using the remote for Self-Timer, Animation, Time-Lapse, and Index Code marking.

REMOTE CONTROL FUNCTIONS: INSERT EDITING

Performing Insert Editing with Remote

Step-by-step guide to performing insert editing using the remote control.

REMOTE CONTROL FUNCTIONS: AUDIO DUBBING

Performing Audio Dubbing with Remote

Recording a new soundtrack onto a tape using the remote control.

USER MAINTENANCE AND CLEANING

Post-Use Procedures and Cleaning Guidelines

Standard shutdown procedures and instructions for cleaning the camcorder.

TROUBLESHOOTING: POWER, RECORDING, AND PLAYBACK ISSUES

Troubleshooting Power and Recording Problems

Solutions for common power supply, recording failure, and playback issues.

TROUBLESHOOTING: OTHER COMMON MALFUNCTIONS

Addressing Various Camcorder Errors

Solutions for common errors like tape eject issues, focus problems, and display malfunctions.

VIEWFINDER AND INDICATOR INDEX

Understanding Viewfinder Indicators

Explanation of the various icons and indicators displayed in the camcorder's viewfinder.

CONTROL LAYOUT AND FUNCTIONS

Camcorder Controls Overview

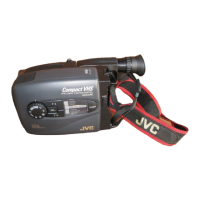
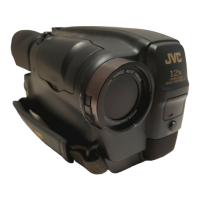
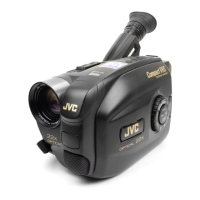
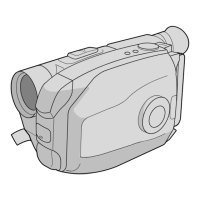
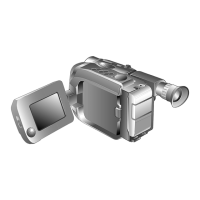
Identification and function of all physical controls on the camcorder body.

CONNECTORS, PARTS, AND INDICATORS

Camcorder Ports, Parts, and Indicators

Details of connectors, other parts, and indicators on the camcorder.

CAUTIONS AND SAFETY WARNINGS

Video Light and Battery/Adapter Safety

Critical safety warnings for the video light, battery usage, and AC adapter.

CAUTIONS: CASSETTE AND UNIT CARE

Cassette Handling and Unit Protection

Best practices for cassette usage, storage, and protecting the camcorder unit.

TECHNICAL SPECIFICATIONS

Camcorder, Adapter, and Accessory Specifications

Detailed technical specifications for the camcorder, adapter, and accessories.

JVC SERVICE AND SUPPORT

Locating Authorized Service Centers

Information on finding authorized JVC service centers for repairs and support.

LIMITED WARRANTY INFORMATION

Warranty Terms and Coverage Details

Details of the product's limited warranty, including coverage period and exclusions.

Related product manuals