EasyManua.ls Logo

JVC HR-DVS2EK User Manual

JVC HR-DVS2EK
69 pages
To Next Page IconTo Next Page
Page #1 background imageLoading...
Page #1 background image
SERVICE MANUAL
No. 82829
November 2000
HR-DVS2EK/EU
SPECIFICATIONS
(The specifications shown pertain specifically to the model HR-DVS2EU)
Mini DV/S-VHS VIDEO CASSETTE RECORDER
Printed in Japan
VICTOR COMPANY OF JAPAN, LIMITED
VIDEO DIVISION
S40894
This service manual is printed on 100% recycled paper.
COPYRIGHT © 2000 VICTOR COMPANY OF JAPAN, LTD.
HR-DVS2EK/EU
No. 82829
625
T
V
P
R
+
T
V
P
R
T
V
T
V
+
123
456
789
1
2
1
2
3
VHS
DV
TV
CABLE/SAT
TV/VCR
– –:– –
AUDIO
0000
START
DEBUT
STOP
FIN
DATE
PR
DAILY/QTDN.
VPS/PDC
AUX
WEEKLY/HEBDO
EXPRESS
LCD PROG
0
PROG
OK
3
4
4
MENU
30
SEC
ENTER/ENTREE
DV IN/OUT
ENTREE/SORTIE DV
VHSDV
A.DUBINSERT
PR
DUB
COPIE
DV VHS
STARTR.A.EDIT
IN/OUT
S-VHS ET
PULL-OPEN
GENERAL
Power requirement : AC 220 V – 240 V`, 50 Hz/60 Hz
Power consumption
Power on : 33 W
Power off : 7.9 W
Temperature
Operating : 5°C to 40°C
Storage : –20°C to 60°C
Operating position : Horizontal only
Dimensions (WxHxD) : 435 mm x 124 mm x 391 mm
Weight : 6.7 kg
Input/Output : 21-pin SCART connectors :
IN/OUT x 1, IN/DECODER x 1
RCA connectors:
VIDEO IN x 1, AUDIO IN x 1, AUDIO OUT x 1
S-Video connectors:
IN x 1, OUT x 1
DV connector: IN/OUT x 1
(4-pin, IEEE1394 conformity, digital input/output)
VHS DECK VIDEO/AUDIO
Signal system : PAL-type colour signal and CCIR monochrome
signal, 625 lines
50 fields
Recording system : DA4 (Double Azimuth) head helical scan system
Format : S-VHS/VHS PAL standard
Signal-to-noise ratio : 45 dB
Horizontal resolution
(SP/LP) : 250 lines (VHS)
400 lines (S-VHS)
(EP) : 220 lines (VHS)
350 lines (S-VHS)
Frequency range : 70 Hz to 10,000 Hz (Normal audio)
20 Hz to 20,000 Hz (Hi-Fi audio)
Maximum recording time
(SP) : 240 min. with E-240 video cassette
(LP) : 480 min. with E-240 video cassette
(EP) : 720 min. with E-240 video cassette
DV DECK VIDEO/AUDIO
Signal system : PAL-type colour signal, 625 lines
50 fields
Recording system : Digital Component Recording
Format : DV format (SD mode)
Cassette : Mini DV Cassette
Maximum recording time
(SP) : 60 min. with M-DV60ME cassette
(LP) : 90 min. with M-DV60ME cassette
Audio recording system
: PCM 48 kHz, 16 bit (2 ch)/
32 kHz, 12 bit (4 ch)
TUNER/TIMER
TV channel storage
capacity : 99 positions
(+AUX position)
Tuning system : Frequency synthesized tuner
Channel coverage : VHF 47 MHz – 89 MHz/
104 MHz – 300 MHz/
302 MHz – 470 MHz
UHF 470 MHz – 862 MHz
Memory backup time : Approx. 60 min.
ACCESSORIES
Provided accessories : RF cable,
21-pin SCART cable,
Satellite Controller RM-SD1,
Infrared remote control unit, "R6"
battery x 2
Specifications shown are for SP mode unless otherwise specified.
E.& O.E. Design and specifications subject to change without notice.

Table of Contents

Question and Answer IconNeed help?

Do you have a question about the JVC HR-DVS2EK and is the answer not in the manual?

JVC HR-DVS2EK Specifications

General IconGeneral
BrandJVC
ModelHR-DVS2EK
CategoryVCR
LanguageEnglish

Summary

SPECIFICATIONS

General Specifications

Details on power, dimensions, weight, and input/output for the video recorder.

DV DECK VIDEO/AUDIO Specifications

Technical details for the DV deck's signal system, recording format, and audio.

VHS DECK VIDEO/AUDIO Specifications

Technical details for the VHS deck's signal system, recording format, and audio.

TUNER/TIMER Specifications

Information on TV channel capacity, tuning system, and memory backup.

ACCESSORIES

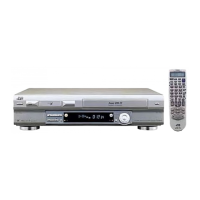
List of included accessories with the video recorder.

SECTION 1 DISASSEMBLY

1.1 HOW TO REMOVE THE MAJOR PARTS

Guide to removing major components, divided by Common, VHS, and DV sections.

1.2 HOW TO READ THE DISASSEMBLY AND ASSEMBLY

Explanation of symbols and procedures for disassembly and assembly diagrams.

1.3 DISCONNECTION OF CONNECTORS (WIRES)

Instructions on safely disconnecting various wire connectors.

1.4 SCREWS USED CABINET COMPONENTS AND BOARD ASSEMBLIES

Identification of screws used in cabinet and board assemblies.

1.5 HOW TO REMOVE THE MAJOR PARTS <COM section>

Detailed steps for disassembling the common section parts.

1.6 HOW TO REMOVE THE MAJOR PARTS <VHS section>

Detailed steps for disassembling the VHS section parts.

1.7 HOW TO REMOVE THE MAJOR PARTS <DV section>

Detailed steps for disassembling the DV section parts.

1.8 SERVICE POSITIONS

Identification of service positions for VHS and DV sections.

1.9 MECHANISM SERVICE MODE

Procedure to enter the mechanism into every operation mode without a cassette.

1.10 CONNECTION

Diagrams and instructions for connecting various internal components.

1.11 EMERGENCY DISPLAY FUNCTION

Functionality for storing and displaying emergency history.

SECTION 2 MECHANISM ADJUSTMENT (VHS)

2.1 BEFORE STARTING REPAIR AND ADJUSTMENT

Precautions, checks, and manual cassette removal procedures.

2.2 REPLACEMENT OF MAJOR PARTS

Detailed instructions for replacing major mechanical parts.

2.3 COMPATIBILITY ADJUSTMENT

Procedures for ensuring compatibility and adjusting tape running behavior.

2.11 MECHANISM TIMING CHART

Chart illustrating the timing of mechanism operations.

2.12 MECHANISM ASSEMBLY/DISASSEMBLY PROCEDURE TABLE

Table detailing the sequence for mechanism assembly and disassembly.

2.13 DISASSEMBLY/ASSEMBLY

Step-by-step disassembly and assembly procedures for various mechanism parts.

2.14 LIST OF PROCEDURES FOR DISASSEMBLY

A comprehensive list of disassembly procedures with part references.

2.15 MECHANISM DISASSEMBLY/ASSEMBLY SHEET

Sheet summarizing screw management for mechanism parts.

2.16 MECHANISM PHASE CHECK/ADJUSTMENT

Procedures for checking and adjusting mechanism phase alignment.

2.17 POSITIONING THE TENSION POLE

Method for positioning the tension pole for proper tape tension.

2.18 COMPATIBILITY AND ERROR RATE ADJUSTMENTS

Adjustments for compatibility and error rates, including linearity and switching points.

2.19 TAPE EJECTION

Procedure for manually ejecting a cassette tape during electrical failure.

SECTION 3 ELECTRICAL ADJUSTMENT (VHS)

3.1 PRECAUTION

General precautions for electrical adjustments and required equipment.

3.2 SERVO CIRCUIT

Switching point and slow tracking adjustment procedures.

3.3 VIDEO CIRCUIT

Adjustment procedures for D/A level, EE Y level, PB Y level, REC color, and Video EQ.

3.4 AUDIO CIRCUIT

Procedure for Audio REC FM adjustment.

3.5 SYSCON CIRCUIT [HR-DVS2EU]

Procedure for adjusting the timer clock of the SYSCON circuit.

ELECTRICAL ADJUSTMENT (DV)

3.6 PREPARATION

Setup and precautions for DV electrical adjustments using a PC.

Important Safety Precautions

Precautions during Servicing

Critical safety measures to follow when servicing the unit.

Safety Check after Servicing

1. Insulation resistance test

Procedure to verify insulation resistance after repair.

2. Dielectric strength test

Procedure to verify dielectric strength after repair.

3. Clearance distance

Verification of clearance distances for safety compliance.

4. Leakage current test

Procedure to measure and verify leakage current.

5. Grounding (Class 1 model only)

Verification of grounding impedance for Class 1 models.

SECTION 2 MECHANISM ADJUSTMENT (DV)

2.9 PREPARATION

Precautions, tools, and procedures for DV mechanism adjustment.

2.10 DISASSEMBLY/ASSEMBLY OF THE MECHANISM ASSEMBLY

Procedures for disassembling and assembling the DV mechanism.

2.11 MECHANISM TIMING CHART

Chart illustrating the timing of DV mechanism operations.

2.12 MECHANISM ASSEMBLY/DISASSEMBLY PROCEDURE TABLE

Table detailing the sequence for DV mechanism assembly and disassembly.

2.13 DISASSEMBLY/ASSEMBLY

Step-by-step disassembly and assembly for DV mechanism parts.

2.14 LIST OF PROCEDURES FOR DISASSEMBLY

A comprehensive list of DV mechanism disassembly procedures.

2.15 MECHANISM DISASSEMBLY/ASSEMBLY SHEET

Sheet summarizing screw management for DV mechanism parts.

2.16 MECHANISM PHASE CHECK/ADJUSTMENT

Procedures for checking and adjusting DV mechanism phase alignment.

2.17 POSITIONING THE TENSION POLE

Method for positioning the tension pole in the DV mechanism.

2.18 COMPATIBILITY AND ERROR RATE ADJUSTMENTS

Adjustments for DV compatibility and error rates.

2.19 TAPE EJECTION

Procedure for manually ejecting a cassette tape in the DV section.

Related product manuals