C
cynthia26Aug 19, 2025
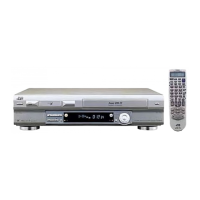
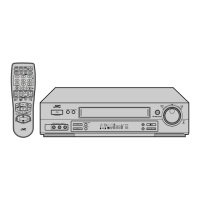
What to do if my JVC HR-DVS3U VCR remote won’t function?
- BBeth AveryAug 19, 2025
If the remote is not working, the batteries may be discharged. Replace the dead batteries with new ones.
What to do if my JVC HR-DVS3U VCR remote won’t function?
If the remote is not working, the batteries may be discharged. Replace the dead batteries with new ones.
What to do if the playback picture is blurred on my JVC VCR?
If the playback picture is blurred or interrupted while TV broadcasts are clear, or if the message “USE CLEANING CASSETTE” appears on the screen, the video heads may be dirty. For the VHS deck, use a dry cleaning cassette TCL-2, or consult your JVC dealer. For the DV deck, use a dry cleaning cassette M-DV12CL, or consult your JVC dealer.
Why can't I record on my JVC VCR?
If you cannot start recording, it might be because there is no cassette loaded, or the cassette loaded has had its record safety tab removed (for VHS deck) or the erase protection switch set to 'SAVE' (for DV deck). To fix this, insert a VHS (or S-VHS) cassette, or cover the hole where the tab was removed using adhesive tape. Alternatively, insert a Mini DV cassette, or set the erase protection switch to 'REC'.
What to do if I can't record TV broadcasts on my JVC HR-DVS3U?
If you cannot record TV broadcasts, it might be because “L-1” or “F-1” has been selected as the input mode. Set to the desired channel to resolve this issue.
How to fix noise during normal playback on my JVC HR-DVS3U?
If noise appears during normal playback on your VHS deck, the automatic tracking mode may be engaged. Try switching to manual tracking to resolve this.
What to do if tape-to-tape editing is not possible on my JVC HR-DVS3U VCR?
If tape-to-tape editing using another component is not possible, it could be due to incorrect connections, incorrect video connector selection (S-VIDEO or VIDEO), power switches not turned on, or an incorrect input mode. Ensure the components are connected correctly and check the 'REAR AUX INPUT' or 'FRONT AUX INPUT' setting. Confirm that all units’ power switches are turned on. Set the input mode to 'L-1' or 'F-1'.
Why is there no power supplied to my JVC HR-DVS3U?
If no power is being supplied to the VCR, the AC power cord may be disconnected. Connect the AC power cord to resolve this.
How to fix breaks in Hi-Fi soundtrack on my JVC VCR?
If you notice breaks in the Hi-Fi soundtrack on your VHS deck, the automatic tracking mode might be engaged. Try switching to manual tracking.
What should I do if my JVC HR-DVS3U clock works but I can't power it on?
If the clock is functioning properly, but the VCR cannot be powered on, check if “#” is displayed on the front display panel with “AUTO TIMER” set to “OFF”. If it is, press the TIMER button to turn the “#” indicator off.
What to do if camcorder recording is not possible with my JVC HR-DVS3U?
If camcorder recording is not possible, the camcorder may not be properly connected, or the input mode is incorrect. Ensure that the camcorder is properly connected and set the input mode to 'L-1' or 'F-1'.
Warning about not opening the cover to avoid electrical shock hazard.
Symbol alerts to uninsulated dangerous voltage and risk of electric shock.
Symbol alerts to important operating and maintenance instructions.
Do not expose unit to rain or moisture to prevent fire or shock.
Avoid extreme temperatures, sunlight, dust, magnetic fields, and vibrations.
Rules for grounding, polarization, power sources, and avoiding overloading.
Ensure proper airflow by not blocking vents and following mounting recommendations.
Precautions against water exposure and inserting objects into the VCR.
Instructions on when to refer servicing to qualified personnel.
Identifies buttons and indicators on the VCR's front panel.
Identifies input/output connectors on the VCR's front panel.
Identifies input/output connectors on the VCR's rear panel.
Explains various symbols displayed on the VCR's front panel.
Details on tape speed, timer, counter, and other display indicators.
Identification and function of buttons on the remote control.
Explains various indicators displayed on the TV screen for VHS playback.
Explains various indicators displayed on the TV screen for DV playback.
Step-by-step guide to connect the VCR to TV and power source.
Detailed instructions for using S-VIDEO for enhanced picture quality.
Automatic clock and tuner setup process for initial configuration.
Steps to navigate to the clock setting menu.
Manual adjustment of clock, host channel, DST, and time zone.
Automatically scans and sets receivable TV and CATV channels.
How to load, select, and play VHS cassettes.
Easy method for timed recording for a set duration.
Steps for loading, selecting, and playing Mini DV cassettes.
Procedures for setting tape speed and initiating DV recording.
Easy timed recording for a set duration on the DV deck.
Simplified timer recording using program code numbers for automatic recording.
Setting the correct guide channel number for accurate VCR Plus+ operation.
Manually entering start and stop times for timed recordings.
Quick setup for timer recordings within 24 hours using VCR controls.
Copying tapes from DV to VHS, including cassette loading and speed settings.
Preparing VHS and DV cassettes and setting tape speed for dubbing.
Finding the start point on VHS and preparing DV deck for dubbing.
Connecting another VCR or PC and setting the input mode.
Replacing the normal audio track of a VHS tape with new sound.
Recording new audio on a DV tape without erasing original audio.
Programming the remote to control different TV brands.
Programming the remote to control different cable box brands.
Programming the remote to control different DBS receiver brands.
Recording VHS tapes with S-VHS picture quality.
Adjusting tape condition for optimal picture quality during playback/recording.
Solutions for problems related to the VCR not powering on.
Troubleshooting tape loading, rewinding, and fast-forwarding.
Solutions for playback problems like no picture or noise.
Troubleshooting issues when recording cannot be started or broadcast.
Troubleshooting clock, timer engagement, and cassette loading errors.
Solutions for VCR Plus+ recording failures and power shutoffs.
Troubleshooting issues with automatic switching of cable or satellite channels.