
S
sandersbrittanyJul 30, 2025
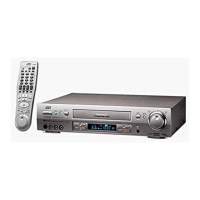
Why won’t the remote control function on my JVC HR-S6700EU VCR?
- JJeremy ChristensenJul 30, 2025
If the remote control for your JVC VCR isn’t working, the batteries might be dead. Try replacing them with new ones.
Why won’t the remote control function on my JVC HR-S6700EU VCR?
If the remote control for your JVC VCR isn’t working, the batteries might be dead. Try replacing them with new ones.
What to do if the playback picture does not appear on my JVC HR-S6700EU?
If the playback picture is absent while the tape is running on your JVC VCR, and you're using an RF connection, ensure the TV receiver is set to the correct video channel. If that doesn't work, you might need to perform the “Video Channel Set” procedure. If you're using the AV or S-VIDEO connection, make sure your TV is set to AV mode.
What to do if the playback picture is blurred on my JVC HR-S6700EU?
If the playback picture on your JVC VCR is blurred or interrupted, or if you see a 'USE CLEANING CASSETTE' message, the video heads may be dirty. Use a dry cleaning cassette TCL-2UX or consult your JVC dealer.
Why does noise appear during normal playback on my JVC HR-S6700EU VCR?
If you are experiencing noise during normal playback on your JVC VCR, the automatic tracking mode might be engaged. Try switching to manual tracking.
What to do if the tape does not run during recording on my JVC HR-S6700EU VCR?
If the tape doesn’t run during recording on your JVC VCR and “i” is displayed, press 4 to turn the “i” indicator off.
Why are breaks noticeable in Hi-Fi soundtrack on my JVC VCR?
If you notice breaks in the Hi-Fi soundtrack of your JVC VCR, the automatic tracking mode might be active. Try switching to manual tracking.
Crucial safety warnings to prevent hazards like fire and shock.
Provides instructions for connecting the recorder to a TV using RF or AV cables.
Explains how to connect the recorder to a TV using S-VIDEO and AUDIO IN connectors.
Guides the user through automatic channel, clock, and program number setup.
Describes downloading channel and program data from the TV via T-V Link.
Details the steps to install and configure the satellite controller.
Explains how to load a cassette and start basic playback.
Describes advanced playback functions like still picture and slow motion.
Explains how to quickly search through a tape.
Allows quick access to previously recorded programs.
Enables quick access to recordings using index codes.
Details how to manually adjust tape tracking for optimal picture quality.
Allows the tape to play back repeatedly up to 100 times.
Explains how to select different audio tracks (stereo, bilingual).
Guides the user through the fundamental steps of recording a program.
A simple method to record for a set duration.
Explains how to record one program while viewing another.
Explains how to check the remaining time on a tape.
Details how to record in S-VHS quality on VHS cassettes.
Explains how to receive and record stereo and bilingual broadcasts.
Explains programming recordings using the SHOWVIEW system.
Provides a method for setting timer recordings without a SHOWVIEW number.
Explains how VPS/PDC ensures accurate timer recording start/stop times.
Allows users to view, cancel, or modify programmed recordings.
Details how to use a camcorder as a source for recording.
Configures input/output modes for AV connectors.
Sets input modes for the AV2 (L-2) connector based on connected devices.
Explains how to transfer tapes between video recorders.
Details how to connect the recorder to a satellite receiver.
Illustrates recommended connections for TVs with dual SCART inputs.
Guides the connection and use of an external decoder.
Explains how to connect the recorder to a Hi-Fi stereo system for audio playback.
Allows selection of various operational modes like B.E.S.T. and O.S.D.
Describes the system that optimizes picture quality during playback and recording.
Adjusts playback picture quality (Auto, Edit, Soft, Sharp).
Automatically engages timer mode when power is turned off.
Controls the display of operational indicators on the TV screen.
Allows starting recording directly from the TV.
Automatically switches to LP mode if SP tape is insufficient for timer recording.
Reduces power consumption when the recorder is turned off.
Enables recording and playback in S-VHS format.
Selects PAL, NTSC, or MESECAM for recording and playback.
Automatically scans for and stores available TV channels.
Allows manual tuning and storage of TV channels.
Describes how to remove unwanted channels from memory.
Explains how to reorder stored channels.
Guides the setup for receiving scrambled TV channels via a decoder.
Allows editing of registered station names.
Allows setting new station names.
Guides manual fine-tuning of stored channels.
Sets guide program numbers for SHOWVIEW timer recording.
Explains how to use the Just Clock feature for automatic time adjustment.
Lists and resolves power supply and operation problems.
Lists and resolves problems related to tape loading and movement.
Lists and resolves common playback picture and sound issues.
Lists and resolves problems encountered during recording.
Lists and resolves issues related to timer programming.
Addresses other miscellaneous problems and troubleshooting steps.
Answers common questions regarding tape playback and search functions.
Addresses frequently asked questions about recording and pause modes.
Answers common questions about timer programming and its status indicators.
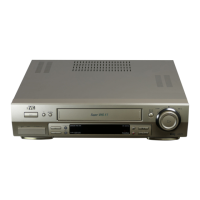
Details general specifications like power, dimensions, and weight.
Lists specifications related to tuning and timer functions.
Lists specifications for signal systems, recording, and audio performance.
Lists the accessories provided with the recorder.
| Type | VCR |
|---|---|
| Tuner | Yes |
| Hi-Fi Audio | Yes |
| Number of Heads | 4 |
| Remote Control | Yes |
| Timer | Yes |
| Video Format | VHS |
| Recording Speed | SP, LP |
| Playback Speed | SP, LP, EP |
| Connections | RF |