EasyManua.ls Logo

JVC KD-SX985 - User Manual

JVC KD-SX985
4 pages
Print Icon
To Next Page IconTo Next Page
Loading...
1
1
184 mm
53 mm
KD-SX985/KD-SX885
Installation/Connection Manual
 !"#$
°“√µ‘¥µ—Èß/§ŸË¡◊Õ°“√µ‘¥µ—Èß
ENGLISH
This unit is designed to operate on 12 V DC,
NEGATIVE ground electrical systems.
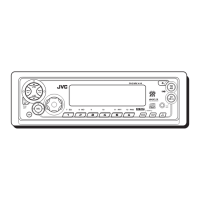
INSTALLATION
(IN-DASH MOUNTING)
The following illustration shows a typical
installation. However, you should make
adjustments corresponding to your specific car.
If you have any questions or require information
regarding installation kits, consult your JVC car
audio dealer or a company supplying kits.
J
V
C
0202KKSMDTJEIN
EN, CH, TH, AR
1
Before mounting: Press (Control
Panel Release button) to detach the control
panel if already attached.
* When shipped from the factory, the control
panel is packed in the hard case.
2
Remove the trim plate.
3
Remove the sleeve after disengaging the
sleeve locks.
1 Stand the unit.
Note: When you stand the unit, be careful
not to damage the fuse on the rear.
2 Insert the 2 handles between the unit and
the sleeve, as illustrated, to disengage
the sleeve locks.
3 Remove the sleeve.
Note: Be sure to keep the handles for future
use after installing the unit.
4
Install the sleeve into the dashboard.
* After the sleeve is correctly installed into
the dashboard, bend the appropriate tabs
to hold the sleeve firmly in place, as
illustrated.
5
Fix the mounting bolt to the rear of the unit’s
body and place the rubber cushion over the
end of the bolt.
6
Do the required electrical connections.
7
Slide the unit into the sleeve until it is locked.
8
Attach the trim plate.
Note: Ensure the recessed part is at the bottom.
If not, the control panel will not open completely.
9
Attach the control panel.
3
GET0073-002A
[U]
1
*
8
9
2
6
7
5
4
4

 !"#$%=12V !"#$%&'(
 !"
 !"#$%
 !"#$%&' ()*+,-./
 !"# $%&'()#*+$
 !"#$%&'()*$+,-./
 !"#=JVC  !"#$%&'(
 !"#$%
1
 !" !"#$%&'()*
 !"#$%&'()$ !"*
*  !"#$%&'()*+,&-./

2
 !"#
3
 !"#$%&'()&*+
1  !"#
  !"#$%&'()*+,-./

2  !"#$%&'(%)*+,-./
 !"#$%&'()*+,
3  !"#$
  !"#$%&'()*+,#-.
 !"
4
 !"#$%&'()
*  !"#$%&'()*+,-./0
 !"#$%&'()"*+,-.

5
 !"#$%&&'()*+,-.
 !"#$%&'(
6
 !"#$%&'
7
 !"#$ %&'()*+,-./
8

  !"#$%&'()%*+,-()
 !"#$%&'()*+
9
 !"#$
‰∑¬
™ÿ¥ª√–°Õ∫™ÿ¥π’È ‰¥È√—∫°“√ÕÕ°·∫∫¡“‡æ◊ËÕ„™Èß“π°—∫√–∫∫°√–
·‰øøÈ““¬¥‘π¢—È«≈∫°√–·µ√ß
12
‚«≈∑Ï
°“√µ‘¥µ—Èß (°“√ª√–°Õ∫·ºßÀπÈ“ª—
∑¡Ï‡¢È“)
¿“æµ—«Õ¬Ë“ßµËÕ‰ªπ’È·¥ß∂÷ß°“√µ‘¥µ—Èß·∫∫∑—Ë«‰ª լ˓߉√°Áµ“¡
§ÿ≥§«√ª√—∫·µËß„ÀȇÀ¡“–¡°—∫√∂¢Õß§ÿ≥‡Õß À“°§ÿ≥¡’ª—
≠À“À√◊ÕµÈÕß°“√¢ÈÕ¡Ÿ≈‡°’ˬ«°—∫™ÿ¥µ‘¥µ—Èß °√ÿ≥“ª√÷°…“°—
∫ºŸÈ¢“¬‡§√◊ËÕ߇’¬ß√∂¬πµÏ
JVC
¢Õß∑Ë“πÀ√◊Õ∫√‘…—
∑∑’Ë®”ÀπË“¬™ÿ¥µ‘¥µ—Èßπ’È
1
°ËÕπª√–°Õ∫ °¥ªÿË¡ (ª≈¥·ºß§«∫§ÿ¡)
‡æ◊ËÕÕÕ°®“°·ºß§«∫§ÿ¡
* ‡¡◊ËÕº≈‘µ¿—≥±Ï∂Ÿ°ËßÕÕ°¡“®“°‚√ßß“π ·ºßÀπÈ“ª—¥®–
∫√√®ÿ‰«È„π≈—ß·¢Áß
2
∂Õ¥·ºËπ‚≈À–¢Õ∫·µËßÕÕ°
3
∂Õ¥ª≈Õ°ÀÿÈ¡ÕÕ°À≈—ß®“°ª≈¥∑’Ë≈ÁÕ§ª≈Õ°ÀÿÈ¡ÕÕ°·≈È«
1 ®—∫™ÿ¥ª√–°Õ∫µ—Èߢ÷Èπ
À¡“¬‡Àµÿ : ‡¡◊ËÕ§ÿ≥µ—Èß™ÿ¥ª√–°Õ∫¢÷Èπ √–«—
ßլ˓∑”„ÀÈø‘«Ï∫√‘‡«≥Ë«π∑È“¬‡’¬À“¬
2 „˧—π∫—ß§—∫
2
Õ—π√–À«Ë“ß™ÿ¥ª√–°Õ∫°—∫ª≈Õ°ÀÿÈ¡
(¥—ß¿“æ) ‡æ◊ËÕª≈¥∑’Ë≈ÁÕ§ª≈Õ°ÀÿÈ¡ÕÕ°®“°°—π
3 ª≈¥ª≈Õ°ÀÿÈ¡ÕÕ°
À¡“¬‡Àµÿ : √–¡—¥√–«—ß„Àȧ—π∫—ß§—
∫“¡“√∂„™Èß“π‰¥ÈµËÕ‰ªÀ≈—ß®“°µ‘¥µ—Èß™ÿ¥ª√–°Õ∫·≈È«
4
µ‘¥µ—Èߪ≈Õ°ÀÿÈ¡≈ß„π·ºßÀπÈ“ª—∑¡Ï
* À≈—ß®“°µ‘¥µ—Èߪ≈Õ°ÀÿÈ¡≈ß„π·ºßÀπÈ“ª—∑¡Ïլ˓ß∂Ÿ°µÈÕß·≈È«
¥—¥√ËÕß„ÀÈ‚§ÈßæÕ¥’∑’˪≈Õ°ÀÿÈ¡®–∂Ÿ°¬÷¥‰«Èլ˓߷πËπÀπ“
(¥—ß¿“æ)
5
µ‘¥≈—°ª√–°Õ∫∫√‘‡«≥¥È“πÀ≈—ß‚§√ߢÕß™ÿ¥ª√–°Õ∫·≈–
«“߬“ß°—π°√–·∑°‰«È∫πË«πª≈“¬¢Õß≈—°
6
µËÕ“¬‰øµ“¡∑’˰”À𥉫È∑—ÈßÀ¡¥
7
‡≈◊ËÕπ™ÿ¥ª√–°Õ∫≈ß„πª≈Õ°ÀÿÈ¡®π‡¢È“°—π‰¥ÈæÕ¥’
8
µËÕ·ºËπ‚≈À–¢Õ∫·µËß
À¡“¬‡Àµÿ: ‡«≈“„˵ÈÕß·πË„®«Ë“ µ—«≈ÁÕ§Õ¬ŸË∑“ߥȓπ≈Ë“ß
¡‘©–π—Èπ·≈È« ®–‡ª‘¥·ºß§«∫§ÿ¡ÕÕ°‰¡Ë‰¥È∑—ÈßÀ¡¥
9
µËÕ‡¢È“°—∫·ºß§«∫§ÿ¡
Control panel
 !
ÀπÈ“ª—¥
Handle
 !"
§—π∫—ß§—∫
Fuse

ø‘«Ï
Slot

√ËÕß„™È”À√—∫æ—π≈«¥
Sleeve
 !
ª≈Õ°ÀÿÈ¡
Lock Plate

·ºËπ‚≈À–¬÷¥
(Lock Plate)
Trim plate

·ºËπ‚≈À–¢Õ∫·µËß
Rubber cushion
 !"
¬“ß°—π°√–·∑°Ï
Sleeve
 !
ª≈Õ°ÀÿÈ¡
Trim plate

·ºËπ‚≈À–¢Õ∫·µËß
See “ELECTRICAL CONNECTIONS.”
  !"#
°√ÿ≥“¥ŸÀ—«¢ÈÕ °“√µËÕÕÿª°√≥ωøøÈ“
Mounting bolt
 !
≈—°ª√–°Õ∫
Dashboard

·ºßÀπÈ“ª—∑¡Ï
Control panel
 !
ÀπÈ“ª—¥
O²O²
O²O²
O²
ÒÒ
ÒÒ
Ò
ØVO— X« ULOKFð VØVO— X« ULOKFð V
ØVO— X« ULOKFð V
qOu²«qOu²«
qOu²«qOu²«
qOu²«
±
³³
³³
³
qq
qq
q
««
««
«
²²
²²
²
dd
dd
d
OO
OO
O
VV
VV
V
«{Gj «e
® %d¹d
uŠW «²×Jr© HBq uŠW «²×Jr «« U½X
uuW ÝUÐIUÆ
*
ŽMb «A×s s «*BMl¨ - Ë{l uŠW «²×Jr
œ«šq «BMbËÆ
«½eŸ uŠW «e¹MWÆ
«½e??Ÿ «N?O??J??q?? «u?«w?? ÐF??b?? B?q?? ¦??³?²??U??
«NOJq «u«wÆ
±«Ën «'NU ÐAJq ŽLuœÍÆ
ö?ö?
ö?ö?
ö?
ŠŠ
ŠŠ
Š
EE
EE
E
W?W?
W?W?
W?
ŽM?b? ðuO?n? «'NU?¨ ðQ?b? s
Žb ðCd «Ë «ðö· «HOu «*ułuœ w
«'NW «)KHOW s «'NUÆ
«œšq?? «*??U?²??5?? Ð5?? «'N??U?? Ë«N?O??J??q??
«u«w¨ LU ¼u ³5 w «AJq¨ HBq
¦³²U «NOJq «u«wÆ
«½eŸ «NOJq «u«wÆ
öö
öö
ö
ŠŠ
ŠŠ
Š
E?E?
E?E?
E?
WW
WW
W
¹d?łw «;UE?W ŽK?v «*?UU
s? «łq? «ôݲ?F?L?U? ôŠI?U? ÐF?b? ðd?O?V?
«'NUÆ
¥¥
¥¥
¥V «NOJq «u«w œ«šq ðUÐKu «OUÆ
*
ÐFb? ðdOV? «NOJ?q «u«w? KOU? œ«šq ðUÐK?u
«OU ÐAJq? ×O`¨ «ŁMw «_MW ÐAJq?
MUÝV ²¦³OX «NOJq «u«w ÐAJq ×Jr
w «*JUÊ «B×O`¨ LU ¼u ³5 w «AJqÆ
µµ
µµ
µŁ³?ÒX? ?L?U? «²?d?O?V? ÐU?'N?W? «)K?H?O?W s?
¼OJq «'NU ËÐFb p {l «(Au «*DUÞOW
u ½NU¹W «*LUÆ
«ŽLq «²uOö «*DKuÐWÆ
«œšq «'NU œ«šq «NOJq «u«w вv ¹¦³X
ÐAJq ×O`Æ
—ÒWM¹e« WŠu V
∫WEŠö∫WEŠö
∫WEŠö∫WEŠö
∫WEŠöu:« rI« œułË s bQð Òw ·
ÆqHÝô«
ππ
ππ
πÒV uŠW «²×JrÆ
wÐdŽwÐdŽ
wÐdŽwÐdŽ
wÐdŽ
—U??O??ð W??D??Ý«u??Ð q??L??F??O? “U?N?'« «c?¼ r?L?b?I?
w???zU???Ðd??N?? d???ýU???³?? DCW???L???E???½« ¨X??u?? ±≤ ¨
ÆVUÝ i¹—Qð WOzUÐdN
ðð
ðð
ð
dd
dd
d
OO
OO
O
VV
VV
V
««
««
«
''
''
'
NN
NN
N
UU
UU
U
®®
®®
®
œœ
œœ
œ
««
««
«
šš
šš
š
qq
qq
q
‡‡
‡‡
ðð
ðð
ð
UU
UU
U
ÐÐ
ÐÐ
Ð
KK
KK
K
uu
uu
u
««
««
«
OO
OO
O
UU
UU
U
©©
©©
©
¹³??O???Òs?? «d??Ýr??? «²??u??{O???×??w?? «²??U???w?? Þd??¹I???W??
«²?dO?V? «*¦U?OW?Æ l? p¨ ¹−?V? ŽKO?p? ŽLq?
ðFb¹ö ðDUÐo ½uŸ «OU «²w 9²KJNUÆ ««
U??Ê ¼M?U?? «Ý²??H???U??« «Ë ŠU?łW?? *F??K?u??U??
Ð?Bu? «œË« «²?d?OV?¨ ¹d?łv «Ý²?A?U
uŸ «ôłNe «BuðOW KOU« UW JVC
«Ë «AdW «*uŽW Nc «ôœË«Æ
WU*«
rJײ«WŠË«
ÒdOG
“uOH«
w«u« qJON«
XO³¦²« W×OH
rJײ«WŠË«
WM¹e« WŠu
WOÞUD*« …uA(«
w«u« qJON«
WM¹e« WŠu
…—UO« uKÐUð
VOd²« —UL
r dE½«WOzUÐdNJ« öOu²«Æ
InstalKD-SH985[U]-10 2/14/02, 7:45 PM1
Question and Answer IconNeed help?

Do you have a question about the JVC KD-SX985 and is the answer not in the manual?

Overview

The JVC KD-SX985/KD-SX988 is a high-performance in-dash installation CD receiver designed for automotive audio systems. This device serves as a central unit for playing CDs, receiving radio broadcasts, and managing various audio settings within a vehicle.

Function Description:

The primary function of the KD-SX985/KD-SX988 is to provide high-quality audio playback from compact discs and to tune into AM/FM radio stations. It features a CD player capable of handling standard audio CDs. The radio tuner allows users to access a wide range of broadcast stations, with options for presetting favorite frequencies for quick access. The unit also includes a display for showing track information, radio frequencies, and various settings.

Beyond basic playback, the device offers advanced audio control features. It includes a built-in equalizer (EQ) to allow users to customize the sound output to their preferences or to compensate for the acoustic characteristics of their vehicle's interior. This EQ typically provides several preset modes (e.g., Rock, Pop, Jazz) and often a user-definable custom mode. The unit also supports balance and fader controls, enabling users to adjust the sound distribution between the left and right speakers, and front and rear speakers, respectively.

For enhanced audio systems, the KD-SX985/KD-SX988 includes pre-out connections, typically RCA outputs, for connecting external amplifiers. These outputs are crucial for users who wish to upgrade their car's audio system with more powerful speakers or subwoofers, as they provide a clean, low-level signal to the external amplifiers. There are usually separate pre-outs for front, rear, and subwoofer channels, allowing for a fully customizable multi-channel audio setup.

The device also integrates with the vehicle's electrical system, drawing power from the car's 12V DC supply. It includes connections for the car's antenna, power (constant and switched), ground, and speaker outputs. Some models may also feature an illumination wire to synchronize the unit's lighting with the vehicle's dashboard lights, and a remote control wire for connecting to steering wheel controls or an external remote sensor.

Important Technical Specifications:

  • Power Supply: Operates on a 12V DC negative ground electrical system. This is a standard specification for automotive electronics, ensuring compatibility with most vehicles.
  • Maximum Current Consumption: Typically around 10A to 15A for the main unit, with additional current draw for external amplifiers if connected. This requires proper wiring and fusing to prevent electrical issues.
  • Speaker Impedance: Designed to work with speakers having an impedance of 4 ohms. Using speakers with lower impedance can overload the internal amplifier and potentially damage the unit.
  • Pre-out Voltage: The RCA pre-outs usually provide a low-level signal, often around 2V to 4V, which is suitable for connecting to external amplifiers.
  • Fuse Rating: The unit typically has a built-in fuse, often 10A or 15A, to protect against overcurrents. It is crucial to replace a blown fuse with one of the specified rating.
  • Dimensions: Standard single-DIN size, allowing it to fit into most car dashboards with a compatible opening. Specific dimensions are provided in the manual for precise installation.

Usage Features:

  • User Interface: The front panel features a combination of buttons, a rotary knob (for volume and menu navigation), and a display screen. The layout is designed for intuitive operation while driving.
  • Display: The display shows essential information such as current track number, elapsed time, radio frequency, station names (if supported by RDS), and menu options. Some displays may offer adjustable brightness or color options.
  • Radio Presets: Users can store multiple AM and FM radio stations as presets, allowing for quick tuning to favorite channels with a touch of a button.
  • CD Playback: Supports standard audio CDs. Features typically include track skip, fast forward/reverse, repeat, and random play modes.
  • Audio Customization: Built-in equalizer with various preset sound modes (e.g., Rock, Pop, Jazz, Vocal) and often a user-definable custom EQ setting. Bass, treble, balance, and fader controls are standard for fine-tuning the sound.
  • Remote Control Compatibility: The unit may be compatible with an optional wireless remote control or a wired steering wheel remote interface, enhancing convenience and safety by allowing control without reaching for the main unit.
  • Detachable Faceplate: A common security feature where the front panel can be removed and taken with the user, deterring theft. This feature requires careful handling during removal and reattachment.
  • System Expansion: Pre-out connections for external amplifiers and subwoofers allow users to expand and upgrade their audio system for more power and better sound quality.

Maintenance Features:

  • Installation: The manual provides detailed instructions for installation, including wiring diagrams and mounting procedures. Proper installation is critical for optimal performance and safety. It emphasizes connecting the ground wire first and ensuring all connections are secure.
  • Wiring Precautions: The manual highlights the importance of using correct wire gauges and insulating all unused wires to prevent short circuits. It also advises against connecting the unit's speaker outputs directly to the vehicle's chassis ground.
  • Fuse Replacement: Instructions are provided for replacing the fuse, emphasizing the use of a fuse with the specified rating to prevent damage.
  • Troubleshooting: A dedicated troubleshooting section helps users diagnose common issues such as no power, no sound, poor radio reception, or CD playback problems. It offers solutions like checking connections, verifying fuse integrity, and resetting the unit.
  • Cleaning: Recommendations for cleaning the unit, particularly the CD slot and front panel, are usually included. It advises against using harsh chemicals that could damage the display or plastic components.
  • Grounding: Proper grounding is crucial for preventing noise and ensuring stable operation. The manual often specifies connecting the ground wire to a clean, unpainted metal part of the vehicle's chassis.
  • Speaker Wiring: Detailed diagrams illustrate how to connect speakers, emphasizing correct polarity and avoiding short circuits between speaker wires or to the vehicle's chassis.
  • External Amplifier Connections: Instructions for connecting external amplifiers and subwoofers via the RCA pre-outs are provided, ensuring proper signal flow and power distribution.
  • Antenna Connection: Guidance on connecting the vehicle's antenna, sometimes requiring an adapter or a powered antenna lead for optimal radio reception.
  • Service and Repair: The manual typically advises against attempting repairs yourself and directs users to authorized service centers for any complex issues.

The JVC KD-SX985/KD-SX988 is a robust and versatile car stereo designed to deliver a rich audio experience, with features catering to both casual listeners and audio enthusiasts looking to customize and expand their in-car sound system.

JVC KD-SX985 Specifications

General IconGeneral
BrandJVC
ModelKD-SX985
CategoryCar Receiver
LanguageEnglish

Related product manuals