Do you have a question about the K2 Systems Everest CrossRail 44-X and is the answer not in the manual?
Cut CrossRail profiles to appropriate lengths based on desired tilt angle and table guidelines.
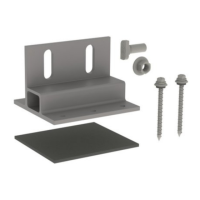
Select and install roof attachment per manufacturer instructions and structural calculations, ensuring roof integrity.
Install EverFlash flashing with L-foot, aligning pilot hole and securing lag bolt through EPDM washer.
Apply sealant rings to E-Curb and place around T-Foot, then fill with sealant as per manufacturer guidelines.
Connect rear tilt leg to tilt connector using M10 T-bolts and serrated hex nuts, ensuring flush fit.
Attach tilt connector to front tilt leg using M10 T-bolt and serrated hex nut, verifying T-bolt engagement.
Position leg set flush against L-Foot/T-Foot, hand-tighten with M10 T-bolts and nuts for alignment.
Position leg set flush against L-Foot/T-Foot, hand-tighten for 7-degree landscape tilt angle.
Attach horizontal CrossRail sections to tilt leg sets using the Climber Set, respecting support point distances.
Align the ends of two rail sections precisely next to each other for connection.
Slide the rail connector from below, centering it between the two rail ends without interference.
Attach the rail connector to the rails using M10 T-bolts and serrated hex nuts, ensuring proper T-bolt engagement.
Attach chosen device to CrossRail top channel using Micro Inverter Mounting Kit hardware.
Insert MK3 slot nut of end clamps into top channel, rotate to engage, and attach to module per manufacturer instructions.
Insert MK3 slot nut of mid clamps into top channel, rotate to engage, and attach to module per manufacturer instructions.
Push pins of the appropriately sized end cap into the end of the rail.
Install Everest Ground Lug by inserting MK3 slot nut, rotating to engage, torque M8 bolt, insert wire, and tighten terminal screw.
Install WEEB Lug 10.3 by inserting M10 T-Bolt, rotating, attaching components, and inserting DC ground wire.
| Brand | K2 Systems |
|---|---|
| Model | Everest CrossRail 44-X |
| Category | Racks & Stands |
| Language | English |