Do you have a question about the Kampa Brean 4 Classic AIR and is the answer not in the manual?
| Type | Air Tent |
|---|---|
| Capacity | 4 Person |
| Flysheet Material | Polyester |
| Inner Tent Material | Breathable Polyester |
| Groundsheet Material | Polyethylene |
| Bedroom Area | 4.5 m² |
| Material | Polyester |
| Fire Retardant | Yes |
| Doors | 2 |
| Pitching Time | 10 minutes |
| Ventilation | Yes |
Tent material requires weathering to maximise weatherproofing by wetting and drying.
Special sewing thread used; cotton swells to fill holes. Seam sealer may be needed for persistent leaks.
Designed for light to moderate weather and touring use, not static or commercial.
Choose a flat, protected site. Clear sharp stones. Pitch doors away from wind. Avoid pitching under trees.
Lay groundsheet, unpack, identify parts. Assemble porch pole, ensure poles are fully inserted.
Hold valve when unscrewing/replacing to prevent tube twist and premature failure.
Never open inner tube zips when poles are inflated to prevent pole bursting.
Attach pump, inflate to 7 psi. Push poles upwards for correct shape. Tighten valve caps.
Peg corners, re-peg as needed. Peg intermediate points ensuring sides are straight.
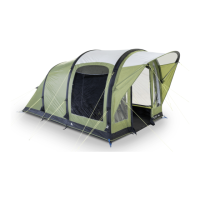
Thread the front canopy pole through the tent sleeve.
Inflate central ridge pole, locate between front and middle poles. Attach velcro pads.
Suspend inner tent from colour-coded buckles. Attach remaining suspension points.
Use all guy lines, peg taut without distorting shape. Adjust using runners. Peg in line with seams.
General purpose pegs provided. Consider different pegs for different ground. Drive pegs at 45° angle.
Slight leakage possible, not a fault. Rectify by spot treating seams with sealant or spray.
Prolonged sunlight weakens fabric. Use shaded sites for extended periods. UV degradation not covered by warranty.
Breathable material reduces condensation. Ensure all vents are open.
Do not cook in the tent or use naked flames. Read fire precautions label.
Close openings/blinds. Un-peg lines/points. Open valves. Expel air. Fold/roll towards valves. Store dry.
Store aired and dry in ventilated place. Wash with water/soft brush, no detergents.
AirPoles need no maintenance but protect from damage. Improper use/damage not covered by warranty.
Treat zips with care. Carry spares kit: waterproof spray, seam sealer, tape.
Use Kampa-recommended repairers. Unauthorized repairs may invalidate warranty.
Check valve is screwed in, tube is untwisted. Noise may indicate twisted tube.
Check valve screwed in, O-ring seal in place, top cap tight.
Check for condensation first. Increase ventilation. Do not cook in tent.
Tent needs weathering. Treat small areas with waterproofing spray if needed.
Undo/re-attach valve, check for twists. Re-inflate. Check hose fittings. If problem persists, AirPole may be punctured.
Unzip sleeve, remove AirPole. Unzip protective cover to expose tube. Locate puncture, submerge if needed.
Repair tube using Kampa Repair Tape and Solution. Follow manufacturers instructions. Spares available.
Goes under tent to protect and keep groundsheet clean.
Adds luxury, insulating, soft underfoot feel to living area.
Provides privacy and protection from the wind.