EasyManua.ls Logo

K&K Sound MANDOLIN TWIN INTERNAL - User Manual

Default Icon
4 pages
Print Icon
To Next Page IconTo Next Page
Loading...
92798 Cape Arago Hwy, Coos Bay, OR 97420 | 541-888-3517 | Toll Free 800-867-6863 | kksound.com
MANDOLIN TWIN INTERNAL
Thank you for choosing the Mandolin Twin Internal!
We strongly recommend that this pickup system is professionally installed by a luthier or mandolin technician.
Special tools are not provided, but are needed to safely enlarge the endpin hole and for installation of the endpin
jack. This manual does not provide the information about all the necessary tools and/or how they should be used.
Please do not install this system if you do not feel confident with every aspect of installing it.
Soldering might be necessary if the cables need to be shortened, although in most cases the system should fit
with the provided cable length. This manual does not provide instructions on wire work/soldering.
INSTALLATION
1. The picture at right shows the desired locations of the two transducers
inside the mandolin. In some models the two braces will run differently
than shown here.
If a brace does not allow you to place the pickup next to the exact center
(the widest part) of the F hole, just move the pickup up or down a bit until
you find a spot that fits the transducer. However, move it a little as
possible from the position shown.
2. Drill the endpin hole. The diameter should be 12mm (or a 1/32” less than ½”), but ½ works okay.
3. Apply double stick tape to the golden side of the transducers, it is a very thin film:
Question and Answer IconNeed help?

Do you have a question about the K&K Sound MANDOLIN TWIN INTERNAL and is the answer not in the manual?

Summary

Mandolin Twin Internal Product Overview

Installation Steps

Transducer Placement

Shows desired transducer locations inside the mandolin, advising adjustment for brace placement.

Drill Endpin Hole

Drill the endpin hole to a diameter of 12mm (or 1/32" less than 1/2").

Apply Double Stick Tape

Apply thin double stick tape to the golden side of the transducers.

Endpin Jack Preparation

Endpin Jack Assembly and Depth Setting

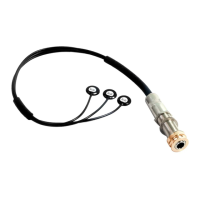
Prepare endpin jack, adjusting nut for end block thickness and ensuring strap knob fit.

Feed Transducers and Jack

Use feeder wire to pull transducers and endpin jack through the endpin hole.

Retrieve Transducers and Prepare Putty

Fish transducers from F-holes and form putty into a round ball for pickup placement.

Pickup Attachment and Finalizing Installation

Attach Pickup with Putty

Stick putty onto pickup, hold with tool, position near F hole, and test fit.

Secure Pickup to Soundboard

Remove protective tape, position pickup, and apply upward pressure to secure.

Install Second Pickup and Endpin Jack

Install the second pickup, pull endpin jack out, attach washer/nut, and tighten strap button.

Noise Check and Cable Management

Test for mechanical noise from internal cables; shorten if necessary.

Additional Installation Tips and Removal

Superglue Enhancement

Apply superglue gel to tape for a secure, permanent bond to the soundboard.

Pickup Removal Procedure

Remove pickups using a blade or knife; avoid solvents to prevent damage.

Overview

The K&K Sound Mandolin Twin Internal is a natural pickup system designed for mandolins, intended for professional installation by a luthier or mandolin technician. This internal pickup system aims to capture the natural sound of the instrument.

Function Description:

The Mandolin Twin Internal system consists of two transducers that are installed inside the mandolin, typically near the F-holes, and an endpin jack for output. The transducers capture vibrations from the mandolin's soundboard, converting them into an electrical signal that can be amplified. The system is designed to provide a natural sound reproduction, suitable for live performance or recording. The internal installation ensures a clean aesthetic and protects the transducers from external damage.

Important Technical Specifications:

  • Transducer Placement: The transducers are designed to be placed inside the mandolin, next to the widest part of the F-holes, closest to the bridge. Specific placement may vary slightly depending on the mandolin's internal bracing.
  • Endpin Hole Diameter: The recommended diameter for drilling the endpin hole is 12mm (or approximately 1/32" less than 1/2"), though 1/2" is also acceptable.
  • Adhesion Method: The transducers are attached to the soundboard using double-stick tape. Two layers of tape are recommended for secure adhesion and to reduce sensitivity to unwanted mechanical transmissions. An optional drop of superglue gel can be applied to the center of the tape for a more permanent bond, especially on slightly arched surfaces.
  • Cable Length: The system is typically supplied with a cable length that fits most installations, minimizing the need for soldering to shorten cables.

Usage Features:

  • Professional Installation Recommended: Due to the need for specialized tools (not provided) to enlarge the endpin hole and install the endpin jack, and the delicate nature of internal placement, professional installation by a luthier or mandolin technician is strongly advised.
  • Internal Mounting: The transducers are mounted internally, providing a discreet and protected setup.
  • Endpin Jack Output: The system utilizes an endpin jack, which also functions as a strap button, offering a convenient and standard output connection.
  • Adjustable Inner Nut: The endpin jack features an inner nut that can be adjusted based on the thickness of the mandolin's end block to ensure a secure fit and proper plug insertion. It is crucial that the strap knob screws in completely over the outer threaded part of the jack to prevent intermittent sound issues.
  • Installation Tool (Bent Nail): A bent nail is used as a temporary installation tool to position the transducers inside the mandolin. Putty is used to temporarily adhere the transducer to the bent nail, allowing for precise placement and testing.
  • Soundboard Adhesion: Once the desired spot is found, the transducer is firmly pressed onto the soundboard using upward pressure from the installation tool to ensure secure adhesion of the double-stick tape.
  • Cable Management: After installation, it is important to test that the internal cables are not making mechanical noise. If they are, they may need to be shortened, which could involve soldering.

Maintenance Features:

  • Pickup Removal (Specific Procedure): If removal is necessary, a specific procedure is recommended to prevent damage to the pickup. This involves carefully sliding a razor blade or slim knife under the pickup to lift it off. Any remaining adhesive can be rubbed off with a thumb or fine sandpaper.
  • Avoid Solvents for Removal: It is explicitly stated that no chemical or solvent (such as acetone, Goo-Gone, super glue remover, rubbing alcohol, or WD-40) should be used to remove the pickup, as these can delaminate and destroy the transducer.
  • Putty Reusability: The putty used during installation can be removed from the installation tool and saved for installing the second transducer.
  • Superglue Curing Time: If superglue gel is used for a more permanent bond, it is essential to hold each pickup in place for about two minutes and allow an additional 10 minutes for the glue to properly cure before removing the installation tools. Kneading the glue before use is also recommended to ensure even consistency.

K&K Sound MANDOLIN TWIN INTERNAL Specifications

General IconGeneral
BrandK&K Sound
ModelMANDOLIN TWIN INTERNAL
CategoryAccessories For Music Instruments
LanguageEnglish

Related product manuals