– 4
The scope of delivery of your appliance is il-
lustrated on the packaging. Check the con-
tents of the appliance for completeness
when unpacking.
In the event of missing accessories or any
transport damage, please contact your
dealer.
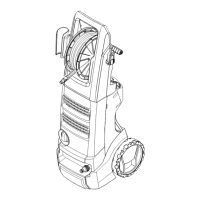
Illustrations on fold-out page!
1 Coupling element for water
connection
2 High pressure hose
3 Quick coupling for high pressure hose
4 Water connection with integrated sieve
5 Appliance switch "0/OFF“/ „I/ON“
6 Dosage regulator for detergent
7 Storage for trigger gun
8 Transport handle, detachable
9 Storage for high-pressure hose
10 Storage of detergent reservoir with de-
tergent connection
11 Storage for accessories
12 Storage hook for mains connection ca-
ble
13 Detergent reservoir with locking lid
14 Mains cable with mains plug
15 Wheels
16 Trigger gun
17 Lock trigger gun
18 Key to detach the high pressure hose
from the trigger gun
19 Spray lance with pressure regulation
(Vario Power)
20 Spray lance with Dirtblaster
21 Washing brush
Special accessories expand the possibili-
ties of using your appliance. Please contact
your KÄRCHER dealer for further informa-
tion.
Mount loose parts delivered with appliance
prior to start-up.
Illustration
Push the wheels into the intake and se-
cure them with the plugs. Align the plug
properly.
Illustration
Place the bottom holder into the recess-
es and push forward until it audibly
locks in.
Insert the top holder and push down all
the way.
Illustration
Press in the storage hook and lock it
into the top position.
Illustration
Place the transport handle into the in-
take until you feel resistance. Use the
heel of your hand or a soft rubber mallet
to position it.
You will need the 2 included screws as well
as a Philips screwdriver PH 2.
Illustration
Insert both detergent hoses onto the
hose fittings.
Install the dosage regulator and con-
nect using 2 screws.
Note: During installation you must
make sure that the tongues of the dos-
age regulator match up with the intend-
ed recesses in the casing.
Illustration
Push the high pressure hose into the
trigger gun until it locks audibly.
Operation
Scope of delivery
Description of the Appliance
Special accessories
Before Startup
Install wheels
Install the storage for hand-spray gun
Install the storage hook for the mains
connection cable
Install the transport handle
Install the dosage regulator for deter-
gent
Connect the high pressure hose to the
hand spray gun
17EN

 Loading...