English 11
ATTENTION
Risk of damage to the paintwork
When working with the washing brush, it must be free of
dirt or other particles.
Push the washing brush into the trigger gun and
fasten it by a 90° turn.
Note: If required, the washing brushes can be used to
work with detergent.
Most KÄRCHER detergents can be bought ready to use
in a Plug 'n' Clean detergent bottle.
Note: Detergent can only be added when the device is
operated in low pressure mode.
DANGER
When using detergents, the material data safety sheet
issued by the detergent manufacturer must be adhered
to, especially the instructions regarding personal pro-
tective equipment.
Remove the cap of the Plug 'n' Clean detergent
bottle.
Illustration
Push the detergent bottle with the opening pointing
downwards into the connection for the Plug 'n'
Clean detergent.
Use Vario Power spray lance.
Turn the spray lance towards "MIX" until the the
LED "MIX" is on on the pressure indicator of the
trigger gun.
Note: This will mix the detergent with the water
stream.
Spray the detergent sparingly on the dry surface
and allow it to react, but not to dry.
Spray off loosened dirt with the high pressure jet.
Remove the Plug 'n' Clean detergent bottle from
the intake and close it with the lid.
For storage, put the detergent bottle into the retain-
er with the cap pointing up.
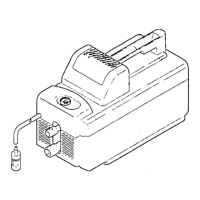
Optional
Fill the detergent solution in the detergent tank of
the foam nozzle (observe dosage instructions on
the packaging of the detergent).
Connect the detergent tank to the foam nozzle.
Connect the foam nozzle to the trigger gun.
Release the lever of the trigger gun.
Lock the lever of the trigger gun.
Illustration
Put the trigger gun with the spray lance into the
parking position.
During longer breaks (more than 5 minutes), also
turn the appliance off using the "0/OFF" switch.
Release the lever of the trigger gun.
Turn off the appliance "0/OFF".
Disconnect the mains plug from the socket.
몇 CAUTION
Only separate the high-pressure hose from the trigger
gun or the device when there is no pressure in the system.
Turn off tap.
Press the lever of the trigger gun to release any re-
maining pressure in the system.
Release the lever of the trigger gun.
Lock the lever of the trigger gun.
ATTENTION
When disconnecting the supply or high pressure hose,
warm water may leak from the connections after opera-
tion.
Detach the appliance from the water supply.
몇 CAUTION
Risk of personal injury or damage!
Mind the weight of the appliance during transport.
Lift appliance by the carrying handle and carry it.
Pull out the transport handle until it audibly snaps
into place.
Pull the appliance by its transport handle.
Prior to horizontal transport: Remove the Plug 'n'
Clean detergent bottle from the intake and close it
with the lid.
Secure the appliance against shifting and tipping
over.
몇 CAUTION
Risk of personal injury or damage!
Consider the weight of the appliance when storing it.
Park the machine on an even surface.
Detach spray lance from the trigger gun.
Push the disconnect button on the trigger gun and
pull the high-pressure hose out of the trigger gun.
Place the trigger gun into the storage for the trigger
gun.
Put both spray lances into the storage for the spray
lance.
–
Dirtblaster
spray lance: Nozzle towards the bottom.
– Vario Power spray lance: Nozzle towards the top.
Store the mains connection in the accessory com-
partment.
몇 CAUTION
Risk of personal injury or damage!
Observe the rotation direction of the hose reel upon coil-
ing up the high-pressure hose.
Coil up the high-pressure hose.
Turn the hose reel in a counter-clockwise direc-
tion using the crank handle.
Prior to extended storage periods, as during the winter,
also observe the instructions in the Care section.
Operation with washing brush
Operation with detergent
Recommended cleaning method
After operation with detergent
Foam nozzle
Interrupting operation
Finish operation
Transport
When transporting by hand
When transporting in vehicles
Storage
Storing the Appliance