- 8
Î Unscrew the screw on the pivoting point
of the roller brush arm.
Î Pull out roller brush swinging arm.
Î Remove the roller brush cover.
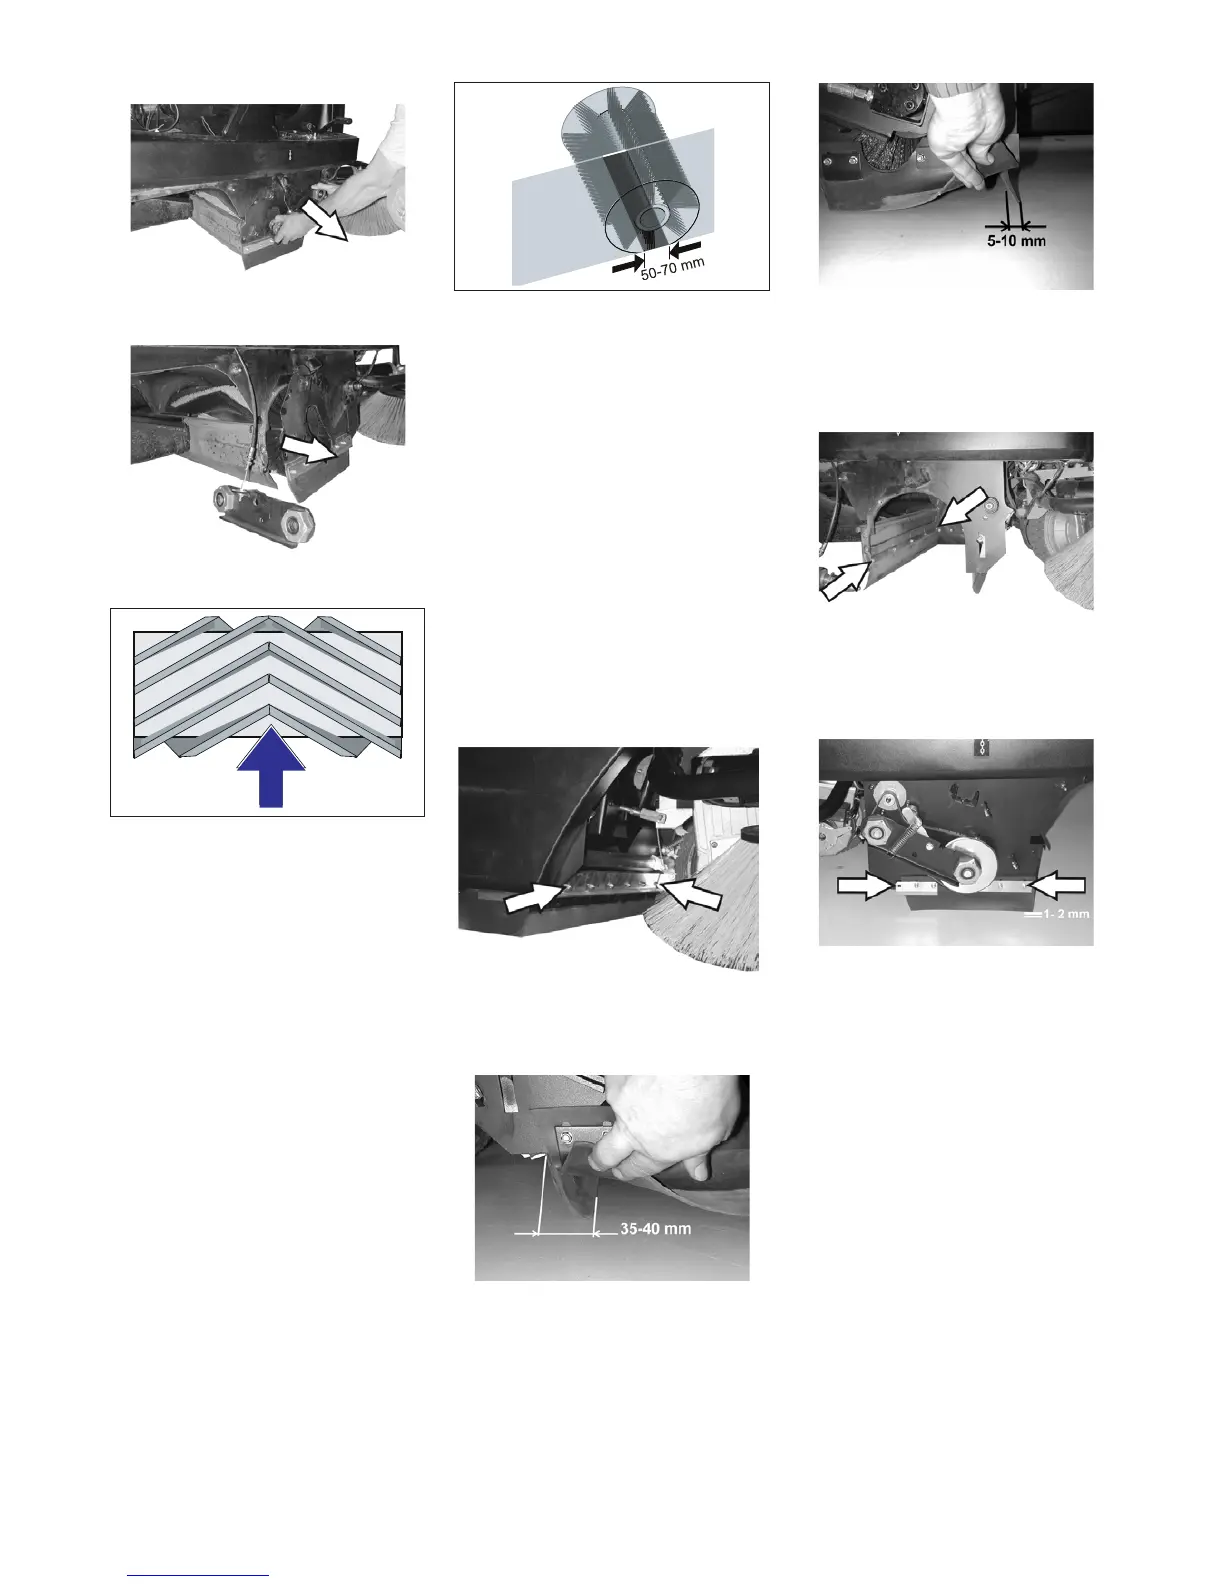
Î Pull out roller brush.
Installation position of roller brush in direc-
tion of travel
Î Push new roller brush into the roller
brush housing and onto the drive pin.
Note: When installing the new roller brush,
ensure correct positioning of the bristle as-
sembly.
Note: Adjust the bowden cable, so that the
roller brush is lifted approx. 10 mm off the
floor.
Î Position roller brush cover.
Î Install the roller brush arm.
Î Hook the Bowden cable in.
Î Tighten the fastening screws.
Î Screw on side panel.
Î Push in the waste containers on both
the sides and lock them.
Î Set programme switch to step 1 (driv-
ing). The side brush and roller brush are
raised.
Î Drive sweeper on to a smooth, even
surface covered with a visible layer of
dust or chalk.
Î Set programme switch to step 2. Roller
brush is lowered. Slightly press down
on the drive pedal and allow the sweep
brush to briefly rotate.
Î Raise roller brush.
Î Press pedal which raises bulk waste
flap and keep pressed.
Î Drive machine backwards.
The sweeping track should have an even
rectangular shape which is between 50 and
70 mm wide.
Note:The side brush floating mounting of
the roller brush adjusts the sweeping track
as the bristles wear down. The roller brush
must be replaced if it becomes too worn.
Î Park the sweeper on an even surface.
Î Set programme switch to step 1 (driv-
ing). Roller brush is raised.
Î Turn main key to "0" and remove it.
Î Secure the machine with wheel
chock(s) to prevent it from rolling away.
Î Raise slightly the waste containers on
both sides and pull them out.
Î Open the fastening screws of the side
panels on both sides.
Î Remove side panels.
Front sealing strip
Î Slightly loosen retaining nuts for the
front sealing strip; to replace, unscrew.
Î Screw on new sealing strip without fully
tightening the nuts.
Î Adjust sealing strip.
Î Set the distance of the sealing strip to
the floor so that the bottom edge trails
behind at a distance of between 35 and
40 mm.
Î Tighten nuts.
Rear sealing strip
Î Set the distance between the sealing
strip and the floor so that the bottom
edge trails behind at a distance of be-
tween 5 and 10 mm.
Î If worn, replace.
Î Remove roller brush.
Î Unscrew retaining nuts for rear sealing
strip.
Î Screw on new sealing strip.
Side sealing strips
Î Slightly loosen retaining nuts for the
side sealing strip (to replace, unscrew).
Î Screw on new sealing strip without fully
tightening the nuts.
Î To set the floor clearance, insert a
sheet with a thickness of between 1 and
2 mm under the sealing strip.
Î Adjust sealing strip.
Î Tighten nuts.
Î Screw on side panels.
Î Push in the waste containers on both
the sides and lock them.
몇 Warning
Empty waste container before replacing
dust filter. Wear a dust mask when working
around the dust filter. Observe safety regu-
lations on the handling of fine particulate
material.
Î Turn main key to "0" and remove it.
Î Press emergency-stop button.
Î Open the hood, insert retaining rod.
Check the sweeping mirror of the
sweeping roller
Adjusting and replacing sealing strips
Replacing dust filter
23EN
 Loading...