– 5
CAUTION
Possible hazardous situation
that could lead to mild injury to
persons or damage to property.
When unpacking the product, make
sure that no accessories are missing
and that none of the package contents
have been damaged. If you detect any
transport damages please contact your
dealer.
Note: Please refer to page 2 for figures
of the appliance and the operation.
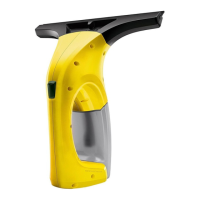
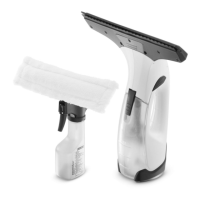
Illustration
1 Charger with charging cable
2 Basic appliance
3 Charging box
4 ON/OFF switch for appliance
5 Charge/operations display
6 Support leg
7 Handle
8 waste water tank, removable
9 Lock, waste water tank
10 Separator
11 Unlocking device, separator
12 Suction nozzle, wide
13 Suction nozzle, narrow
14 Unlocking device, suction nozzle
15 Spray bottle
16 Wiping attachment
17 Spray lever
18 Spray head
19 Micro-fibre wiping pad
20 Window cleaner concentrate
Illustration
Attach the suction nozzle to the
separator until it snaps in place au-
dibly
Note: Depending on the size and
accessibility of the surface to be
cleaned, use the appropriate suc-
tion nozzle. For example, a narrow
suction nozzle for multi-pane win-
dows, a wide suction nozzle for
large windows.
Illustration
Set spray head on the thread of the
wiper attachment and screw.
Fill the provided concentrate (1 x 20
ml) in the spray bottle.
Illustration
Fill slowly the bottle with clear water
up to the "MAX" marking (makes
250 ml of detergent solution).
Illustration
Set wiper attachment on spray bot-
tle and screw.
Attach wiping pad to pad holder due
to Velcro.
CAUTION
Before using the first time, fully charge
the battery.
Illustration
Plug the charger into a proper pow-
er outlet prior to use.
Insert the charging cable plug to the
back of the appliance.
Note: The charging / power indica-
tor flashes during the charging pro-
cess. If the accumulator is fully
charged, it is constantly illuminated
in green.
Start up
Description of the Appliance
Assemble the appliance
Attach the spray bottle and
wiper attachment and fill it
with detergent
Charge the battery
 Loading...