8
WARNING /
ឌ֙
This product is not provided with cord and plug or with other means for connection from the supply. When connect or change the power cord or
lead wire, it must be replaced by the competent personnel in order to avoid hazard.
Please use 2271EC53(RVV) or thickness of tube is 1 mm or above. (Other requirements such as diameter of lead wire, please use according to
the regulation of the country). Can cause fi re, electric shock, ceiling fan drop and injuries.
本產品不提供電纜和插頭或連接電源的其它裝置。連接或更換電纜或電線時必須由能勝任的人員進行以避免危險。
請使用
2271EC53(RVV)
或厚度超過
1
毫米的導管。(其它要求, 例如電線直徑等等, 請遵守相關國家的條例
)
。 可以導致火災、電擊、吊扇
掉落和受傷。
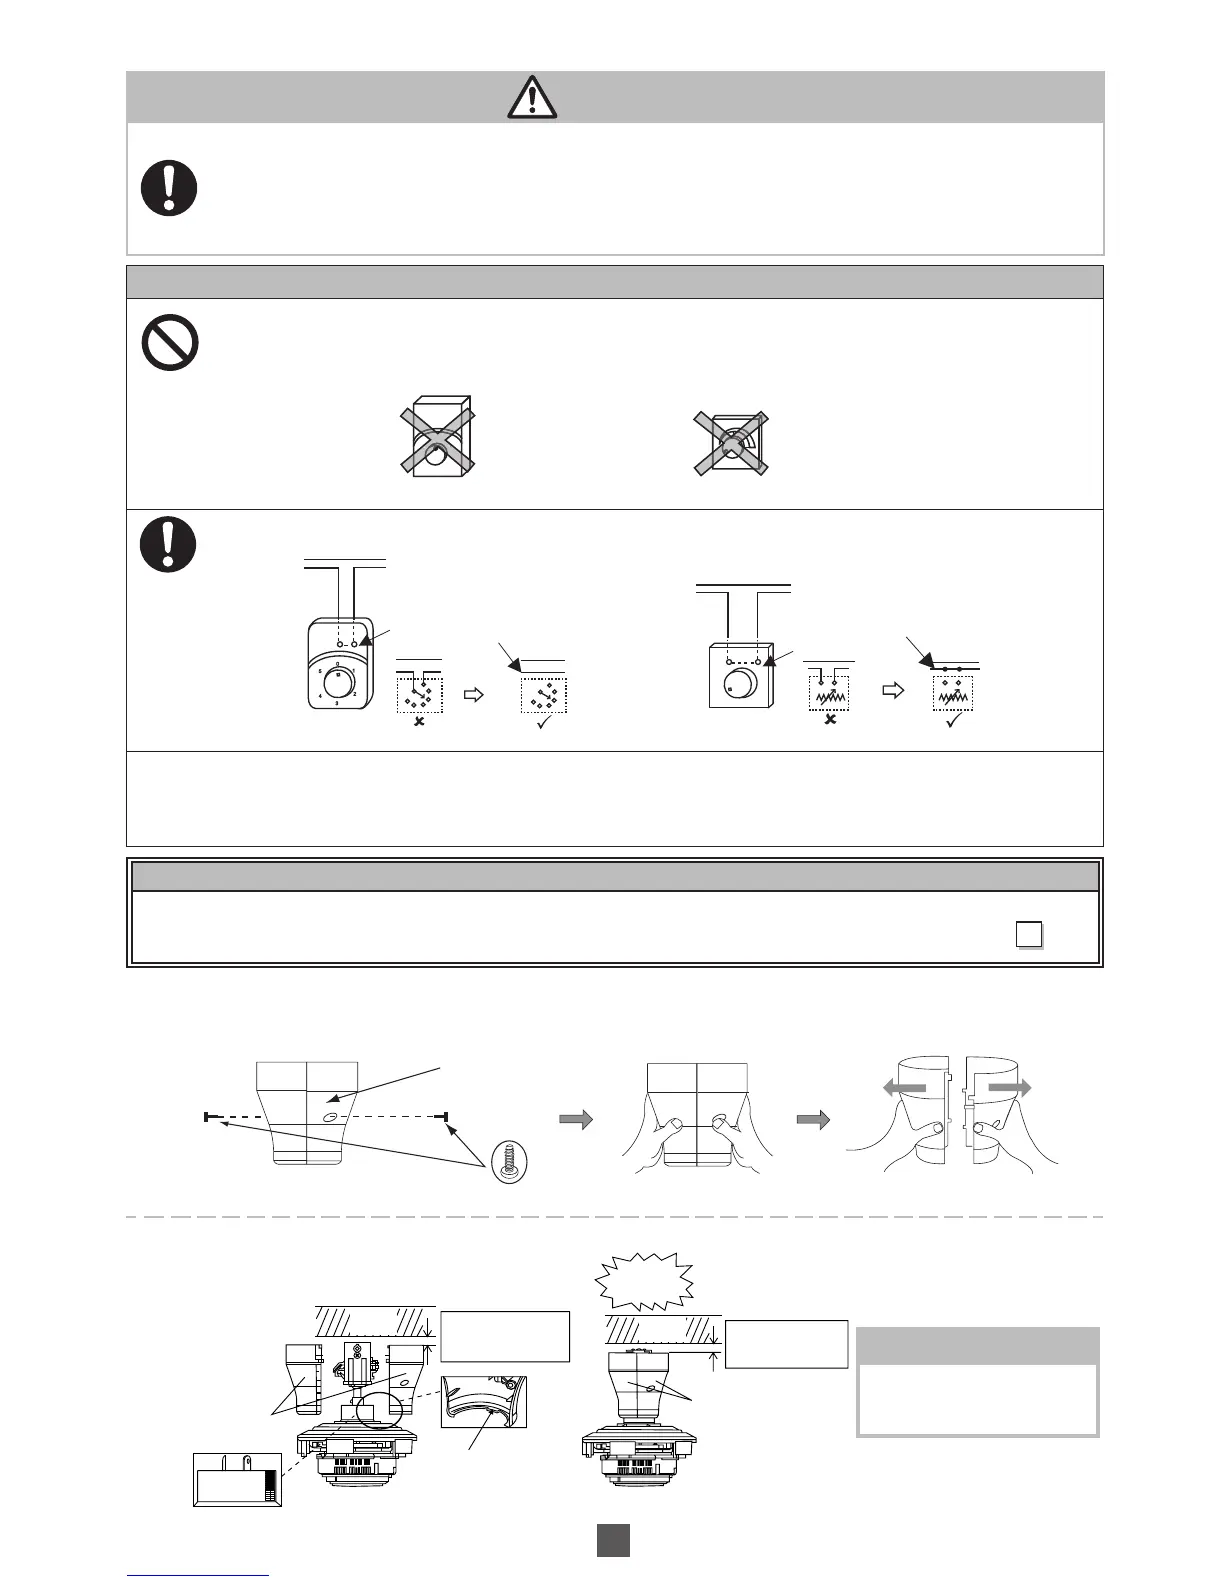
ATTENTION /
ཎ
This product should be installed with a double poles single throw switch (Breaker Switch) with minimum 3 mm contact gap in the
fi xed installation circuit.
Do not use regulator or dimmer switch. (It can damage the Ceiling Fan)
此產品必須在固定安裝電路上裝上觸點間隙為最少
3
毫米的雙極單投開關(斷路開關)。
切勿使用調節器或調光開關。(這會損壞吊扇)
0
5
4
3
2
1
Regulator /
調節器
Dimmer Switch /
調光開關
Should there be a regulator or dimmer switch, disconnect it and reconnect the wiring as below.
若有調節器或調光開關,請按照下圖拆除然後重新連接。
Regulator /
調節器
Power Supply /
電源
Power Supply /
電源
Dimmer Switch /
調光開關
Connect Directly /
直接連接
Connect Directly /
直接連接
It is recommended to user, to install an OFF/ON switch on the wall for the Ceiling Fan, replacing existing regulator or new regulator point. If
your Remote Control is missing or misplaced, LED light will not function. However, the Ceiling Fan can be switched on at pre-set speed 3.
建議用戶將吊扇的
OFF/ON
開關安裝在牆壁上,替換現有的調節器或新的調節點。若您的遙控器不見了,
LED
燈光不能開啟,但是吊扇可
以以預設速度
3
開啟。
Check Point After Installation /
Ԋ၆ࡣޟᘈᔮࢥ
Check /
檢查
1. The wiring is connected properly to the power supply.
電線已正確地連接了電源線。
C)
Installing the canopy /
Ԋ၆ဋᇐ
1
1
Separate the Canopy by loosen the 2 Screws provided.
鬆開
2
枚配備的螺絲分開罩蓋。
Canopy /
罩蓋
Screw /
螺絲
Press / 按
Remove the Screws /
拆開螺絲
Pull / 拉
2
2
Take the Canopy (2 pieces) and clip it until the “click” sound is heard.
拿起罩蓋(
2
片)並夾住直至聽到“滴答"一聲。
ATTENTION /
ݧཎ
Make sure both Canopy Rib fi x into the
same level of Canopy Slot for both side.
確保兩邊的罩蓋凸緣切入對邊相對的罩
蓋凸緣。
Canopy rib /
罩蓋凸緣
Click /
按一下
Approximately 5 mm /
大約
5
毫米
Approximately 5 mm /
大約
5
毫米
Canopy /
罩蓋
Canopy /
罩蓋
Ceiling
天花板
Ceiling
天花板