EN
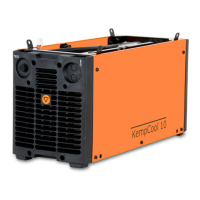
2.4.2 Main parts of cooling unit
E
F
G
H
A
B
C
D
TEST
Front machine
A. Housing
B. Test switch
C. Overheat control lamp
D. Filling hole
Back side
E. Mains voltage connection cable
F. Control cable
G. Cooling water output hose
H. Cooling water input hose
2.5 Preparing for operation
NOTE! Cooling liquid is injurious! Avoid also contact with skin or eyes. In case of
injury, seek for medical advice.
See also 2.4.2. Main parts of cooling unit.
1. Connect the mains voltage and control connectors of the cooler unit
to the corresponding connectors on the base of the power supply.
The connection can be established through the base of the power
supply when the devices are separated or through the right side of the
KempCool 10 cooler by removing the right side plate.
2. Attach the power supply on the KempCool 10 cooler.
55© Kemppi Oy / 1038
 Loading...