EasyManua.ls Logo

Kenmore 385.15516000 - User Manual

Kenmore 385.15516000
85 pages
Print Icon
To Next Page IconTo Next Page
Loading...
®
SEWING MACHINE
Owner's Manual
MAQUlNA DE COSER
Manual de Instrucciones
MACHINE A COUDRE
Manuel d'instructions
Model, Modelo, Modele 385.15516000
O
O
744-800-083 Sears, Roebuck and Co., Hoffman Estates, IL 60179 U.S.A. www.sears.com

Table of Contents

Question and Answer IconNeed help?

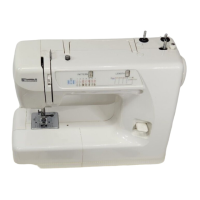
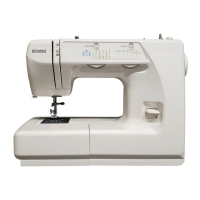
Do you have a question about the Kenmore 385.15516000 and is the answer not in the manual?

Summary

IMPORTANT SAFETY INSTRUCTIONS

WARRANTY

Machine Specifications

SECTION I. NAMES OF PARTS

Available Accessories and Attachments

SECTION II. GETTING READY TO SEW

Connecting Machine to Power Supply

How to connect the sewing machine to the electrical power supply.

For Your Safety

Safety precautions to be observed while operating the machine.

Operating Instructions

Guidelines for operating the sewing machine, including polarized plugs.

Controlling Sewing Speed

How to adjust the sewing speed using the foot control pedal.

Presser Foot Types

Zigzag foot

Use this foot for both straight and zigzag stitching.

Straight stitch foot

Use this foot for exclusively for straight stitching with center needle position.

Automatic buttonhole foot (Foot R)

Use this foot for one step automatic buttonholing.

Zipper foot

This foot can be set to sew on each side of the zipper.

Satin stitch foot

Use this foot for satin stitch and outlining applique.

Selecting Needle and Fabric

Adjust the Needle Thread Tension for Straight Stitch

Correct tension

Ideal straight stitch has threads locked between two layers of fabric.

Tension is too tight

Bobbin thread shows through on the right side, feels bumpy.

Tension is too loose

Needle thread shows through on the wrong side, feels bumpy.

Adjust the Needle Thread Tension for Zigzag Stitch

Correct tension

Minimize visible needle thread on the wrong side without puckering.

Tension is too tight

Corner of each zigzag pulls together on the right side.

Tension is too loose

Needle thread loops through wrong side, pulled almost together.

Stitch Selector

Stitch Length Control

Adjusting Stretch Stitch Balance

Reverse Stitch Control

SECTION III. STRAIGHT STITCH SEWING

Starting to sew

Steps to begin sewing a straight stitch seam.

Finishing sewing

How to secure and finish a seam.

Use the Seam Guides

Using the guides on the needle plate for seam measurement.

Turn a Square Corner

Technique for sewing a square corner.

Topstitching

Zipper Sewing

Fabric preparation

Preparing the fabric for zipper sewing.

Darning

SECTION IV. ZIGZAG STITCHES

Basic Zigzag

The zigzag stitch is common and versatile for utility and decorative uses.

Satin Stitch

Satin stitch is used for decoration, overcasting raw edges, and applique.

Monogramming

Applique

Bar Tacking

Button Sewing

Overcasting Stitch

SECTION V. UTILITY STITCHES AND DECORATIVE STITCHES

Blind Hem Stitch

A stitch used for hemming, creating a near-invisible stitch.

Lace Work

Adding decorative lace to garments and home decor.

Multiple Zigzag Stitch

Shell Stitch

Box Stitch

Decorative Stitch of Geometric Pattern

SECTION VI. STRETCH STITCHES

Straight Stretch

Strong, durable stitch recommended for elasticity and strength needs.

Rick-rack Stretch

Used on stretch fabrics for decorative topstitching or zigzag stitch.

Overcast Stretch Stitching

Smocking

SECTION VII. BUTTONHOLE

Automatic Buttonhole

How to sew automatic buttonholes using the special foot.

Preparation for sewing

Attaching the automatic buttonhole foot correctly.

To sew

Steps for sewing an automatic buttonhole.

Corded Buttonhole

SECTION VIII. CARE OF YOUR MACHINE

Replacing the Light Bulb

Instructions for safely replacing the sewing machine light bulb.

Cleaning the Feed Dogs

How to clean the feed dogs and needle plate.

Cleaning the Shuttle Race

Cleaning the shuttle area

Instructions for cleaning the shuttle race area.

Replacing shuttle assembly

Steps for replacing the shuttle assembly.

Oiling the Machine

Oil behind the face cover

Where and how to oil the machine behind the front cover.

Oil the shuttle area

How to oil the shuttle area.

Troubleshooting

The needle thread breaks.

Causes and references for when the needle thread breaks.

The bobbin thread breaks.

Causes and references for when the bobbin thread breaks.

The needle breaks.

Causes and references for when the needle breaks.

Skipped stitches

Causes and references for skipped stitches.

Seam puckering

Causes and references for seam puckering.

The cloth is not feeding smoothly.

Causes and references for uneven fabric feeding.

The machine doesnt work.

Causes and references for machine malfunctions.

Patterns are distorted.

Causes and references for distorted stitch patterns.

Noisy operation

Causes and references for noisy machine operation.

Kenmore 385.15516000 Specifications

General IconGeneral
BrandKenmore
Model Number385.15516000
TypeSewing Machine
Stitch OptionsVarious
Needle TypeUniversal
Bobbin SystemDrop-in
Built-in Needle ThreaderYes
Drop FeedYes
Free ArmYes
Foot ControlYes
Stitch WidthUp to 5 mm
Included AccessoriesAll-Purpose Foot, Zipper Foot, Buttonhole Foot, Button Sewing Foot, Seam Ripper, Needles, Bobbins, Screwdriver, Spool Pin Felt, Spool Pin

Related product manuals