

C
Carolyn YangSep 7, 2025
Why is my Kenwood DDX3028 displaying 'NO Voice Device'?
- MmichaelhallSep 8, 2025
The connected mobile phone does not have the voice recognition system, that's why Kenwood Car Receiver displays 'NO Voice Device'.
Why is my Kenwood DDX3028 displaying 'NO Voice Device'?
The connected mobile phone does not have the voice recognition system, that's why Kenwood Car Receiver displays 'NO Voice Device'.
Why is my Kenwood DDX3028 Car Receiver showing 'Authorization Error'?
Check whether the connected iPod/iPhone is compatible with this Kenwood Car Receiver.
Why is my Kenwood Car Receiver showing parking off?
No playback picture is shown on Kenwood Car Receiver when the parking brake is not engaged.
Why is my Kenwood DDX3028 Car Receiver not displaying a picture?
Turn on the screen of your Kenwood Car Receiver.
Why is there no sound coming from the speakers of my Kenwood Car Receiver?
Ensure the volume is at an audible level and check all speaker wire connections.
Why is my Kenwood DDX3028 showing no signal?
If your Kenwood Car Receiver is showing 'No Signal', start playback on the external component connected to the AV-IN input. Check the cords and connections. The signal input may be too weak.
How to fix miswiring DC offset error on Kenwood Car Receiver?
If you are getting a Miswiring DC Offset Error on your Kenwood Car Receiver, it means a speaker cord has shorted or is in contact with the car chassis. Wire or insulate the speaker cord as needed, then reset the unit.
What to do if my Kenwood DDX3028 Car Receiver displays 'USB Device Error'?
If your Kenwood Car Receiver shows a 'USB Device Error', try turning the unit off and then on again. If the problem persists, try connecting a different USB device.
How to adjust Echo or noise that occurs on Kenwood Car Receiver?
Adjust the microphone unit position.
Why is the sound interrupted while using a Bluetooth audio player on my Kenwood DDX3028?
Reduce the distance between the unit and the Bluetooth audio player. Disconnect the device connected for Bluetooth phone. Turn off, then turn on the unit. When the sound is not yet restored connect the player again.
| Bluetooth | Yes |
|---|---|
| DVD Player | Yes |
| Navigation | No |
| Rear View Camera Input | Yes |
| Preamp Voltage | 2.5V |
| AM/FM Tuner | Yes |
| CD Playback | Yes |
| MP3 Playback | Yes |
| WMA Playback | Yes |
| Resolution | 800 x 480 |
| USB Port | Yes |
| Audio Formats Supported | MP3, WMA, AAC |
| Video Formats Supported | MPEG1, MPEG2, DivX |
| Power Output | 50 Watts x 4 Channels |
| Preamp Outputs | 3 Pairs (Front, Rear, Subwoofer) |
| AUX Input | Yes |
| iPod Compatibility | Yes |
| iPhone Compatibility | Yes |
| Steering Wheel Control Compatibility | Yes |
Procedure to reset the unit to factory settings, restoring default configurations.
Explanation of symbols, icons, and conventions used throughout the instruction manual.
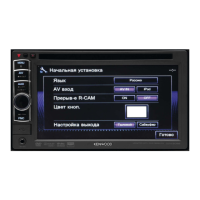
Steps for initial setup and configuration of the unit upon first use or after reset.
Basic operations for powering the unit on, off, standby, and managing the screen display.
How to adjust audio volume and attenuate the sound.
Navigating between different screens and using touch gestures for control.
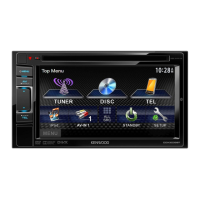
Choosing the source for audio or video playback like DISC, USB, iPod, TUNER, VIDEO, Bluetooth.
Instructions for inserting, playing, and ejecting discs, including handling issues.
Lists compatible DVD, CD, and VCD formats and file types supported by the unit.
Accessing playback controls and selecting files from various media sources.
Accessing and using video playback options like Audio, Subtitle, Angle, and Picture Adjust.
Choosing playback modes like Repeat, Random, and direct track selection.
How to play files from USB devices and connect them to the unit.
Important warnings and limitations when using USB devices with the unit.
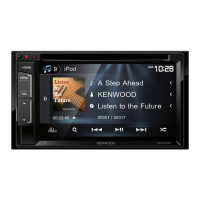
How to connect and configure iPod/iPhone devices for audio and video playback.
Controlling music and video playback, repeat/random modes, and device control.
Navigating menus on the iPod/iPhone to select music tracks or videos.
Controls and features for tuning radio stations, including preset and seek functions.
How to preset radio stations using automatic or manual methods and select them.
Searching for radio programs based on PTY codes for specific content.
Connecting external components like cameras or players to the AV-IN terminal.
Displaying the navigation screen, canceling it, and configuring its settings.
Adjusting sound levels using preset modes or custom equalization.
Selecting sound modes, adjusting bands, and saving custom sound profiles.
Changing panel color, making custom color adjustments, and using custom backgrounds.
Adjusting brightness, contrast, black level, color, tint, and sharpness of the video picture.
Selecting aspect ratios and zooming the video picture for optimal viewing.
Enabling the rear view camera and displaying its image manually or automatically.
Adjusting Fader/Balance, Equalizer, Loudness, X'over, Volume Offset, and Preout settings.
Adjusting dimmer, customizing display design, and setting OSD Clock.
Configuring AV-IN, Navigation, Language, Clock, Beep, and Security settings.
Saving and loading custom settings from the <Setup> menu.
Preventing settings from being accidentally changed.
Calibrating the touch panel for accurate input response.
General precautions and compatibility notes for using Bluetooth devices.
Pairing the unit with new Bluetooth phones or audio players for the first time.
Connecting/disconnecting registered devices and deleting paired devices.
Receiving, making calls, switching modes, and adjusting microphone volume.
Using the phone book/call lists and making calls via direct entry or voice dialing.
Storing frequently used phone numbers for quick access.
Configuring settings for Bluetooth mobile phones and audio players.
Cleaning the unit, handling discs properly, and keeping them clean.
Details on file playback formats like DivX, MPEG, JPEG, MP3, WMA, WAV, AAC.
Solutions for common error messages and operational problems.
Technical details for the monitor, DVD player, USB interface, and Bluetooth sections.
Instructions for using the KS-UBT1 USB Bluetooth Adapter.
Technical details and certifications for the KS-UBT1 adapter.