Do you have a question about the Kenwood DMX125DAB and is the answer not in the manual?
Lists critical safety warnings and precautions to prevent hazards like short circuits or fire.
Covers connecting, disconnecting, and playing audio/video files from a USB device.
Details connecting, disconnecting, and playing music from iPod/iPhone devices.
Covers pairing a smartphone, receiving, and making phone calls via Bluetooth.
Crucial safety warnings and advice before starting the installation process.
Step-by-step guide for installing the unit, including accessory details and mounting methods.
Detailed diagram and explanation of all wire connections to the unit's terminals.
Illustrates how to connect iPod, iPhone, and Android devices using USB cables.
This document is a Quick Start Guide for the Kenwood DMX125DAB and DMX125BT monitor receivers, providing essential information for installation, basic operation, and maintenance.
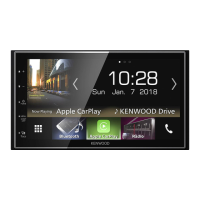
The Kenwood DMX125DAB and DMX125BT are monitor receivers designed for in-car entertainment and communication. They offer a range of functions including radio, DAB (Digital Audio Broadcasting), USB playback, iPod/iPhone connectivity, external audio/video input, rear view camera support, and Bluetooth for hands-free calling and audio streaming. The device features a touch-sensitive display for intuitive control and a set of physical buttons for common operations.
To begin using the unit, turn the ignition key to ACC. The unit will power on, and you can access the main menu by pressing the <MENU> button. From there, touch the [0] icon to access system settings. Key settings include [Beep Tone] to activate or deactivate touch tones, [Language] to select the display language, [Time/Date] for clock adjustments, [Clock Mode] for time display format, [Steering Remote] for remote control functions, and [Parking Guidelines] for rear view camera assistance. The [Bluetooth] setting displays Bluetooth options, and [Screen] allows for dimmer mode and demonstration mode adjustments. The clock can be synchronized with FM RDS or adjusted manually by deactivating [RDS Clock Sync] and using the [▲] or [▼] keys in the [Time/Date] menu.
The front panel features a Remote Sensor for remote control signals, a <MENU> button to display the HOME screen (also used to turn the unit on/off with a long press), an AUD button to display the Audio screen, + and - buttons for volume control, and a MUTE/DISP OFF button to mute sound or turn off the screen. A Reset button is also available to restore factory settings if the unit malfunctions.
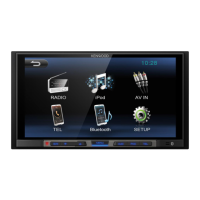
The HOME screen, accessed via the <MENU> button, displays the clock and provides touch keys for various sources: [Radio] (FM/AM), [USB], [iPod], [Mirroring] (for Android devices), [AV-IN], [TEL] (Hands Free), [BT Audio] (Bluetooth audio), and [SETUP].
To operate the radio, press <MENU> and then [Radio]. The source control screen shows station information, band selection ([FM], [AM]), and seek functions ([] []) for automatic tuning. Stations can be preset automatically by touching [] and [Auto Store], or manually by tuning to a desired station and holding a preset number [#] (1-6). Recalling a preset station is done by touching its corresponding [#].
Radio setup options, accessed via [], include [Auto Store] for automatic preset storage, [Area] to select regional tuning intervals (N.America, S.America, Europe), [Local Seek] to tune only strong signals, [RDS Clock Sync] for time synchronization, and [RDS] for RDS settings.
Access DAB by pressing <MENU> and then [DAB]. The DAB source control screen displays service name, frequency, and PTY information. [DAB] switches between DAB bands (DAB1, DAB2, DAB3), and [I] tunes ensembles, services, and components. [DLS] displays Dynamic Label Segment information. Services can be auto-sought using <◄◄>/<►►I> or manually sought by holding these keys. To select a service from a list, touch [] and then [Service List].
DAB setup options, accessed via [], include [Service List], [TI] for traffic information, [PTY] for program type search, [Priority] for switching to RDS if DAB reception is poor, [Announcement Select] for specific announcements, [Related Service] for switching to related services if the current DAB network is unavailable, and [Antenna Power] to supply power to a booster-equipped Digital Radio antenna.
To use a USB device, remove the cap from the USB terminal and connect the device using a USB cable. The unit will automatically read the device and begin playback. To disconnect, switch to another source and then detach the USB device. The unit supports various audio and video file formats from USB mass storage class devices.
During playback, the source control screen displays album art, file information, playing time, and a play time bar. Controls include [x] for random playback, [] for repeat playback, [►] [II] for play/pause, [←] [I] for previous/next content (hold for fast forward/backward), and [Q] to search for files. For video playback, touch the screen to display operation buttons, which include [INITIALIZE] for image quality adjustment, play/pause, previous/next, and [Q] for file search. Screen modes ([NORMAL], [16:9], [4:3]) are also available.
To select a track from a list, touch [Q], choose between audio [] or video [D] files, then navigate through folders using [] and select the desired item.
Connect an iPod/iPhone using a USB Audio cable (KCA-iP103 for Lightning connector models). The unit will read the device and start playback. Disconnect by switching to another source and detaching the device. Supported models include various iPhone XS, XR, X, 8, 7, 6s, 6, 5s, and SE models.
Playback controls are similar to USB playback, with album art, file information, playing time, and a play time bar. Controls include [x] for random playback, [] for repeat playback, [►] [II] for play/pause, [←] [I] for previous/next content (hold for fast forward/backward), and [Q] to search for content. To select content from a list, touch [Q], then navigate and select the desired item.
To use external audio/video players, connect them to the AV-IN input terminal. Press <MENU>, touch [AV-IN], and then start playback on the connected component. For video playback, touch the screen to display operation buttons, which disappear after 5 seconds of inactivity.
For rear view camera functionality, the REVERSE lead connection is required. The rear view screen automatically displays when shifting into reverse (R) gear. Touch the screen to dismiss the caution message.
To register a smartphone, enable Bluetooth on the phone and search for "DMX125BT". Enter "0000" if a PIN code is requested. A Bluetooth icon will appear when connected. Disconnect by turning off Bluetooth on the phone or turning off the ignition.
To receive a phone call, touch []. To reject, touch []. During a call, options include sending tones, closing the window [], and switching audio output between the phone and speaker. Adjust receiver volume using + or -.
To make a phone call, press <MENU>, then [TEL]. You can dial a number using the keypad, call from call records (incoming [], outgoing [], missed []), or call from the phonebook []. The phonebook can be updated by touching [C].
Press the AUD button to access audio settings. Touch [Fader / Balance] to adjust the front/rear volume balance (Fader) and left/right volume balance (Balance). [INITIALIZE] clears the adjustments.
Press <MENU>, then [BT Audio]. The source control screen displays file information, playing time, and a play time bar. Controls include [x] for random playback, [] for repeat playback, [►] [II] for play/pause, [←] [I] for previous/next content (hold for fast forward/backward), and [Q] to search for files. To select content from a list, touch [Q], then navigate and select the desired item.
If the front panel is stained, wipe it with a dry soft cloth, such as a silicon cloth. For stubborn stains, use a cloth moistened with a neutral cleaner, then wipe again with a clean, soft, dry cloth. Avoid applying spray cleaner directly to the unit or using hard cloths or volatile liquids like thinner or alcohol, as these can damage the surface or erase printed text.
If the unit or a connected device malfunctions, reset the unit by pressing the Reset button (located behind the trim plate, see "Removing the trim plate" in the installation section).
To prevent damage, do not operate the monitor with sharp objects like a ballpoint pen.
Before installation, ensure the ignition and battery wires are connected to the fuse box to prevent short circuits and fire. Do not cut fuses. Install the unit in the vehicle's console, avoiding direct sunlight, excessive heat, humidity, dust, or water splashes. Do not touch hot metal parts of the unit. Use only the provided screws. If the car's ignition lacks an ACC position, connect ignition wires to a power source that turns on/off with the ignition key to prevent battery drain. Ensure the front panel does not hit the console lid when closing. If a fuse blows, check for short circuits before replacing it with one of the same rating. Insulate unconnected wires and terminals. Secure wires with clamps and vinyl tape to prevent contact with metal parts and short circuits.
Connect speaker wires correctly to their terminals; incorrect wiring or grounding to the car chassis can damage the unit. If only two speakers are used, connect them to either the front or rear output terminals, not a mix. After installation, verify proper operation of car components like brake lamps, blinkers, and wipers. Mount the unit at an angle of 30° or less. Avoid pressing hard on the panel surface during installation. Keep metal objects away from the Bluetooth antenna to prevent reception issues.
To remove the trim plate, use the extraction key (accessory ③) to lever out the four tabs (two on each side) and then pull the plate forward. To remove the unit, first remove the trim plate. Then, insert the extraction key (accessory ②) deeply into the slots on both sides, ensuring the protrusion on the key faces the unit. With the keys secured, pull the unit halfway out, then carefully pull it all the way out with your hands, avoiding dropping it. Be cautious of catch pins on the extraction key to prevent injury.
| Display Size | 6.8 inches |
|---|---|
| Resolution | 800 x 480 pixels |
| DAB+ Radio | Yes |
| Bluetooth | Yes |
| USB Input | Yes |
| Apple CarPlay | No |
| Android Auto | No |
| Rear View Camera Input | Yes |
| Touchscreen | Yes |
| AUX Input | Yes |
| Steering Wheel Control Compatibility | Yes |
| Built-in Microphone | Yes |
| Power Output | 4 x 50W |